Submit Form using AJAX in PHP/MySQLi

This tutorial will teach you on how to submit form and retrieve the values of the form in the url of your AJAX code. The primary code of this tutorial is serialize() function which will convert our form to be ready to process into our AJAX. Note: Scripts and css used in this tutorial are hosted, therefore, you need internet connection for them to work.
Creating our Database

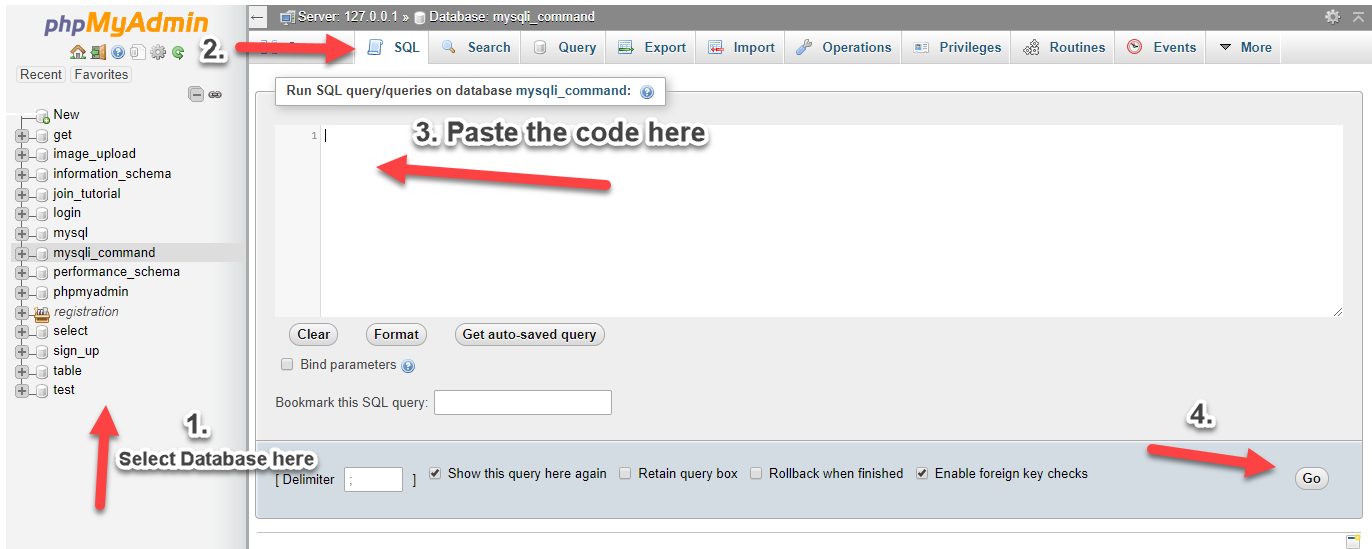
First step is to create our database. 1. Open phpMyAdmin. 2. Click databases, create a database and name it as sample. 3. After creating a database, click the SQL and paste the below codes. See image below for detailed instruction.
  1. CREATE TABLE `user` (
  2.   `userid` INT(11) NOT NULL AUTO_INCREMENT,
  3.   `firstname` VARCHAR(30) NOT NULL,
  4.   `lastname` VARCHAR(30) NOT NULL,
  5.   `username` VARCHAR(30) NOT NULL,
  6.   `password` VARCHAR(30) NOT NULL,
  7.   `address` VARCHAR(100) NOT NULL,
  8. PRIMARY KEY(`userid`)
  9. ) ENGINE=InnoDB DEFAULT CHARSET=latin1;
form_ajax

Creating our Connection

Next, we create our connection to our database. This will serve as the bridge between our forms and database. We name this as conn.php.
  1. <?php
  2.  
  3. $conn = mysqli_connect("localhost","root","","sample");
  4. if (!$conn) {
  5.         die("Connection failed: " . mysqli_connect_error());
  6. }
  7.  
  8. ?>

index.php

We show our form in this page together with our sample user table to show that our form has been submitted via AJAX.
  1. <!DOCTYPE html>
  2.         <title>Submit Form using AJAX in PHP/MySQLi</title>
  3.         <script src="https://ajax.googleapis.com/ajax/libs/jquery/3.1.0/jquery.min.js"></script>
  4.         <link rel="stylesheet" href="https://maxcdn.bootstrapcdn.com/bootstrap/3.3.6/css/bootstrap.min.css" />
  5.         <script src="https://maxcdn.bootstrapcdn.com/bootstrap/3.3.7/js/bootstrap.min.js"></script>
  6.  
  7.         <style>
  8.                 .title{
  9.                         font-size:30px;
  10.                         color:blue;
  11.                 }
  12.                 .main{
  13.                         width:60%;
  14.                         padding:auto;
  15.                         margin:auto;
  16.                 }
  17.                 .h20{
  18.                         height:20px;
  19.                 }
  20.                 .h10{
  21.                         height:10px;
  22.                 }
  23.                 .desc{
  24.                         position:relative;
  25.                         top:6px;
  26.                 }
  27.         </style>
  28. </head>
  29. <div class="container">
  30.         <div class="h20"></div>
  31.         <div class="well main">
  32.                 <div class="row">
  33.                         <div class="col-lg-12">
  34.                                 <span class="title"><center>Submit Form using AJAX in PHP/MySQLi</center></span>
  35.                         </div>
  36.                 </div>
  37.                 <div class="h20"></div>
  38.                 <form id="form">
  39.                 <div class="row">
  40.                         <div class="col-lg-2">
  41.                                 <span class="desc">Firstname:</span>
  42.                         </div>
  43.                         <div class="col-lg-10">
  44.                                 <input type="text" name="firstname" class="form-control">
  45.                         </div>
  46.                 </div>
  47.                 <div class="h10"></div>
  48.                 <div class="row">
  49.                         <div class="col-lg-2">
  50.                                 <span class="desc">Lastname:</span>
  51.                         </div>
  52.                         <div class="col-lg-10">
  53.                                 <input type="text" name="lastname" class="form-control">
  54.                         </div>
  55.                 </div>
  56.                 <div class="h10"></div>
  57.                 <div class="row">
  58.                         <div class="col-lg-2">
  59.                                 <span class="desc">Username:</span>
  60.                         </div>
  61.                         <div class="col-lg-10">
  62.                                 <input type="text" name="username" class="form-control">
  63.                         </div>
  64.                 </div>
  65.                 <div class="h10"></div>
  66.                 <div class="row">
  67.                         <div class="col-lg-2">
  68.                                 <span class="desc">Password:</span>
  69.                         </div>
  70.                         <div class="col-lg-10">
  71.                                 <input type="password" name="password" class="form-control">
  72.                         </div>
  73.                 </div>
  74.                 <div class="h10"></div>
  75.                 <div class="row">
  76.                         <div class="col-lg-2">
  77.                                 <span class="desc">Address:</span>
  78.                         </div>
  79.                         <div class="col-lg-10">
  80.                                 <input type="text" name="address" class="form-control">
  81.                         </div>
  82.                 </div>
  83.                 </form>
  84.                 <div class="h10"></div>
  85.                 <div class="row">
  86.                         <div class="col-lg-12">
  87.                                 <button type="button" class="btn btn-primary pull-right" id="submit">Submit</button>
  88.                         </div>
  89.                 </div>
  90.         </div>
  91.         <div class="h20"></div>
  92.         <div class="row">
  93.                 <div id="table">
  94.                 </div>
  95.         </div>
  96. </div>
  97. <script src="custom.js"></script>
  98. </body>
  99. </html>

custom.js

This script contains our fetch user and add user code. Also, you will see in this script how we serialize our form to be submitted.
  1. $(document).ready(function(){
  2.  
  3.         showTable();
  4.  
  5.         $('#submit').click(function(){
  6.                 var form=$('#form').serialize();
  7.                 $.ajax({
  8.                         url:"add.php",
  9.                         method:"POST",
  10.                         data:form,
  11.                         success:function(){
  12.                                 showTable();
  13.                                 $('#form')[0].reset();
  14.                         }
  15.                 });
  16.         });
  17. });
  18.  
  19. function showTable(){
  20.         $.ajax({
  21.                 url:"fetch.php",
  22.                 method:"POST",
  23.                 data:{
  24.                         fetch: 1,
  25.                 },
  26.                 success:function(data){
  27.                         $('#table').html(data);
  28.                 }
  29.         });
  30. }

fetch.php

This is our PHP code in fetching user from our database to show in our table.
  1. <?php
  2.         include('conn.php');
  3.         if(isset($_POST['fetch'])){
  4.                 ?>
  5.                 <table class="table table-bordered table-striped">
  6.                         <thead>
  7.                                 <th>Firstname</th>
  8.                                 <th>Lastname</th>
  9.                                 <th>Username</th>
  10.                                 <th>Password</th>
  11.                                 <th>Address</th>
  12.                         </thead>
  13.                         <tbody>
  14.                                 <?php
  15.                                         $query=mysqli_query($conn,"select * from user order by userid desc");
  16.                                         while($row=mysqli_fetch_array($query)){
  17.                                         ?>
  18.                                         <tr>
  19.                                                 <td><?php echo $row['firstname']; ?></td>
  20.                                                 <td><?php echo $row['lastname']; ?></td>
  21.                                                 <td><?php echo $row['username']; ?></td>
  22.                                                 <td><?php echo $row['password']; ?></td>
  23.                                                 <td><?php echo $row['address']; ?></td>
  24.                                         </tr>
  25.                                         <?php
  26.                                         }
  27.                                 ?>
  28.                         </tbody>
  29.                 </table>
  30.                 <?php  
  31.         }
  32. ?>

add.php

Lastly, our code in adding new row to our database from the form that we serialize and submitted via AJAX.
  1. <?php
  2.         include('conn.php');
  3.         if(isset($_POST['firstname'])){
  4.                 $firstname=$_POST['firstname'];
  5.                 $lastname=$_POST['lastname'];
  6.                 $username=$_POST['username'];
  7.                 $password=$_POST['password'];
  8.                 $address=$_POST['address'];
  9.  
  10.                 mysqli_query($conn,"insert into user (firstname, lastname, username, password, address) values ('$firstname', '$lastname', '$username', '$password', '$address')");
  11.         }
  12. ?>
That ends this tutorial. If you have any comments or questions, feel free to write it below or message me and I will answer it to the best of my ability. Happy Coding :)

Comments

sorry bus above code is not working....

Add new comment