Simple FB-like Comment using PHP, MySQLi, AJAX and JQuery
Submitted by nurhodelta_17 on Wednesday, August 30, 2017 - 15:09.
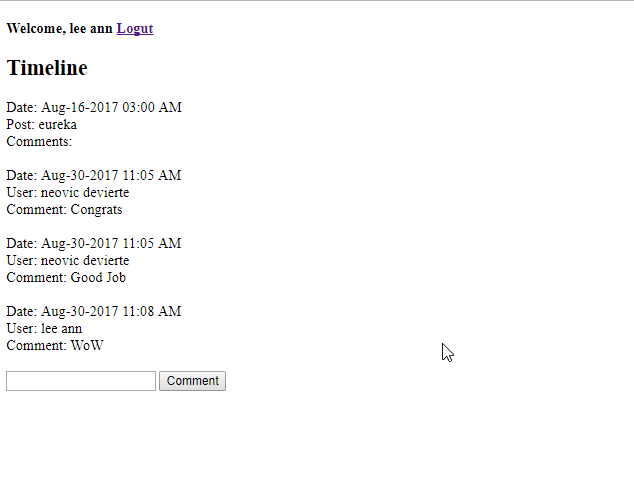
In this tutorial, I'm gonna show you how to create a simple fb-like comment using PHP, MySQLi, AJAX and JQuery. This tutorial will show you how to comment on one post which I've prepared as a sample. This does not a include a good design but will give you idea on the topic.

Creating our Database
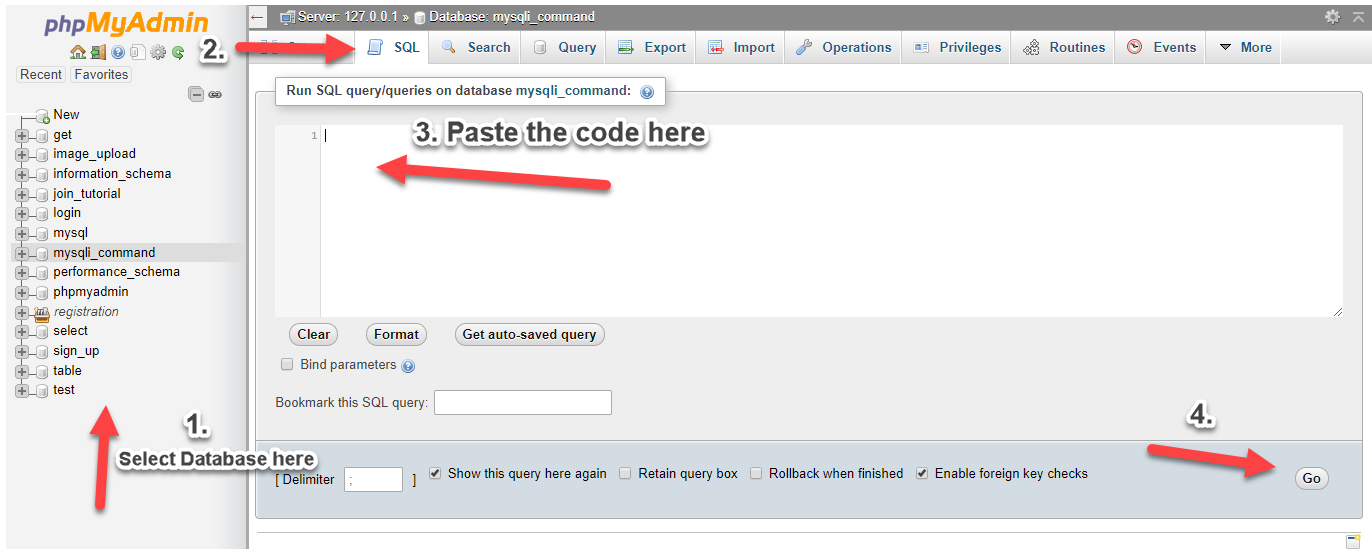
First, we're going to create our database. This will store our post and comment data. 1. Open phpMyAdmin. 2. Click databases, create a database and name it as "fb_db". 3. After creating a database, click the SQL and paste the below codes. See image below for detailed instruction.- CREATE TABLE `comment` (
- `commentid` INT(11) NOT NULL AUTO_INCREMENT,
- `postid` INT(11) NOT NULL,
- `userid` INT(11) NOT NULL,
- `comment_text` VARCHAR(200) NOT NULL,
- `comment_date` datetime NOT NULL,
- PRIMARY KEY(`commentid`)
- ) ENGINE=InnoDB DEFAULT CHARSET=latin1;
- CREATE TABLE `post` (
- `postid` INT(11) NOT NULL AUTO_INCREMENT,
- `post_text` VARCHAR(200) NOT NULL,
- `post_date` datetime NOT NULL,
- PRIMARY KEY(`postid`)
- ) ENGINE=InnoDB DEFAULT CHARSET=latin1;
- CREATE TABLE `user` (
- `userid` INT(11) NOT NULL AUTO_INCREMENT,
- `username` VARCHAR(30) NOT NULL,
- `password` VARCHAR(30) NOT NULL,
- `your_name` VARCHAR(60) NOT NULL,
- PRIMARY KEY(`userid`)
- ) ENGINE=InnoDB DEFAULT CHARSET=latin1;

Inserting Data into our Database
Next, we insert sample data into our database. This includes our sample post and our sample users. If you want, you may learn How to Insert Post. 1. Click "fb_db" database that we have created. 2. Click SQL and paste the codes below.- INSERT INTO `post` (`post_text`, `post_date`) VALUES
- ('eureka', '2017-08-16 03:00:00');
- INSERT INTO `user` (`username`, `password`, `your_name`) VALUES
- ('neovic', 'devierte', 'neovic devierte'),
- ('lee', 'ann', 'lee ann');
Creating our Connection
Next step is to create a database connection and save it as "conn.php". This file will serve as our bridge between our form and our database. To create the file, open your HTML code editor and paste the code below after the tag.- <?php
- //MySQLi Procedural
- if (!$conn) {
- }
- ?>
Creating our Login Page
First, we need to identify who's going to comment in our sample post. So, we need to create a login page. In this tutorial, I have created a simple login but if you want, you may learn How to Create a Login with Validation. We name our login page as "index.php".- <!DOCTYPE html>
- <html>
- <head>
- <title>FB Comment using PHP/MySQLi, Ajax/JQuery</title>
- </head>
- <body>
- <h2>Login Here</h2>
- <form method="POST" action="login.php">
- Username: <input type="text" name="username">
- Password: <input type="password" name="password"> <br><br>
- <input type="submit" value="Login">
- </form><br>
- <?php
- echo $_SESSION['message'];
- }
- ?>
- </body>
- </html>
Creating our Login Code
Next step is to create our login code for us to comment. We name this as "login.php".- <?php
- include('conn.php');
- $username=$_POST['username'];
- $password=$_POST['password'];
- $query=mysqli_query($conn,"select * from `user` where username='$username' and password='$password'");
- $_SESSION['message']="Login Error. Please Try Again";
- }
- else{
- $_SESSION['userid']=$row['userid'];
- }
- ?>
Creating our Timeline Page
Next step is to create our timeline page. In this page, we can comment to our sample post that we created. We name this page as "home.php". Also included in this page our jquery script which is included in the file of this tutorial.- <?php
- include('conn.php');
- }
- ?>
- <!DOCTYPE html>
- <html>
- <head>
- <title>Simple FB Comment using PHP/MySQLi, Ajax/JQuery</title>
- </head>
- <body>
- <div>
- <h4>Welcome, <?php echo $urow['your_name']; ?> <a href="logout.php">Logut</a></h4>
- <h2>Timeline</h2>
- <?php
- ?>
- <div>
- Post: <?php echo $row['post_text']; ?><br>
- Comments: <br><br>
- <div id="result"></div>
- <form>
- <input type="text" id="comment">
- <input type="hidden" value="<?php echo $row['postid']; ?>" id="id">
- <input type="submit" value="Comment" id="add_comment">
- </form>
- </div><br>
- <?php
- }
- ?>
- </div>
- <script src = "jquery-3.1.1.js"></script>
- <script type = "text/javascript">
- $(document).ready(function(){
- displayResult();
- /* Add Comment */
- $('#add_comment').on('click', function(){
- if($('#comment').val() == ""){
- alert('Please comment something first');
- }else{
- $comment = $('#comment').val();
- $id = $('#id').val();
- $.ajax({
- type: "POST",
- url: "add_comment.php",
- data: {
- comment: $comment,
- id: $id,
- },
- success: function(){
- displayResult();
- }
- });
- }
- });
- /***** *****/
- });
- function displayResult(){
- $id = $('#id').val();
- $.ajax({
- url: 'add_comment.php',
- type: 'POST',
- async: false,
- data:{
- id: $id,
- res: 1
- },
- success: function(response){
- $('#result').html(response);
- }
- });
- }
- </script>
- </body>
- </html>
Creating our Add Comment Code
Next, we create our add comment code that will function upon clicking of our Comment button. We name this as "add_comment.php".- <?php
- include ('conn.php');
- $id = $_POST['id'];
- mysqli_query($conn,"insert into `comment` (postid, userid, comment_text, comment_date) values ('$id', '".$_SESSION['userid']."', '$comment', NOW())") or die(mysqli_error());
- }
- ?>
- <?php
- $id = $_POST['id'];
- ?>
- <?php
- $query=mysqli_query($conn,"select * from `comment` left join `user` on user.userid=comment.userid where postid='$id' order by comment_date asc") or die(mysqli_error());
- ?>
- <div>
- User: <?php echo $row['your_name']; ?> <br>
- Comment: <?php echo $row['comment_text']; ?>
- </div>
- <br>
- <?php
- }
- }
- ?>
Creating our Logout Page
Last step is to create our logout page. We name this as "logout.php".- <?php
- ?>
Comments
Add new comment
- Add new comment
- 663 views

