Bootstrap Wizard Registration using PHP/MySQL
Submitted by alpha_luna on Wednesday, July 27, 2016 - 15:55.
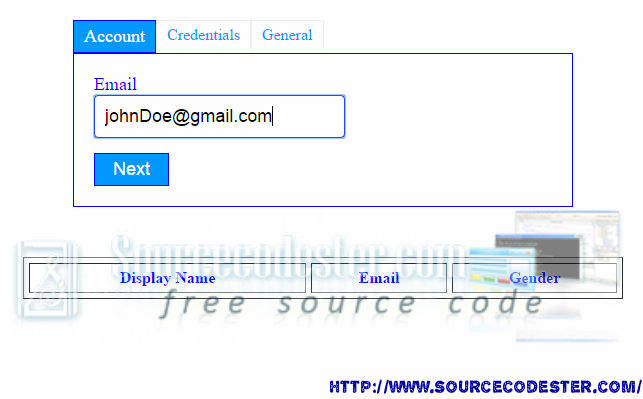
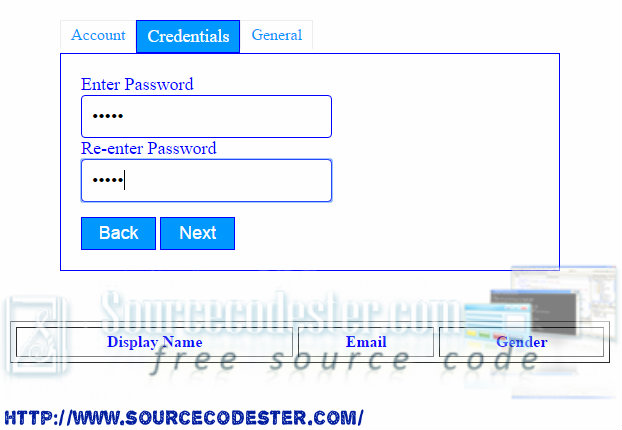
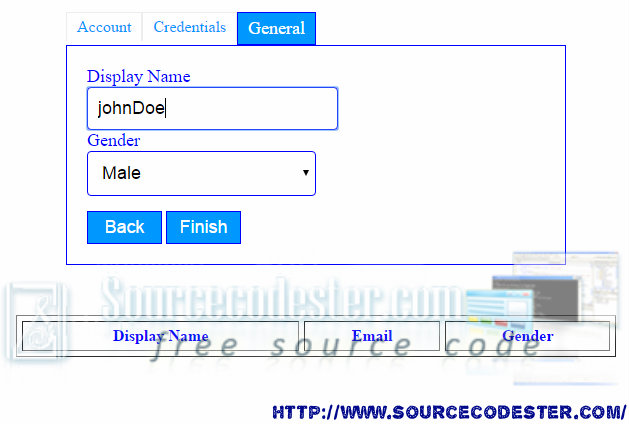
In this tutorial, we are going to learn on Bootstrap Wizard Registration using PHP/MySQL. These form field in registration is separated into a group. We have three steps to complete the registration. And a user can navigate using our previous and next button at every step.
Wizard Registration - HTML
This source code displays all three steps. This is for wizard registration form field.
jQuery Script
This script will help the user to navigate the wizard registration for the previous and next button.
Data Display
This code will display the data after the user saves into the database.
First, the user types their desired value in all field to finish the bootstrap wizard registration shown in the image below.


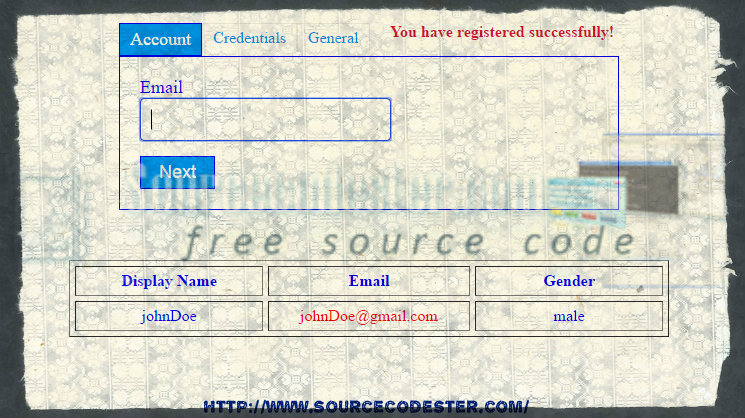
Then, the user hit the finish button to save all the data into the database. The output will shown like this. Hope that this simple tutorial that I created may help you to your future projects. Also, for the beginners who want to learn basic of coding in PHP/MySQL.
If you are interested in programming, we have an example of programs that may help you even just in small ways.
Share us your thoughts and comments below. Thank you so much for dropping by and reading this tutorial post. For more updates, don’t hesitate and feel free to visit this website more often and please share this with your friends or email me at [email protected]. Practice Coding. Thank you very much.
- <ul id="registration-step">
- </ul>
- <form name="frmRegistration" id="registration-form" method="post">
- <div id="account-field">
- </div>
- <div id="password-field" style="display:none;">
- </div>
- <div id="general-field" style="display:none;">
- <div>
- <select name="gender" id="gender" class="demoInputBox">
- </div>
- <div>
- <input class="btnAction" type="button" name="back" id="back" value="Back" style="display:none;">
- <input class="btnAction" type="button" name="next" id="next" value="Next" >
- <input class="btnAction" type="submit" name="finish" id="finish" value="Finish" style="display:none;">
- </div>
- </form>
- <script src="js/code_js.js"></script>
- <script>
- function validate() {
- var output = true;
- $(".registration-error").html('');
- if($("#account-field").css('display') != 'none') {
- if(!($("#email").val())) {
- output = false;
- $("#email-error").html("required");
- }
- if(!$("#email").val().match(/^([\w-\.]+@([\w-]+\.)+[\w-]{2,4})?$/)) {
- $("#email-error").html("invalid");
- output = false;
- }
- }
- if($("#password-field").css('display') != 'none') {
- if(!($("#user-password").val())) {
- output = false;
- $("#password-error").html("required");
- }
- if(!($("#confirm-password").val())) {
- output = false;
- $("#confirm-password-error").html("Not Matched");
- }
- if($("#user-password").val() != $("#confirm-password").val()) {
- output = false;
- $("#confirm-password-error").html("Not Matched");
- }
- }
- return output;
- }
- $(document).ready(function() {
- $("#next").click(function(){
- var output = validate();
- if(output) {
- var current = $(".highlight");
- var next = $(".highlight").next("li");
- if(next.length>0) {
- $("#"+current.attr("id")+"-field").hide();
- $("#"+next.attr("id")+"-field").show();
- $("#back").show();
- $("#finish").hide();
- $(".highlight").removeClass("highlight");
- next.addClass("highlight");
- if($(".highlight").attr("id") == $("li").last().attr("id")) {
- $("#next").hide();
- $("#finish").show();
- }
- }
- }
- });
- $("#back").click(function(){
- var current = $(".highlight");
- var prev = $(".highlight").prev("li");
- if(prev.length>0) {
- $("#"+current.attr("id")+"-field").hide();
- $("#"+prev.attr("id")+"-field").show();
- $("#next").show();
- $("#finish").hide();
- $(".highlight").removeClass("highlight");
- prev.addClass("highlight");
- if($(".highlight").attr("id") == $("li").first().attr("id")) {
- $("#back").hide();
- }
- }
- });
- });
- </script>
- <center>
- <table border="1" cellspacing="5" cellpadding="5" style="margin:15px;">
- <tr style="color:blue;">
- <th>
- Display Name
- </th>
- <th>
- Email
- </th>
- <th>
- Gender
- </th>
- </tr>
- <?php
- $id=$row['user_id'];
- ?>
- <tr style="text-align:center; color:blue;">
- <td style="width:200px;">
- <?php echo $row['display_name']; ?>
- </td>
- <td style="width:200px; color:red;">
- <?php echo $row['email']; ?>
- </td>
- <td style="width:200px; color:blue;">
- <?php echo $row['gender']; ?>
- </td>
- </tr>
- <?php } ?>
- </table>
- </center>
Output
First, the user types their desired value in all field to finish the bootstrap wizard registration shown in the image below.


Then, the user hit the finish button to save all the data into the database. The output will shown like this.
 Hope that this simple tutorial that I created may help you to your future projects. Also, for the beginners who want to learn basic of coding in PHP/MySQL.
If you are interested in programming, we have an example of programs that may help you even just in small ways.
Share us your thoughts and comments below. Thank you so much for dropping by and reading this tutorial post. For more updates, don’t hesitate and feel free to visit this website more often and please share this with your friends or email me at [email protected]. Practice Coding. Thank you very much.
Hope that this simple tutorial that I created may help you to your future projects. Also, for the beginners who want to learn basic of coding in PHP/MySQL.
If you are interested in programming, we have an example of programs that may help you even just in small ways.
Share us your thoughts and comments below. Thank you so much for dropping by and reading this tutorial post. For more updates, don’t hesitate and feel free to visit this website more often and please share this with your friends or email me at [email protected]. Practice Coding. Thank you very much.Add new comment
- 1161 views

