Creating a Simple Upload File with AngularJS Progress Bar and PHP/MySQLi
This tutorial tackles how to create a progress bar in Angular JS. Angular JS is a javascript framework maintained by Google and is capable of creating Single-Page Applications. In the case of this tutorial, we show our progress bar on file upload to track its progress. Increase your upload size by editing your php.ini for uploads.
Getting Started
I've used Bootstrap and Angular JS in this tutorial so you need an internet connection for them to work. Angular JS version = 1.5.7.
Creating our Database
First, we're going to create our database. "Apache" and "MySQL" Servers are required too in this tutorial. In my case I am using XAMPP as my virtual server.
- Open PHPMyAdmin.
- Click databases, create a database and name it as
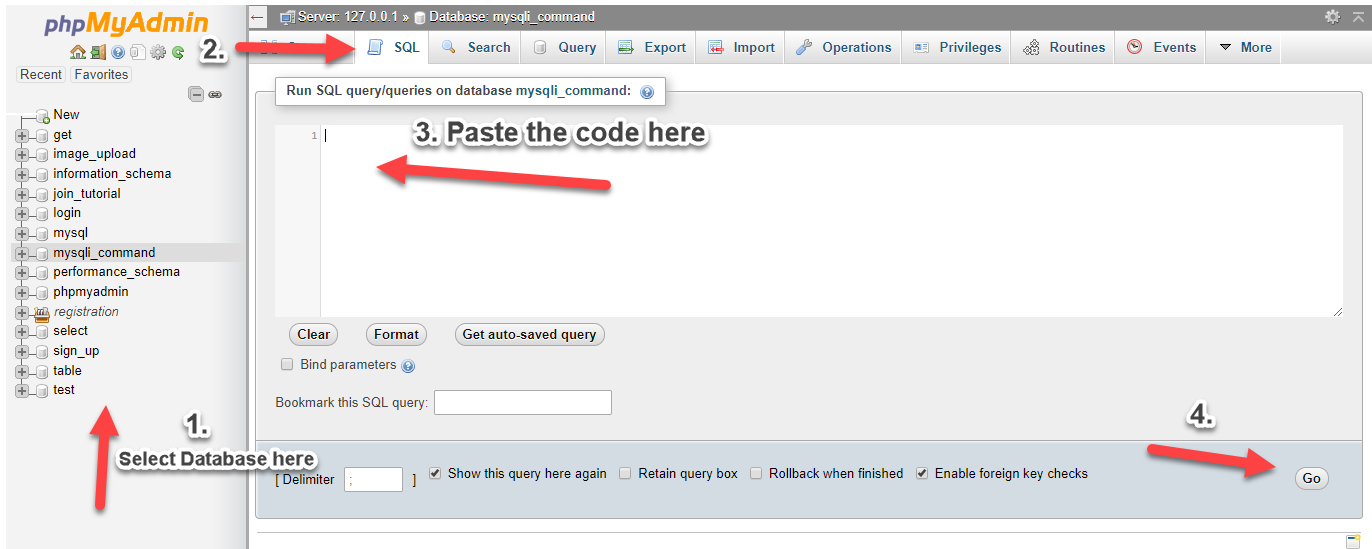
angular. - After creating a database, click the
SQLand copy/paste the below codes. See the image below for detailed instructions.

Creating the Interface
Next, this is our index which contains our upload form and our uploaded files table. Create a new file and copy/paste the script below and save it as index.php.
- <!DOCTYPE html>
- <html >
- <head>
- <meta charset="utf-8">
- <link href="https://maxcdn.bootstrapcdn.com/bootstrap/3.3.7/css/bootstrap.min.css" rel="stylesheet">
- </head>
- <style>
- td{
- word-break: break-all;
- }
- </style>
- <body ng-app="app" ng-controller="uploader" ng-init="fetch()">
- <div class="container">
- <div class="row">
- <div class="col-md-3">
- <hr>
- <input type="file" file-input="files" multiple>
- <hr>
- <progress id="progress" max="100" value="{{progressBar}}" ng-show="showProgress" style="height:30px; width:100%; margin-top:30px;"></progress>
- <div ng-show="error" class="alert alert-danger text-center" style="margin-top:30px;">
- </div>
- <div ng-show="success" class="alert alert-success text-center" style="margin-top:30px;">
- </div>
- </div>
- <div class="col-md-9">
- <table class="table table-bordered table-striped">
- <thead>
- </thead>
- <tbody>
- <tr ng-repeat="upload in uploads">
- </tr>
- </tbody>
- </table>
- <!-- <div class="col-md-4" ng-repeat="image in images">
- <img ng-src="upload/{{ image.filename }}" width="100%" height="250px" class="thumbnail">
- </div> -->
- </div>
- </div>
- </div>
- </body>
- </html>
Creating the Script
This contains our angular.js codes.
- var app = angular.module('app', []);
- app.directive('fileInput', ['$parse', function ($parse) {
- return {
- restrict: 'A',
- link: function($scope, elm, attrs){
- elm.bind('change', function(){
- $parse(attrs.fileInput).assign($scope, elm[0].files);
- $scope.$apply();
- });
- }
- }
- }]);
- app.controller('uploader', function($scope, $http){
- $scope.showProgress = false;
- $scope.error = false;
- $scope.errorMessage = "";
- $scope.success = false;
- $scope.successMessage = "";
- $scope.upload = function(){
- var uploadForm = new FormData();
- angular.forEach($scope.files, function(file){
- uploadForm.append('file[]', file);
- });
- $http.post('upload.php', uploadForm, {
- transformRequest:angular.identity,
- headers: {'Content-Type':undefined, 'Process-Data': false},
- uploadEventHandlers: {
- progress: function (e) {
- if (e.lengthComputable) {
- $scope.showProgress = true;
- $scope.progressBar = (e.loaded / e.total) * 100;
- $scope.progressCounter = $scope.progressBar.toFixed(2) + ' %';
- }
- }
- }
- })
- .success(function(response){
- console.log(response);
- if(response.error){
- $scope.error = true;
- $scope.errorMessage = response.message;
- }
- else{
- $scope.success = true;
- $scope.successMessage = response.message;
- $scope.fetch();
- }
- })
- }
- $scope.fetch = function(){
- $http.get('fetch.php')
- .success(function(data){
- $scope.uploads = data;
- });
- }
- $scope.clearMessage = function(){
- $scope.error = false;
- $scope.errorMessage = "";
- $scope.success = false;
- $scope.successMessage = "";
- }
- });
Creating a Fetch API and Saving Process
This is our PHP API/code that fetches our uploaded files.
fetch.php
- <?php
- $conn = new mysqli('localhost', 'root', '', 'angular');
- $sql = "SELECT * FROM upload";
- $query=$conn->query($sql);
- while($row=$query->fetch_array()){
- $output[] = $row;
- }
- ?>
Lastly, this is our PHP code/API in uploading our files.
upload.php
- <?php
- $conn = new mysqli('localhost', 'root', '', 'angular');
- foreach ($_FILES['file']['name'] as $key => $filename){
- $path = 'upload/' . $newFilename;
- $sql = "INSERT INTO upload (original, new, type) VALUES ('$filename', '$newFilename', '$ext')";
- $query=$conn->query($sql);
- }
- if($query){
- if($count > 1){
- $out['message'] = 'Files Uploaded Successfully';
- }
- else{
- $out['message'] = 'File Uploaded Successfully';
- }
- }
- else{
- $out['error'] = true;
- $out['message'] = 'File Uploaded but not Saved';
- }
- }
- }
- else{
- $out['error'] = true;
- $out['message'] = 'Upload Failed. File empty!';
- }
- ?>
Note: You can increase upload size of your localhost by setting the value of upload_max_filesize and post_max_size in your php.ini. Then, restart your localhost server to save your changes.
That ends this tutorial. I hope this will help you with what you are looking for and will be useful for your future projects.
Happy Coding :)Add new comment
- 1970 views

