Creating a Filterable Image Gallery using JavaScript Tutorial
In this tutorial, you can learn how to create a simple Filterable Image Gallery using HTML, CSS, and JavaScript. The tutorial aims to provide students and beginners with a reference for creating a useful component for a website or web application. Here, a simple web page script will be provided that demonstrates the creation of a filterable image gallery using the said programming markup and languages.
How does the Filterable Image Gallery work?
A Filterable Image Gallery is a web page or a website feature for displaying the images uploaded and related to the site which comes with category filter functionality. Each image that is shown has different categories. Image category filter options are often implemented using buttons, tabs, and dropdown elements.
How to create a Filterable Image Gallery?
The Filterable Image Gallery can be easily achieved using JavaScript. We can simply display the images with an attribute that helps us identify their category. Then using the JS APIs and event listener, we can detect if the gallery is filtered to a specific category which hides the other images that are not equal to the selected category. Check out the simple web application page scripts that I created and provided below to understand more about how to create the Filterable Image Gallery.
Sample Web Page
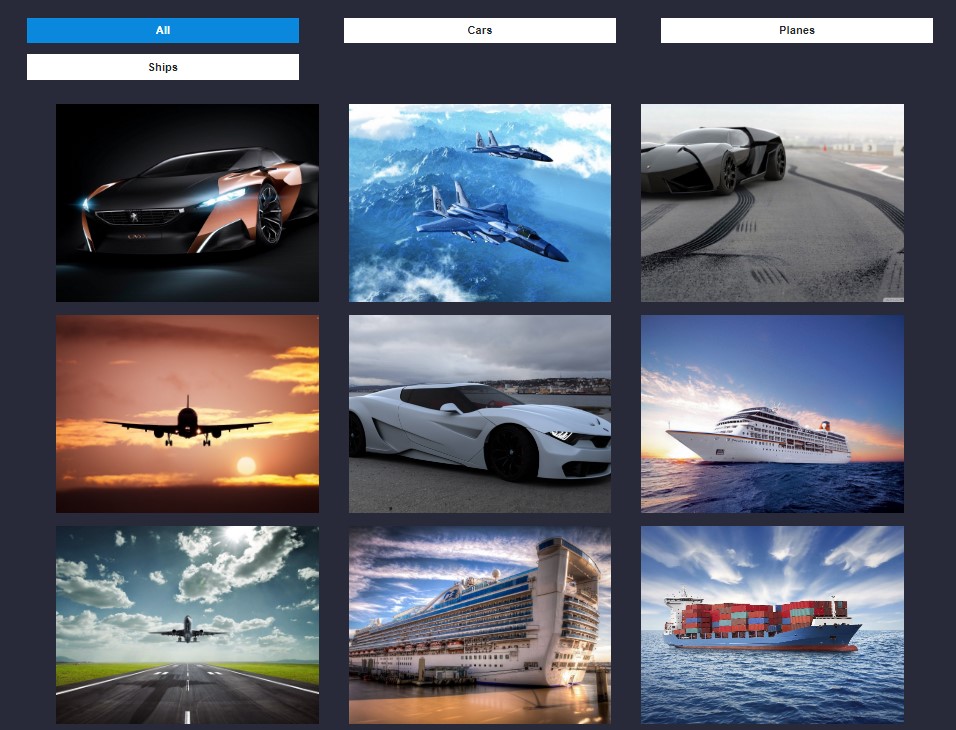
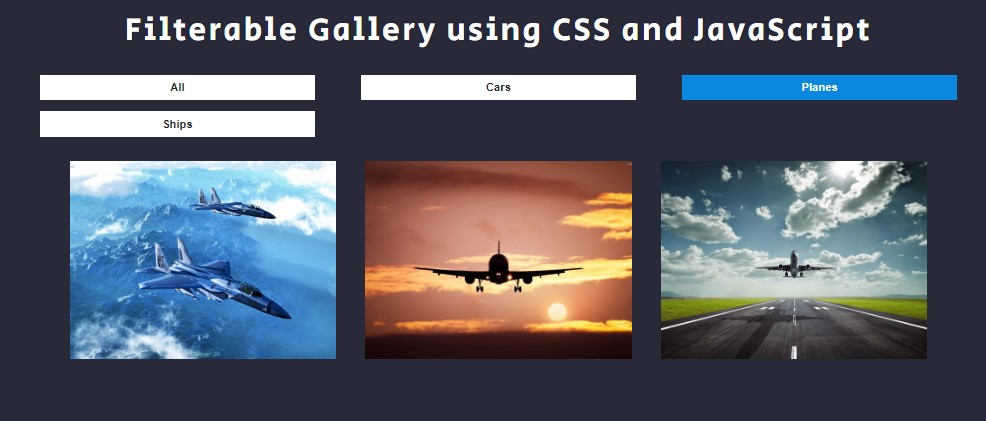
The scripts below result in a simple web application Image Gallery page. It displays multiple images that are shown in a grid view layout. It has also multiple category buttons above the images container that trigger hide and show images upon filtering them by the selected category. Download and Install a virtual web server such as XAMPP/WAMP so you can run the script on your local machine.
JSON Data
Below is a sample JSON data that contains the image path and their category name. Replace the image paths with the image paths that are available on your end.
- [{
- "img_path": "./images/car-1.jpg",
- "category_name": "cars"
- },{
- "img_path": "./images/car-2.jpg",
- "category_name": "cars"
- },{
- "img_path": "./images/car-3.jpg",
- "category_name": "cars"
- },{
- "img_path": "./images/plane-1.jpg",
- "category_name": "planes"
- },{
- "img_path": "./images/plane-2.jpg",
- "category_name": "planes"
- },{
- "img_path": "./images/plane-3.jpg",
- "category_name": "planes"
- },{
- "img_path": "./images/ship-1.jpg",
- "category_name": "ships"
- },{
- "img_path": "./images/ship-2.jpg",
- "category_name": "ships"
- },{
- "img_path": "./images/ship-3.jpg",
- "category_name": "ships"
- }]
Page Interface
Here's the HTML file script named index.html. It contains the page layouts and gallery container elements. I loaded the Bootstrap Framework using CDN which means that an internet connection is a must upon browsing the web page on your browser.
- <!DOCTYPE html>
- <html lang="en">
- <head>
- <meta charset="UTF-8">
- <meta http-equiv="X-UA-Compatible" content="IE=edge">
- <meta name="viewport" content="width=device-width, initial-scale=1.0">
- <link rel="preconnect" href="https://fonts.googleapis.com">
- <link rel="preconnect" href="https://fonts.gstatic.com" crossorigin>
- <link rel="stylesheet" href="https://fonts.googleapis.com/css2?family=Material+Symbols+Outlined:opsz,wght,FILL,[email protected],100..700,0..1,-50..200" />
- <link rel="stylesheet" href="https://cdn.jsdelivr.net/npm/[email protected]/dist/css/bootstrap.min.css">
- <link rel="stylesheet" href="https://cdn.datatables.net/1.13.4/css/jquery.dataTables.min.css">
- <link rel="stylesheet" href="style.css">
- <script src="https://cdn.jsdelivr.net/npm/[email protected]/dist/js/bootstrap.bundle.min.js"></script>
- </head>
- <body>
- <div class="content-md-lg py-3">
- <hr style="margin:auto; width:25px">
- <div class="col-lg-8 col-md-10 col-sm-12 col-12 mx-auto pt-4 position-relative">
- </div>
- </div>
- </body>
- </html>
Stylesheet
Here's the CSS file script named style.css. It contains the styles and the design code of the web page and image containers.
- @import url('https://fonts.googleapis.com/css2?family=Courgette&family=Secular+One&display=swap" rel="stylesheet');
- :root{
- --secular-font: 'Secular One', sans-serif;
- }
- *{
- box-sizing: border-box;
- }
- body *{
- font-family: 'Rubik', sans-serif;
- }
- /**
- Page Design
- */
- body,
- html{
- height: 100%;
- width: 100%;
- margin: 0;
- padding: 0;
- }
- body{
- background-color: #282A3A;
- }
- .page-title{
- font-size: 2.5rem;
- font-weight: 500;
- color: #fff;
- letter-spacing: 3px;
- font-family: var(--secular-font);
- text-align: center;
- text-shadow: 0px 0px 3px #2020208c;
- }
- /* If Galler is empty */
- #gallery-container:empty:after{
- content:"No Images found.";
- position: absolute;
- width: 100%;
- font-weight: lighter;
- font-size: 1.2rem;
- font-style: italic;
- text-align: center;
- }
- /* If Galler is not empty */
- #gallery-container:not(:empty){
- display: flex;
- flex-wrap: wrap;
- justify-content: space-evenly;
- }
- /* Image Item Container */
- #gallery-container:not(:empty) .imageItem{
- width: 29%;
- height: 25vh;
- margin-bottom: 1em;
- }
- /* Image Item */
- #gallery-container:not(:empty) .imageItem>img{
- width: 100%;
- height: 100%;
- object-fit: cover;
- object-position: center center;
- }
- /* Category Buttons Container */
- #category-container{
- display: flex;
- flex-wrap: wrap;
- justify-content: space-between;
- }
- /* Category Buttons */
- button.catbtn {
- width: 30%;
- background: #fff;
- margin-bottom: 1em;
- text-transform: capitalize;
- font-weight: 600;
- }
- button.catbtn.active {
- background: #0988dd;
- border-color: #0a8ce4;
- color: #fff;
- }
- button.catbtn:hover{
- color: #292929;
- background: #ebebeb;
- border-color: #dddcdc;
- }
JavaScript
Lastly, here's the JavaScript file script named script.js. It contains the JS codes for loading the images and categories to the web page. It also contains the function that makes the image filtering feature functional.
- // Image Item Element
- const imageItem = document.createElement('div')
- imageItem.classList.add('imageItem')
- imageItem.innerHTML = `<img src="" alt="">`;
- // Image Container Selector
- const ImageContainer = document.getElementById('gallery-container')
- // Image Category Selector
- const catContainer = document.getElementById('category-container')
- // Image Category Button Element
- const catBtnItem = document.createElement('button')
- catBtnItem.type = 'button'
- catBtnItem.classList.add('catbtn')
- catBtnItem.classList.add('btn')
- catBtnItem.classList.add('btn-sm')
- catBtnItem.classList.add('rounded-0')
- let images = {}
- let categories = ['all']
- window.onload = async () =>{
- /**Fetch Gallery Data */
- await fetch('data.json')
- .then(response =>{
- return response.json()
- })
- .then(JSONdata=>{
- images = JSONdata
- Object.values(images).map(image => {
- if(!categories.includes(image.category_name))
- categories.push(image.category_name)
- })
- })
- // Load Category Buttons
- await load_categories()
- // Shuffle Image Data
- await shuffleImages()
- // Load Image Data
- await load_images()
- catContainer.querySelectorAll('.catbtn').forEach(catBTN => {
- //Add Click Event Listener to Category Button to filter
- catBTN.addEventListener('click', filterGallery.bind(null, catBTN))
- })
- }
- //Shuffle Image Data Function
- const shuffleImages = () =>{
- var shuffle = images
- for (var i = 0; i < (shuffle.length - 1); i++ ){
- var k = Math.floor(Math.random() * (i +1));
- var image = shuffle[i]
- shuffle[i] = shuffle[k]
- shuffle[k] = image
- }
- images = shuffle
- }
- //Load Category Buttons Function
- const load_categories = () =>{
- categories.forEach(category => {
- var btn = catBtnItem.cloneNode(true)
- btn.innerText = category
- catContainer.append(btn)
- })
- catContainer.querySelector('.catbtn:nth-child(1)').classList.add('active')
- }
- //Load Image Items Function
- const load_images = () =>{
- images.forEach(image => {
- var item = imageItem.cloneNode(true)
- item.dataset.category=image.category_name
- item.querySelector('img').src = image.img_path
- ImageContainer.appendChild(item)
- });
- }
- // Filter Gallery By selected Category
- const filterGallery = (selectedCatBTN) => {
- //Update Active Category Button
- catContainer.querySelectorAll('.catbtn').forEach(catBTN => {
- if(selectedCatBTN == catBTN){
- if(!catBTN.classList.contains('active'))
- catBTN.classList.add('active');
- }else{
- if(catBTN.classList.contains('active'))
- catBTN.classList.remove('active');
- }
- })
- // Get selected category
- var cat = selectedCatBTN.innerText.toLowerCase()
- //Hide Images that category are not equal to selected category
- ImageContainer.querySelectorAll('.imageItem').forEach(item=>{
- if(cat == "all" || cat == item.dataset.category){
- item.style.display = 'block'
- }else{
- item.style.display = 'none'
- }
- })
- }
Snapshots
Here are the images or snapshots of the overall result of the scripts that I provided above.
Page Interface (Unfiltered)

Filtered Interface (Cars Category)

Filtered Interface (Planes Category)

DEMO VIDEO
There you go! I have also provided the complete source code zip file that I created for this tutorial and it is free to download on this site. The download button can be found after this tutorial's content. Feel free to download the source code and do some experiments to enhance your programming skills and knowledge.
That's it! I hope this Creating a Filterable Image Gallery using JavaScript Tutorial will help you with what you are looking for and will be useful for your current and future web application projects.
Happy Coding =)
Add new comment
- 582 views

