Creating a Draggable HTML Element using CSS and JavaScript Tutorial

In this tutorial, you can learn how to create a simple Draggable HTML Element using CSS and JavaScript for your dynamic websites or web applications. This tutorial aims to provide students and beginners with a reference for learning some tricks using CSS and JS to develop a creative and interactive UI/UX of a website or web application. Here, I will be providing the scripts of a simple web page that demonstrate the creation of a draggable HTML Element.
What is a Draggable HTML Element?
The Draggable HTML Element is a UI/UX feature of web pages or websites that allows the users to reposition or change the position of an element by dragging it. This kind of feature is commonly implemented in card elements or panels. This feature is useful for users in terms of setting up the element orders or layout according to his/her desire.
How to create a Draggable HTML Element?
A Draggable HTML Element/DIV Element can be achieved easily using CSS and JavaScript. We can design and style the draggable element, wrapper, containers, and target locations. JavaScript will be useful for making dragging and changing the position of the element. Using the JS mousedown, mousemove, and mouseup event listeners to detect and update the element's location and position when dragging. Check out the web page script that I created and provided below to have a better idea of how to create the Draggable HTML Element.
Sample Web Page
The scripts below result in a simple web page that demonstrates the creation of a simple Draggable HTML Element. The web page contains static contents with a single draggable element and 4 targets or possible element locations. The user can simply grab the draggable element and start dragging it into the location they wanted. When dragging, the possible location of the card will be visible.
HTML
Here's the HTML file script named index.html that contains the page layout and content elements.
- <!DOCTYPE html>
- <html lang="en">
- <head>
- <meta charset="UTF-8">
- <meta http-equiv="X-UA-Compatible" content="IE=edge">
- <meta name="viewport" content="width=device-width, initial-scale=1.0">
- <link rel="preconnect" href="https://fonts.googleapis.com">
- <link rel="preconnect" href="https://fonts.gstatic.com" crossorigin>
- <link rel="stylesheet" href="https://fonts.googleapis.com/css2?family=Material+Symbols+Outlined:opsz,wght,FILL,[email protected],100..700,0..1,-50..200" />
- <link rel="stylesheet" href="style.css">
- </head>
- <body>
- <div id="wrapper">
- <hr style="margin:auto; width:25px">
- <!-- Dragble Element Wrapper -->
- <div id="draggable-el-wrapper">
- <!-- Dragble Element Container -->
- <div class="draggable-el-holder">
- <!-- Draggable Element -->
- <div class="card">
- <hr width="30px" style="margin:auto">
- </div>
- <!-- Draggable Element -->
- </div>
- <!-- Dragble Element Container -->
- <!-- Dragble Element Container -->
- <!-- Dragble Element Container -->
- <!-- Dragble Element Container -->
- <!-- Dragble Element Container -->
- <!-- Dragble Element Container -->
- <!-- Dragble Element Container -->
- </div>
- <!-- Dragble Element Wrapper -->
- </div>
- </body>
- </html>
Stylesheet
Here is the CSS file script named style.css which is included or loaded on the index page. This file contains the script for the design and styles of the page layout, content, draggable content, and elements layouts when dragging.
- @import url('https://fonts.googleapis.com/css2?family=Rubik&display=swap');
- @import url('https://fonts.googleapis.com/css2?family=Courgette&family=Secular+One&display=swap" rel="stylesheet');
- @import url('https://fonts.googleapis.com/css2?family=Satisfy&display=swap" rel="stylesheet');
- :root{
- --secular-font: 'Secular One', sans-serif;
- --satisfy-font: 'Satisfy', cursive;
- }
- *{
- box-sizing: border-box;
- }
- body *{
- font-family: 'Rubik', sans-serif;
- }
- /**
- Page Design
- */
- body,
- html{
- height: 100%;
- width: 100%;
- margin: 0;
- padding: 0;
- }
- body{
- background-color: #363636;
- }
- /* Page Wrapper */
- #wrapper{
- width: 100%;
- padding: 3em 5em;
- }
- .page-title{
- font-size: 35px;
- font-family: var(--secular-font);
- letter-spacing: 2px;
- text-align: center;
- color:#fff;
- }
- /*
- Draggable Wrapper and Holder
- */
- #draggable-el-wrapper{
- position:relative;
- width: 100%;
- margin-top: 1em;
- display: flex;
- flex-wrap: wrap;
- justify-content: space-evenly;
- }
- #draggable-el-wrapper .draggable-el-holder{
- position:relative;
- width: 45%;
- min-height: 200px;
- margin-bottom: 1em;
- }
- /* Element Holder when Dragging */
- #draggable-el-wrapper[data-drag="true"] .draggable-el-holder {
- background: #ffffff0a;
- }
- /* Element Holder hovered when Dragging */
- #draggable-el-wrapper[data-drag="true"] .draggable-el-holder[data-dragging-hovered="true"]{
- border: 2px dashed #e7e7e7;
- background-color: #bbbbbb7d;
- }
- /* Element Holder current Container when Dragging */
- #draggable-el-wrapper[data-drag="true"] .draggable-el-holder:has(.card[data-dragging="true"]){
- background: #70b6ff4a;
- }
- /*
- Draggable Card
- */
- .card{
- width: calc(100%);
- min-height: 200px;
- background: #fff;
- border:1px solid #dadada;
- padding: 2em 1em;
- box-shadow: 0px 0px 7px #dadada9c;
- cursor: move;
- }
- .card[data-dragging="true"]{
- position: fixed;
- z-index: 9;
- filter: opacity(.8);
- }
- .card[data-dragging="true"] > * {
- user-select: none;
- }
- .card .card-header{
- font-size: 30px;
- font-weight: 400;
- text-align: center;
- }
- .card .card-body{
- padding: 1em 0;
- text-align: center;
- color:#585858;
- font-weight:lighter;
- }
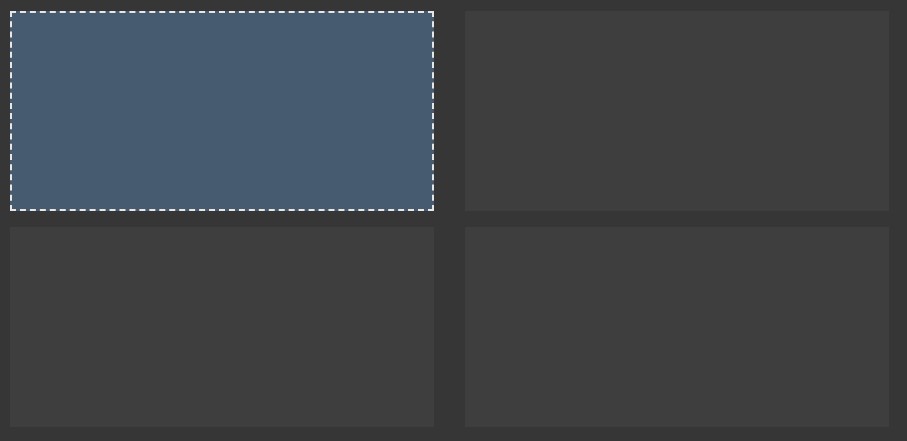
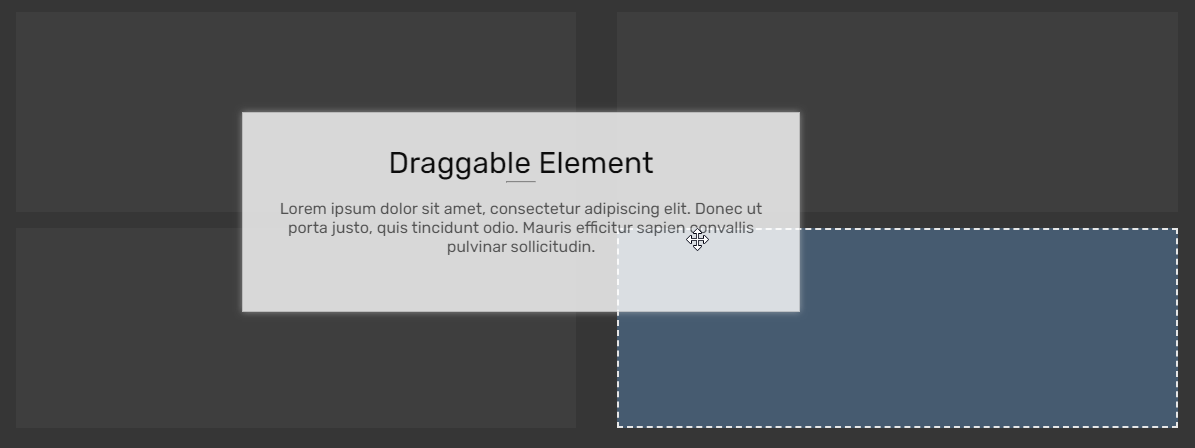
Without the Dragging function script, the provided scripts will output like the following:
Page Layout

Page Layout when Dragging
JavaScript
Lastly, here's the JS file script named script.js. The script contains the codes for making the dragging feature functional using the JS selectors, methods/functions, APIs, and event listeners. This file is also loaded on the index page.
- // Element Wrapper Selector
- const DraggableElWrapper = document.getElementById("draggable-el-wrapper");
- // Element Holder Selector
- const DraggableElHolder = DraggableElWrapper.querySelectorAll('.draggable-el-holder')
- // Draggable Element Selector
- const DraggableEl = DraggableElWrapper.querySelector('.card')
- /** Start Drag */
- DraggableEl.addEventListener('mousedown', (e) =>{
- var _layerLocX = e.layerX
- var _layerLocY = e.layerY
- DraggableEl.style.width = DraggableEl.clientWidth + `px`
- DraggableEl.style.Height = DraggableEl.clientHeight + `px`
- DraggableElWrapper.dataset.drag='true'
- DraggableEl.dataset.dragging='true'
- // Dragging Event Function
- function dragging(e){
- console.log('dragging')
- var posX = e.clientX
- var posY = e.clientY
- var possibleTargets = [...DraggableElHolder]
- DraggableEl.style.top = (posY - _layerLocY) + 'px'
- DraggableEl.style.left = (posX - _layerLocX) + 'px'
- possibleTargets.find(el=>{
- var rect = el.getBoundingClientRect()
- if(posX > rect.x && posX < (rect.x + rect.width) && posY > rect.y && posY < (rect.y + rect.height)){
- el.appendChild(DraggableEl)
- el.dataset.draggingHovered = true;
- }else{
- if(!!el.dataset.draggingHovered)
- delete el.dataset.draggingHovered
- }
- })
- }
- dragging(e);
- // Trigger Dragging Event
- document.addEventListener('mousemove',dragging)
- // Stop Dragging Event
- document.addEventListener('mouseup', () =>{
- DraggableElWrapper.dataset.drag='false'
- DraggableEl.dataset.dragging='false'
- document.removeEventListener('mousemove', dragging)
- DraggableEl.removeAttribute('style')
- })
- })
Result
The over result of the whole script I have provided above will output something like the following image when the user is dragging the element.
DEMO

There you go! I have provided also the complete source code zip file of the web page scripts on this site and it is free to download. Feel free to download the file and modify the script to do some more experiments to enhance your programming capabilities. The download button is located below this tutorial's content.
That's the end of this tutorial! I hope this Creating a Draggable HTML Element using CSS and JavaScript Tutorial will help you with what you are looking for and will be useful for your current and future web applications or website projects.
Explore more on this website for more Tutorials and Free Source Codes.
Happy Coding =)
Add new comment
- 294 views