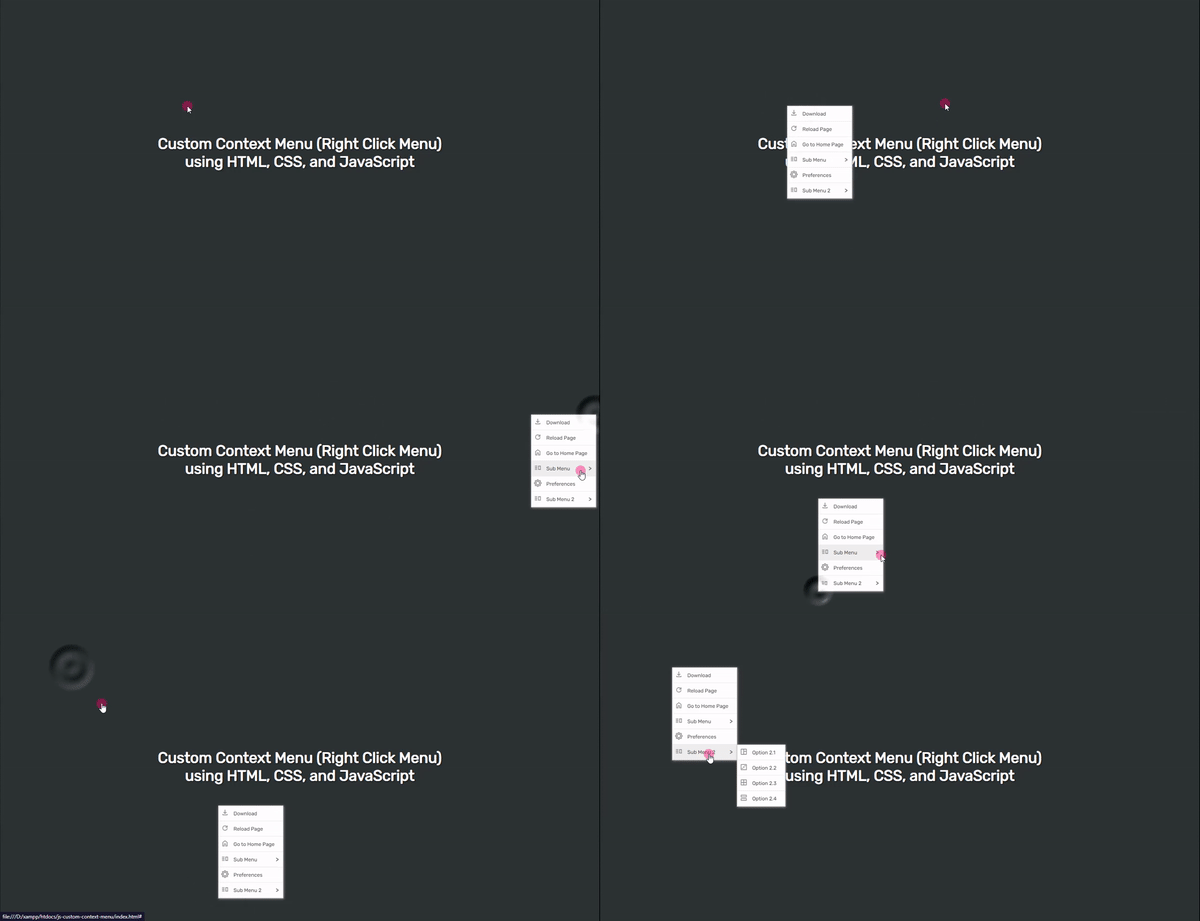
Creating a Custom Context Menu using CSS and JavaScript Tutorial
In this tutorial, you can learn how to create a Custom Context Menu for websites or web applications using HTML, CSS, and JavaScript. The tutorial aims to provide students and new programmers with a reference for learning to customize some of the default features of browsers when browsing websites or web applications. Here, I will be providing the scripts of a simple web page that demonstrate the creation of a simple Custom Context Menu. The source code zip file will be provided also and is free to download.
What is a Context Menu?
A Context Menu is also known as a contextual, pop-up, or shortcut menu. It is a GUI (Graphical User Interface) that is shown or triggered by the right-click operation. By default, browsers have a built-in context menu for all the pages that are browsed using it but some developer implements a custom one for achieving their own requirements and provided options or menus that are only applicable to the specific page, page element, or wrappers. It is often used also for providing the users to have more options or choices of action that are possible to make with the selected object or page element.
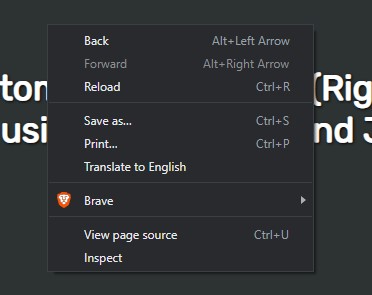
The default context menu of browsers is something like the following image:
How to create a Context Menu?
We can simply achieve the Custom Context Menu using only HTML, CSS, and JavaScript without any libraries. Using the HTML elements, we can create the list of choices or menus we want to provide to users and the CSS or stylesheet scripts will be used for designing it for how we want the Custom Context Menu to look on the front end. Then, the JavaScript can change the browser's context menu to the custom one and display and reposition the element where the right-click event was triggered. JS comes with an event listener called contextment that allows the developer the prevent the default to display and show the custom context menu. Check out the sample web page scripts that I provided below to know and understand more.
Sample Web Page
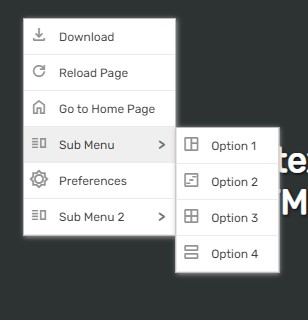
The below scripts result in a simple web application's web page that demonstrates the creation of a simple Custom Context Menu. The web page context menu will be shown when right-click operation is triggered anywhere on the web page document. It contains multiple choices of actions or menus and some of it has sub-menus and will be shown when hovering over the parent menu.
Interface
Here's the HTML file script that contains the sample page elements which are the static page content and the custom context menu.
- <!DOCTYPE html>
- <html lang="en">
- <head>
- <meta charset="UTF-8">
- <meta http-equiv="X-UA-Compatible" content="IE=edge">
- <meta name="viewport" content="width=device-width, initial-scale=1.0">
- <link rel="preconnect" href="https://fonts.googleapis.com">
- <link rel="preconnect" href="https://fonts.gstatic.com" crossorigin>
- <link rel="stylesheet" href="https://fonts.googleapis.com/css2?family=Material+Symbols+Outlined:opsz,wght,FILL,[email protected],100..700,0..1,-50..200" />
- <link rel="stylesheet" href="style.css">
- </head>
- <body>
- <!-- Custom Context Menu -->
- <div id="custom-contextmenu">
- <ul>
- <li>
- download
- </li>
- <li>
- refresh
- </li>
- <li>
- home
- </li>
- <li>
- vertical_split
- <div class="custom-contextmenu-sub">
- <ul>
- <li>
- space_dashboard
- </li>
- <li>
- view_timeline
- </li>
- <li>
- window
- </li>
- <li>
- view_agenda
- </li>
- </ul>
- </div>
- </li>
- <li>
- brightness_low
- </li>
- <li>
- vertical_split
- <div class="custom-contextmenu-sub">
- <ul>
- <li>
- space_dashboard
- </li>
- <li>
- view_timeline
- </li>
- <li>
- window
- </li>
- <li>
- view_agenda
- </li>
- </ul>
- </div>
- </li>
- </ul>
- </div>
- <!-- End of Custom Context Menu -->
- <main>
- <section>
- </section>
- </main>
- </body>
- </html>
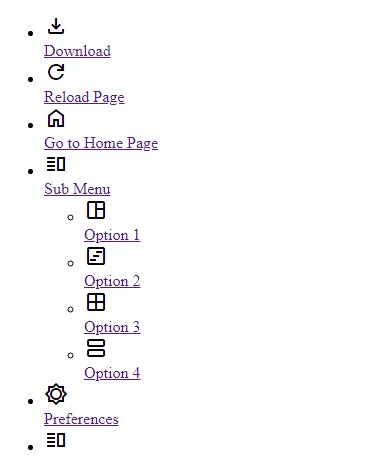
Without any CSS and JS scripts, the script above will output like the following:
Stylesheet
The below script is the CSS code of the web page layout and the custom context menu design.
- @import url('https://fonts.googleapis.com/css2?family=Rubik&display=swap');
- body *{
- font-family: 'Rubik', sans-serif;
- }
- /**
- Page Design
- */
- body,
- html{
- height: 100%;
- width: 100%;
- margin: 0;
- padding: 0;
- }
- body{
- background-color: #2C3333;
- }
- main{
- height: 100%;
- width: 100%;
- display: flex;
- flex-direction: column;
- justify-content: center;
- align-items: center;
- }
- section{
- width:760px;
- margin: auto;
- padding: 1em 2em;
- text-align: center;
- }
- @media (max-width: 760px) {
- section{
- width:100%;
- }
- }
- .page-title{
- color: #fff;
- text-shadow: 1px 1px 3px #000;
- font-size: 35px;
- }
- /*
- Context Menu Design
- */
- #custom-contextmenu,
- #custom-contextmenu .custom-contextmenu-sub
- {
- position: fixed;
- top:0;
- left:0;
- width: auto;
- background-color: #fff;
- border: 1px solid #bebbbb;
- box-shadow: 1px 1px 5px #a1a1a1;
- display: none;
- }
- /* Display Custom Menu */
- #custom-contextmenu.show
- {
- display: block;
- }
- #custom-contextmenu .custom-contextmenu-sub
- {
- position: absolute;
- left:unset;
- right:0;
- transform: translateX(100%) translateY(0%);
- }
- #custom-contextmenu .custom-contextmenu-sub.left{
- left:0;
- right:unset;
- transform: translateX(-100%) translateY(0%);
- }
- #custom-contextmenu .custom-contextmenu-sub.up
- {
- transform: translateX(100%) translateY(-75%);
- }
- #custom-contextmenu .custom-contextmenu-sub.left.up
- {
- transform: translateX(-100%) translateY(-75%);
- }
- #custom-contextmenu ul{
- padding: unset;
- margin: unset;
- }
- #custom-contextmenu ul li .material-symbols-outlined{
- font-size: 20px;
- }
- #custom-contextmenu ul li{
- list-style: none;
- position: relative;
- display: flex;
- justify-content: start;
- align-items: center;
- font-size: 12px;
- font-weight: 500;
- padding: 0.5em 0;
- padding-right: 20px;
- padding-left: 5px;
- border-bottom: 1px solid #ebebeb;
- }
- #custom-contextmenu ul li:hover {
- background: #efefef;
- }
- #custom-contextmenu ul li .custom-contextmenu-icon{
- padding-right: 10px;
- color: #919191;
- }
- #custom-contextmenu ul li .custom-contextmenu-link{
- text-decoration: none;
- color: #424040;
- }
- #custom-contextmenu ul li .custom-contextmenu-link.multi-lvl {
- position: relative;
- width: calc(100%);
- display: block;
- }
- #custom-contextmenu ul li .custom-contextmenu-link.multi-lvl:before {
- content: ">";
- position: absolute;
- font-size: 14px;
- right: -10px;
- top: -2px;
- font-weight: 700;
- color: #707070;
- }
- /* Custom Menu's Sub Menus */
- #custom-contextmenu ul li .custom-contextmenu-sub.show
- {
- display: block;
- }
The script above will output like the following:
Function Script
The below script is the Javascript code for changing the default context menu into the custom one. It also contains the scripts for re-position the custom context menu depending on where the right-click event was triggered.
- /** Slecting Custom Context Menu Element */
- const CustomcontextMenu = document.getElementById('custom-contextmenu')
- /** Opening Custom Context Menu */
- window.addEventListener('contextmenu', (e) => {
- e.preventDefault()
- //Adding Class to Context Menu Element to trigger show
- if(!CustomcontextMenu.classList.contains('show'))
- CustomcontextMenu.classList.add('show');
- setTimeout(()=>{
- // Re-positioning the Context Menu Element According to cursor position and left/right
- if((e.clientY + CustomcontextMenu.clientHeight) < window.innerHeight){
- CustomcontextMenu.style.top = e.clientY + `px`;
- CustomcontextMenu.querySelectorAll('.custom-contextmenu-sub').forEach(el=>{
- if(el.classList.contains('up'))
- el.classList.remove('up');
- })
- }else{
- CustomcontextMenu.style.top = (e.clientY - CustomcontextMenu.clientHeight) + `px`;
- CustomcontextMenu.querySelectorAll('.custom-contextmenu-sub').forEach(el=>{
- if(!el.classList.contains('up'))
- el.classList.add('up');
- })
- }
- if((e.clientX + CustomcontextMenu.clientWidth) < window.innerWidth){
- CustomcontextMenu.style.left = e.clientX + `px`
- CustomcontextMenu.querySelectorAll('.custom-contextmenu-sub').forEach(el=>{
- if(el.classList.contains('left'))
- el.classList.remove('left');
- })
- }else{
- CustomcontextMenu.style.left = (e.clientX - CustomcontextMenu.clientWidth) + `px`;
- CustomcontextMenu.querySelectorAll('.custom-contextmenu-sub').forEach(el=>{
- if(!el.classList.contains('left'))
- el.classList.add('left');
- })
- }
- }, 0)
- /** Event Listenter for submenu is hovered */
- CustomcontextMenu.querySelectorAll('.custom-contextmenu-link.multi-lvl').forEach((el)=>{
- el.addEventListener('mouseenter', function(){
- var submenu = el.parentElement.querySelector('.custom-contextmenu-sub')
- // Open Submenu
- if(submenu !== undefined && !submenu.classList.contains('show'))
- submenu.classList.add('show')
- //Hiding the submenu
- el.parentElement.addEventListener('mouseleave', e =>{
- if(submenu !== undefined && submenu.classList.contains('show'))
- submenu.classList.remove('show')
- })
- })
- })
- })
- /** Event Listener for Hiding the Custom Context Menu */
- window.addEventListener('click', e => {
- var _target = e.target
- // Check if the clicked target is not a child of the context menu
- if((CustomcontextMenu).contains(_target) === true)
- return false;
- /** Hiding the Custom Context Menu */
- if(CustomcontextMenu.classList.contains('show'))
- CustomcontextMenu.classList.remove('show')
- })
Overall, the scripts will result in something like the following:
There you go! I have also provided the source code zip file that I created for this tutorial on this website and it is free to download. the download button is located below this tutorial's content. Feel free to download and modify it.
That's the end of this tutorial! I hope this Creating a Custom Context Menu using HTML, CSS, and JS Tutorial will help you with what you are looking for and will be useful for your current and future web application projects.
Explore more on this website for more Tutorials and Free Source Codes.
Happy Coding =)
Add new comment
- 421 views

