Creating a Dynamic Confirmation Dialog using jQuery and Bootstrap Modal Tutorial
In this tutorial, I will teach/share with you some techniques that I am using when developing a web application. This tutorial will tackle about Creating a Dynamic Confirmation Dialog using jQuery and Bootstrap Modal. This kind of web application feature can help you to reduce the number of lines you are writing and also to prevent redundancy in creating a function in your source code.
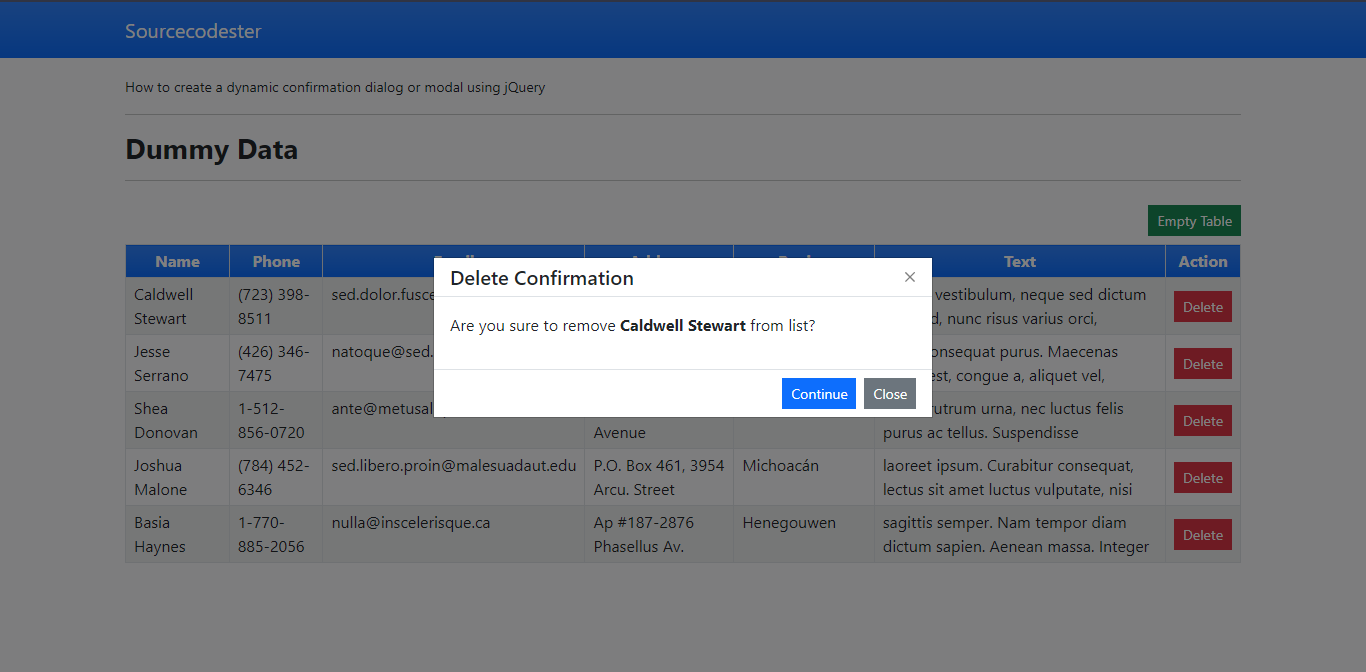
To give you a better understanding of this tutorial, I will be providing a simple web application that has dummy table data. The application contains a delete table row function and an emptying table function. The application that we will create has only static data which means there's no database server needed for this.
Getting Started
In this tutorial, I used Bootstrap v5 for the design of application. And, kindly download also the jQuery Lirary. After that, compile you CSS and Script assets into a directory.
Creating the Page Interface
The script below is the HTML code/script for the index page of the application that we will be creating. This contains navbar, table, static data, buttons, and the confirmation modal HTML scripts.
Open a text editor i.e. (sublime, notepad++, or vs code editor) and create a new HTML file naming index.html and save the file inside your created source code directory.
- <!DOCTYPE html>
- <html lang="en">
- <head>
- <meta charset="UTF-8">
- <meta http-equiv="X-UA-Compatible" content="IE=edge">
- <meta name="viewport" content="width=device-width, initial-scale=1.0">
- <link rel="stylesheet" href="./css/bootstrap.min.css">
- <!-- Custom CSS -->
- <style>
- </style>
- </head>
- <body class="bg-light">
- <nav class="navbar navbar-expand-lg navbar-dark bg-primary bg-gradient" id="topNavBar">
- <div class="container">
- <a class="navbar-brand" href="https://sourcecodester.com">
- Sourcecodester
- </a>
- </div>
- </nav>
- <div class="container py-3" id="page-container">
- <hr>
- <div id="printables">
- <div class="to_print" id="first_element">
- <hr>
- <table class="table table-bordered table-striped" id="dummy-tbl">
- <thead>
- <tr class="bg-primary bg-gradient text-white">
- </tr>
- </thead>
- <tbody>
- <tr data-id="1">
- <td class="px-2 py-1 text-center align-middle">
- </td>
- </tr>
- <tr data-id="2">
- <td class="px-2 py-1 text-center align-middle">
- </td>
- </tr>
- <tr data-id="3">
- <td class="px-2 py-1 text-center align-middle">
- </td>
- </tr>
- <tr data-id="4">
- <td class="px-2 py-1 text-center align-middle">
- </td>
- </tr>
- <tr data-id="5">
- <td class="px-2 py-1 text-center align-middle">
- </td>
- </tr>
- </tbody>
- </table>
- </div>
- </div>
- </div>
- <!-- Confirmation Modal -->
- <div class="modal fade" id="confimartionModal" data-bs-backdrop="static" data-bs-keyboard="false" tabindex="-1" aria-labelledby="confimartionModalLabel" aria-hidden="true">
- <div class="modal-dialog modal-dialog-centered rounded-0">
- <div class="modal-content rounded-0">
- <div class="modal-header py-1">
- </div>
- <div class="modal-body rounded-0">
- </div>
- <div class="modal-footer py-1 rounded-0">
- </div>
- </div>
- </div>
- </div>
- <!-- End of Confirmation Modal -->
- </body>
- </html>
Creating JavaScript/jQuery Functions
The script below is a javascript file which contains all the jQuery functions for our application. This contains the dynamic modal function, delete function, and the empty table function.
Create a new javascript file and copy/paste the code below and save it as script.js. In my case, all of my JavaScript Files are compiled inside a JS folder which means code below is store to my js folder.
- // confirm dialog function
- window.confirm_dialog = function($confirmation_title = '', $confirmation_html = '', $callback = '', $callback_param = []) {
- // Confirmation Modal
- var confirmation_modal = $('#confimartionModal')
- // Checking if modal exist on the current page
- if (confirmation_modal.length <= 0) {
- alert("Confimation Modal/Dialog does not exist in this page");
- return false;
- }
- // Display Confrimation title
- confirmation_modal.find('#confimartionModalLabel').html($confirmation_title);
- // Display Confrimation Content
- confirmation_modal.find('.modal-body').html($confirmation_html);
- // Show Confirmation Modal
- confirmation_modal.modal('show')
- // Execute Modal Callback when Continue Button is clicked
- confirmation_modal.find('.confirm-btn').click(function() {
- if ($callback != '') {
- // Checking if callback function exists
- if (typeof window[$callback] != 'function') {
- alert('Confimartion Dialog\'s Callback Function is undefined.')
- } else {
- // Executing callback
- window[$callback]($callback_param);
- }
- } else {
- alert('Confirmation Confirmed but no callback function stated')
- }
- // Close Modal
- confirmation_modal.modal('hide')
- })
- return true;
- }
- window.sample_func = function() {
- alert('Confirmed!')
- }
- function delete_row(element) {
- action = new Promise(resolve => {
- element.hide('slow')
- resolve()
- })
- action.then(() => {
- element.remove();
- })
- }
- function empty_table() {
- $('#dummy-tbl tbody').html('<tr><th colspan="7" class="text-center">No Data Listed</th></tr>')
- }
- $(function() {
- $('.delete-data').click(function() {
- var tr = $(this).closest('tr')
- var name = tr.find('td:nth-child(1)').text()
- confirm_dialog('Delete Confirmation', '<p>Are you sure to remove <b>' + name + '</b> from list?</p>', 'delete_row', tr)
- })
- $('#empty-table').click(function() {
- confirm_dialog('Empty Table Confirmation', '<p>Are you sure to the table?</p>', 'empty_table')
- })
- })
There you go. You can now test the application we created on your end by browsing the index.html file in your browser. To see if the application works properly, each button functionality must open a confirmation dialog when clicked so you as the user can confirm to continue the action or not. Note, the data that has been deleted will be back after reloading the page since the application we created displays static data.
DEMO VIDEO
That's the end of this tutorial. I hope this Creating a Dynamic Confirmation Dialog using jQuery and Bootstrap Modal Tutorial will be helpful for your future web application projects. If you have encountered any errors, review your code or you can also download the working source code I created for this tutorial. The download button is located below this article.
Explore more on this website for more Tutorials and Free Source Codes.

