How to create your Own Web Browser Using C#
Submitted by joken on Monday, May 5, 2014 - 17:48.
In this tutorial I’m going to teach how to create your own Web Browser Using C#. This lesson will also involve the use of some very common tools such as Buttons and WebBrowser. To start building this application, let’s create a new project and call it as “WebBrowser” then design it that looks like as shown below.
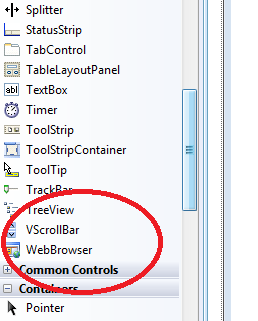
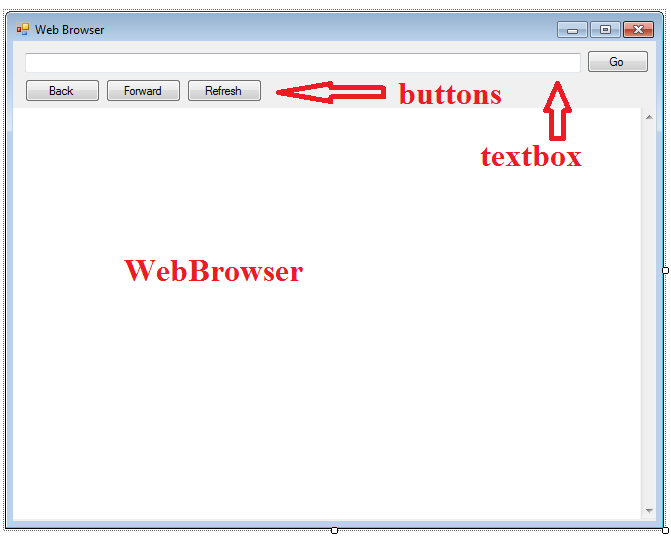 If you have find difficulties in finding the WebBrowser Tool you can follow it in the image provided below.
 Next, on the “Go” button, double click it and add the following code:
In the code above, we simply assign a web URL from the textbox to the browser. And it loads the document at the specified Uniform Resource Locator based on the user input.
Then we need also to add code for our “Back” button. This back button takes you to the last page stored in the web browser. And here’s the following code.
Next, for the “Forward” button, this button allows you to move to the next page in the navigation history, if one is available. And here’s the following code.
And also for the “Refresh” button, here’s the following code:
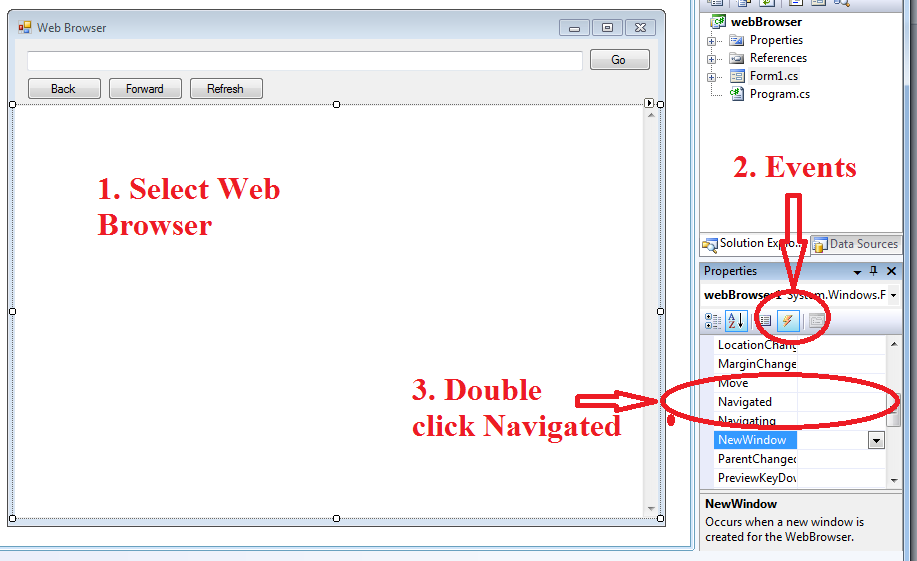
And if you try to run your application, it will give you some error when navigating the web browser. Because the URL in the textbox is not changing, especially when you click the “Back” or the “Forward” button. So to fix this bug, first select the “Web Browser” on the Form then on the “Properties”, choose “events” or the “lightning icon”. And double click “Navigated”. The process is also shown in the figure below.
 Then add this following code:
And you can now press “F5” to your application. And it will look like as shown below.
 And here’s all the code use for this application.
 If you have find difficulties in finding the WebBrowser Tool you can follow it in the image provided below.
 Next, on the “Go” button, double click it and add the following code:
- private void button1_Click(object sender, EventArgs e)
- {
- webBrowser1.Navigate(textBox1.Text );
- }
- private void btnBack_Click(object sender, EventArgs e)
- {
- webBrowser1.GoBack();
- }
- private void btnForward_Click(object sender, EventArgs e)
- {
- webBrowser1.GoForward();
- }
- private void btnRefresh_Click(object sender, EventArgs e)
- {
- webBrowser1.Refresh();
- }
 Then add this following code:
- private void webBrowser1_Navigated(object sender, WebBrowserNavigatedEventArgs e)
- {
- //gets the URL of the current document and assign to the Textbox
- textBox1.Text = webBrowser1.Url.ToString();
- }
 And here’s all the code use for this application.
- using System;
- using System.Collections.Generic;
- using System.ComponentModel;
- using System.Data;
- using System.Drawing;
- using System.Linq;
- using System.Text;
- using System.Windows.Forms;
- namespace webBrowser
- {
- public partial class Form1 : Form
- {
- public Form1()
- {
- InitializeComponent();
- }
- private void button1_Click(object sender, EventArgs e)
- {
- webBrowser1.Navigate(textBox1.Text );
- }
- private void btnBack_Click(object sender, EventArgs e)
- {
- webBrowser1.GoBack();
- }
- private void btnForward_Click(object sender, EventArgs e)
- {
- webBrowser1.GoForward();
- }
- private void btnRefresh_Click(object sender, EventArgs e)
- {
- webBrowser1.Refresh();
- }
- private void webBrowser1_Navigated(object sender, WebBrowserNavigatedEventArgs e)
- {
- //gets the URL of the current document and assign to the Textbox
- textBox1.Text = webBrowser1.Url.ToString();
- }
- }
- }

