Part II: Inserting and Reading of Data in MySQL Database Using Visual Basic.Net
Submitted by joken on Tuesday, September 3, 2013 - 14:22.
This tutorial is the continuation of Connecting MySQL Database using Visual Basic.NET. In this part we will focus on how to insert Data and to load data and display it in a form using DataGridview Object.
To start with, we will set up first our database table. To do this make sure that you have installed XAMPP this software is free and open source cross-platform web server solution stack package, consisting mainly of the Apache HTTP Server, MySQL database, and interpreters for scripts written in the PHP and Pearl programming languages. If not installed you can download it to the web and install it into your computer. After you have successfully installed it on your computer just simply run the Apache Server and MySQL database using the XAMPP Control Panel Application.
Next step open any browser available in your local computer. For example “google chrome” and on the address bar just type http://localhost/phpmyadmin/ and press enter. After this on the List of the Database then Select “test” Database as default the test database don’t have any table(s) available inside it. And on the “menus” Select the SQL tab and paste this code:
 Now it’s time to proceed to our main goal of this tutorial, to do this let’s open the first Part and the title of this is “Connecting MySQL Database using Visual Basic.Net” and the project name of this is “VBMYSQL”. After this step Go to Solution Explorer->right click the Project name->Click Add->Select Windows Form and automatically new form will open and the default name of this is “Form2”.
 Hence we have designed our User Interface let’s proceed to add functionality one of our button specifically the “Create User”, to do this just Double Click “Create User” button after this you be redirected to the code view. And add again we’re going to do something we have done in our first tutorial that we put an Imports MySql.Data.MySqlClient above Public class so that we can have access to our MySQL Objects. Then we need also to copy and paste our declaration of our object the MySqlConnection Dim con As New MySqlConnection and together with this declaration we need also to add declaration and the code now will like as shown below.
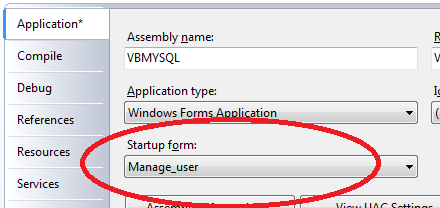
This time we will try to test if our code is working properly. But before this, we need to set first that when the program runs it run first the “Manage User” Form. To do this, Go to Solution Explorer->right click and select Properties. And on the properties choose the “Application Tab” and under the “Startup form” choose the “manage_user” like as shown below.
Hence we have designed our User Interface let’s proceed to add functionality one of our button specifically the “Create User”, to do this just Double Click “Create User” button after this you be redirected to the code view. And add again we’re going to do something we have done in our first tutorial that we put an Imports MySql.Data.MySqlClient above Public class so that we can have access to our MySQL Objects. Then we need also to copy and paste our declaration of our object the MySqlConnection Dim con As New MySqlConnection and together with this declaration we need also to add declaration and the code now will like as shown below.
This time we will try to test if our code is working properly. But before this, we need to set first that when the program runs it run first the “Manage User” Form. To do this, Go to Solution Explorer->right click and select Properties. And on the properties choose the “Application Tab” and under the “Startup form” choose the “manage_user” like as shown below.
 Then just press f5 to run your application. And you test it by writing something in the textbox provided and after just simply click “Create User” button.
 After this you can view the result in phpmyadmin if you really successfully saved your user inputted.
 So we are designing and adding of code to our “Create User” we only need is to display all the user saved in the database to our datagridview. To do this, double click “Read user” and Add this code.
After this add another sub procedure like this.
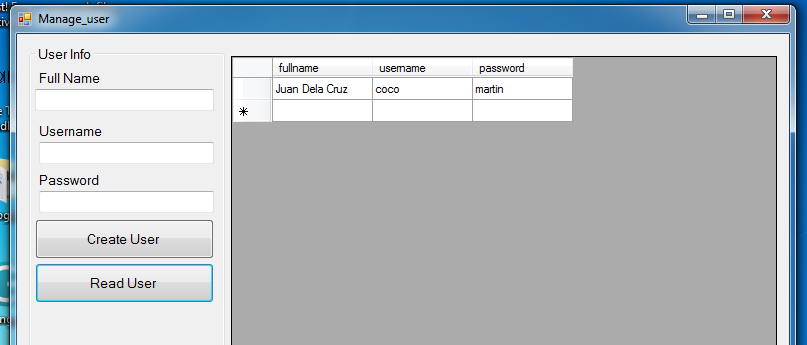
And finally try to run your application and the final output will be look like as shown below.
So we are designing and adding of code to our “Create User” we only need is to display all the user saved in the database to our datagridview. To do this, double click “Read user” and Add this code.
After this add another sub procedure like this.
And finally try to run your application and the final output will be look like as shown below.
 these are all the source code in this tutorial.
So that is for now folks. My Part III of my Tutorial will be focusing on completing the User CRUD or the CREATE, READ, UPDATE AND DELETE.
these are all the source code in this tutorial.
So that is for now folks. My Part III of my Tutorial will be focusing on completing the User CRUD or the CREATE, READ, UPDATE AND DELETE.
So this code will create a table named “users” and it has a field such as user_id, fullname, username and password. Now the users table will look like as shown below.
Now it’s time to proceed to our main goal of this tutorial, to do this let’s open the first Part and the title of this is “Connecting MySQL Database using Visual Basic.Net” and the project name of this is “VBMYSQL”. After this step Go to Solution Explorer->right click the Project name->Click Add->Select Windows Form and automatically new form will open and the default name of this is “Form2”.
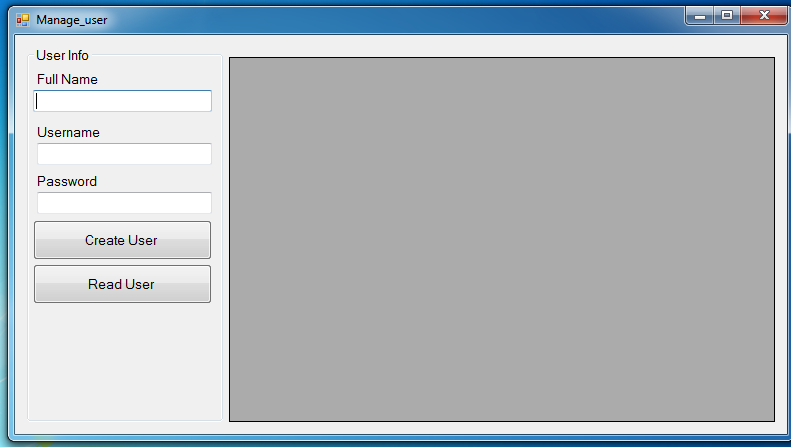
Designing the User Interface
In the User Interface just add two Buttons, three Textbox, three Labels, one Groupbox and one Datagridview.Object Property Settings Form2 Name manage_user Text Manage User Button1 Name btncreate Text Create User Button2 Name btnRead Text Read User Textbox1 Name txtfullname Textbox2 Name txtusername Textbox3 Name txtpassword Label1 Text Full Name Label2 Text Username Label3 Text Password GroupBox1 Text User Info DataGridView1 Name dtguserAnd the design looks like as shown below.
Hence we have designed our User Interface let’s proceed to add functionality one of our button specifically the “Create User”, to do this just Double Click “Create User” button after this you be redirected to the code view. And add again we’re going to do something we have done in our first tutorial that we put an Imports MySql.Data.MySqlClient above Public class so that we can have access to our MySQL Objects. Then we need also to copy and paste our declaration of our object the MySqlConnection Dim con As New MySqlConnection and together with this declaration we need also to add declaration and the code now will like as shown below.
- Imports MySql.Data.MySqlClient
- Public Class Manage_user
- Dim con As New MySqlConnection
- Dim result As Integer
- 'MySqlCommand It represents a SQL statement to execute against a MySQL Database
- Dim cmd As New MySqlCommand
- Next will add code to our btncreate button and here’s the code.
- Private Sub btncreate_Click(ByVal sender As System.Object, ByVal e As System.EventArgs) Handles btncreate.Click
- 'this line of is simply we copy this one from our form
- con.ConnectionString = ("server=localhost;user id=root;password=;database=test")
- Try
- 'we open Connection
- con.Open()
- With cmd
- .Connection = con
- .CommandText = "INSERT INTO `test`.`users` (`user_id`, `fullname`, `username`, `password`) " & _
- "VALUES (NULL, '" & txtfullname.Text & "', '" & txtusername.Text & "', '" & txtpassword.Text & "');"
- 'in this line it Executes a transact-SQL statements against the connection and returns the number of rows affected
- result = cmd.ExecuteNonQuery
- 'if the result is equal to zero it means that no rows is inserted or somethings wrong during the execution
- If result = 0 Then
- Else
- End If
- End With
- Catch ex As Exception
- End Try
- End Sub
Then just press f5 to run your application. And you test it by writing something in the textbox provided and after just simply click “Create User” button.
After this you can view the result in phpmyadmin if you really successfully saved your user inputted.
So we are designing and adding of code to our “Create User” we only need is to display all the user saved in the database to our datagridview. To do this, double click “Read user” and Add this code.
- Private Sub btnload_Click(ByVal sender As System.Object, ByVal e As System.EventArgs) Handles btnload.Click
- 'again we do this because we do not yet declare this as global, but we do it for now beacause in later tutorial
- 'we will do the moduling and more on refactoring of codes
- con.ConnectionString = ("server=localhost;user id=root;password=;database=test")
- Try
- con.Open()
- With cmd
- .Connection = con
- 'in this query it does simply selecting or getting all the user found in the database.
- .CommandText = "Select * from users"
- End With
- Catch ex As Exception
- End Try
- da.Dispose()
- filltable(dtguser)
- End Sub
- ' this our sub procedure that well always used
- 'this beacause it always catch all the result query
- 'and it will display to any kind of visual basic containers like datagridview,listbox,listview, etc...
- Public Sub filltable(ByVal dtgrd As Object)
- 'declare a variable as new datatable
- Dim publictable As New DataTable
- Try
- 'Gets or sets an SQL statement or stored procedure used to select records in the database.
- da.SelectCommand = cmd
- da.Fill(publictable)
- dtgrd.DataSource = publictable
- dtgrd.Columns(0).Visible = False
- da.Dispose()
- Catch ex As Exception
- End Try
- End Sub
these are all the source code in this tutorial.
- Imports MySql.Data.MySqlClient
- Public Class Manage_user
- Dim con As New MySqlConnection
- Dim result As Integer
- 'MySqlCommand It represents a SQL statement to execute against a MySQL Database
- Dim cmd As New MySqlCommand
- 'Represents a set of data commands and a database connection that
- 'are used to fill a dataset and update a MySQL database. This class cannot be inherited.
- Dim da As New MySqlDataAdapter
- Private Sub btncreate_Click(ByVal sender As System.Object, ByVal e As System.EventArgs) Handles btncreate.Click
- 'this line of is simply we copy this one from our form
- con.ConnectionString = ("server=localhost;user id=root;password=;database=test")
- Try
- 'we open Connection
- con.Open()
- With cmd
- .Connection = con
- .CommandText = "INSERT INTO `test`.`users` (`user_id`, `fullname`, `username`, `password`) " & _
- "VALUES (NULL, '" & txtfullname.Text & "', '" & txtusername.Text & "', '" & txtpassword.Text & "');"
- 'in this line it Executes a transact-SQL statements against the connection and returns the number of rows affected
- result = cmd.ExecuteNonQuery
- 'if the result is equal to zero it means that no rows is inserted or somethings wrong during the execution
- If result = 0 Then
- Else
- End If
- End With
- Catch ex As Exception
- End Try
- End Sub
- Private Sub btnload_Click(ByVal sender As System.Object, ByVal e As System.EventArgs) Handles btnload.Click
- 'again we do this because we do not yet declare this as global, but we do it for now beacause in later tutorial
- 'we will do the moduling and more on refactoring of codes
- con.ConnectionString = ("server=localhost;user id=root;password=;database=test")
- Try
- con.Open()
- With cmd
- .Connection = con
- 'in this query it does simply selecting or getting all the user found in the database.
- .CommandText = "Select * from users"
- End With
- Catch ex As Exception
- End Try
- da.Dispose()
- filltable(dtguser)
- End Sub
- ' this our sub procedure that well always used
- 'this beacause it always catch all the result query
- 'and it will display to any kind of visual basic containers like datagridview,listbox,listview, etc...
- Public Sub filltable(ByVal dtgrd As Object)
- 'declare a variable as new datatable
- Dim publictable As New DataTable
- Try
- 'Gets or sets an SQL statement or stored procedure used to select records in the database.
- da.SelectCommand = cmd
- da.Fill(publictable)
- dtgrd.DataSource = publictable
- dtgrd.Columns(0).Visible = False
- da.Dispose()
- Catch ex As Exception
- End Try
- End Sub
- End Class
Comments
dtguser or datagridview
change the name of your datagridview to dtguser or whatever name you like.
listbox cannot view data
how to solve problem with listbox after run the program n save date ...when i try to read the system.data.datarowview appear