Creating a Pop-up Notification using PHP, AJAX, and Bootstrap
This tutorial will show you how to create a simple pop-up notification using AJAX/JQuery. In this tutorial, I've set up the notification to appear at the bottom but you can change its position depending on your preference. Also, I've used bootstrap to slightly improve the visuals. We will use Ajax to sent the data of our form upon submission to process with the back-end scripts without leaving or the page.
Note: Scripts and CSS used in this tutorial are hosted.Creating our Database
The first and most important step in to create our database.
- Open PHPMyAdmin.
- Click databases, create a database and name it as "notif".
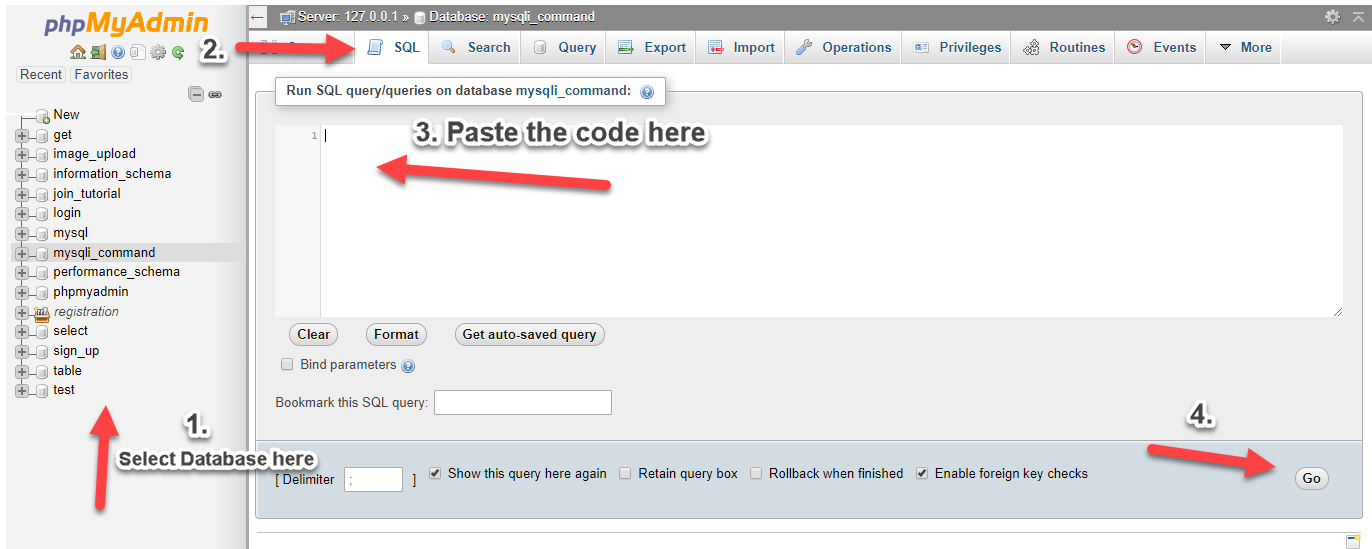
- After creating a database, click the SQL and paste the below code. See image below for detailed instruction.
- CREATE TABLE `user` (
- `userid` INT(11) NOT NULL AUTO_INCREMENT,
- `firstname` VARCHAR(10) NOT NULL,
- `lastname` VARCHAR(10) NOT NULL,
- `seen_status` INT(1) NOT NULL,
- PRIMARY KEY(`userid`)
- ) ENGINE=InnoDB DEFAULT CHARSET=latin1;

Creating our Connection
Next step is to create a database connection and save it as "conn.php". This file will serve as our bridge between our form and our database. To create the file, open your HTML code editor and paste the code below.
- <?php
- //MySQLi Procedural
- if (!$conn) {
- }
- ?>
Creating our Main Page
Next step is to create our main page that contains our add form and the place that the notification will appear. We name this as "index.php".
- <?php
- include('conn.php');
- ?>
- <!DOCTYPE html>
- <html lang = "en">
- <head>
- <script src="https://ajax.googleapis.com/ajax/libs/jquery/3.1.0/jquery.min.js"></script>
- <link rel="stylesheet" href="https://maxcdn.bootstrapcdn.com/bootstrap/3.3.6/css/bootstrap.min.css" />
- <script src="https://maxcdn.bootstrapcdn.com/bootstrap/3.3.7/js/bootstrap.min.js"></script>
- <title>PHP Pop-up Notification using AJAX Bootstrap</title>
- <style>
- #alert_popover
- {
- display:block;
- position:absolute;
- bottom:50px;
- left:50px;
- }
- .wrapper {
- display: table-cell;
- vertical-align: bottom;
- height: auto;
- width:200px;
- }
- .alert_default
- {
- color: #333333;
- background-color: #f2f2f2;
- border-color: #cccccc;
- }
- </style>
- </head>
- <body>
- <div style="height:30px;"></div>
- <div class="row">
- <div class="col-md-3">
- </div>
- <div class="col-md-6 well">
- <div class="row">
- <div class="col-lg-12">
- <center><h2 class="text-primary">PHP Pop-up Notification using AJAX Bootstrap</h2></center>
- <hr>
- <div>
- <form class="form-inline" method="POST" id="add_form">
- <div class="form-group">
- <label>Firstname:</label>
- <input type="text" name="firstname" id="firstname" class="form-control">
- </div>
- <div class="form-group">
- <label>Lastname:</label>
- <input type="text" name="lastname" id="lastname" class="form-control">
- </div>
- <div class="form-group">
- <input type="submit" name="addnew" id="addnew" class="btn btn-primary" value="Add">
- </div>
- </form>
- </div>
- </div>
- </div><br>
- </div>
- <div class = "col-md-3">
- </div>
- </div>
- <div id="alert_popover">
- <div class="wrapper">
- <div class="content">
- </div>
- </div>
- </div>
- </body>
- <script>
- $(document).ready(function(){
- setInterval(function(){
- load_last_notification();
- }, 5000);
- function load_last_notification(){
- $.ajax({
- url:"fetch.php",
- method:"POST",
- success:function(data){
- $('.content').html(data);
- }
- })
- }
- $('#add_form').on('submit', function(event){
- event.preventDefault();
- if($('#firstname').val() != '' && $('#lastname').val() != ''){
- var form_data = $(this).serialize();
- $.ajax({
- url:"addnew.php",
- method:"POST",
- data:form_data,
- success:function(data){
- $('#add_form')[0].reset();
- }
- })
- }
- else{
- alert("Please input data first");
- }
- });
- });
- </script>
- </html>
Creating our Fetch Code
Next, we create our fetch code that will fetch data from our database and return to us via notification. We name this as "fetch.php".
- <?php
- //fetch.php;
- include('conn.php');
- $output = '';
- $output .= '
- <div class="alert alert_default">
- <a href="#" class="close" data-dismiss="alert" aria-label="close">×</a>
- <p>Firstname: <strong>'.$row['firstname'].'</strong><br>
- Lastname: <strong>'.$row['lastname'].'</strong></p>
- </div>
- ';
- }
- echo $output;
- ?>
Creating our Add Code
Lastly, we create our add code that will add data into our database. We name this as "addnew.php".
- <?php
- //insert.php
- {
- include('conn.php');
- }
- ?>
That's you have now a simple web application that has a notification feature. The notification feature can be useful for any web application especially to backup some features that need to notify users when updated such as messaging features.
I hope this tutorial will help you with what you are looking for and also for your future PHP project development.
Happy Coding :)Add new comment
- 10158 views

