User Registration Form Using PHP
Submitted by alpha_luna on Saturday, April 23, 2016 - 11:52.

If you are looking for the User Registration Form Using PHP then you are at the right place. In this article, we are going to learn on how to create simple user registration form using PHP Language.
In the example below, you have to input the data of the user in each field to save it into a database. Then, the alert message will show "Successfully Registered" at the top of the form field.
Registration Form Field - HTML
This HTML source code for the user registration.
Data Table
This is the data where the user information shows in this table.
PHP Query
This query is used to save the user data into the database.
And, this is the style.
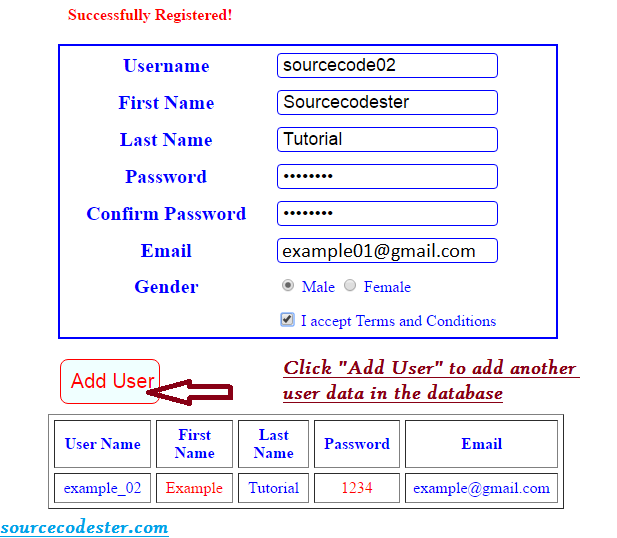 After saving the user data in the database.
 Share us your thoughts and comments below. Thank you so much for dropping by and reading this tutorial post. For more updates, don’t hesitate and feel free to visit this website more often and please share this with your friends or email me at [email protected]. Practice Coding. Thank you very much.
- <form method="post" action="">
- <table border="0" width="500" align="center" class="demo-table">
- <tr>
- </tr>
- <tr>
- </tr>
- <tr>
- </tr>
- <tr>
- </tr>
- <tr>
- </tr>
- <tr>
- </tr>
- <tr>
- <input type="radio" name="gender" value="Female" <?php if(isset($_POST['gender']) && $_POST['gender']=="Female") { ?>checked<?php } ?>> Female
- </td>
- </tr>
- <tr>
- </tr>
- </table>
- <div>
- <input type="submit" name="submit" value="Add User" class="btnRegister">
- </div>
- </form>
- <table border="1" class="table_data" cellspacing="5" cellpadding="5">
- <tr style="color:blue;">
- <th>
- User Name
- </th>
- <th>
- First Name
- </th>
- <th>
- Last Name
- </th>
- <th>
- Password
- </th>
- <th>
- Email
- </th>
- </tr>
- <?php
- $id=$row['id'];
- ?>
- <tr style="text-align:center; color:blue;">
- <td style="width:200px;">
- <?php echo $row['user_name']; ?>
- </td>
- <td style="width:200px; color:red;">
- <?php echo $row['first_name']; ?>
- </td>
- <td style="width:200px; color:blue;">
- <?php echo $row['last_name']; ?>
- </td>
- <td style="width:200px; color:red;">
- <?php echo $row['password']; ?>
- </td>
- <td style="width:200px; color:blue;">
- <?php echo $row['email']; ?>
- </td>
- </tr>
- <?php } ?>
- </table>
- require_once("db.php");
- $db_handle = new DB();
- $query = "INSERT INTO registered_users (user_name, first_name, last_name, password, email, gender) VALUES
- ('" . $_POST["userName"] . "', '" . $_POST["firstName"] . "', '" . $_POST["lastName"] . "', '" . ($_POST["password"]) . "', '" . $_POST["userEmail"] . "', '" . $_POST["gender"] . "')";
- $result = $db_handle->insertQuery($query);
- $alert_message = "Successfully Registered!";
- } else {
- $alert_message = "Incorrect Details. Try Again!";
- }
- <style type="text/css">
- body {
- width:600px;
- margin:auto;
- }
- .alert_message {
- color: #FF0000;
- font-weight: bold;
- margin-left: 30px;
- margin-top: 10px;
- }
- .demo-table {
- border:blue 2px solid;
- color:blue;
- margin:20px;
- }
- .demo-table td {
- padding:5px;
- }
- .table_container {
- font-size:18px;
- border:blue 1px solid;
- border-radius: 4px;
- text-indent:5px;
- }
- .btnRegister {
- background-color:azure;
- border:blue 1px solid;
- color: blue;
- width:100px;
- padding:10px;
- font-size:20px;
- margin-left:22px;
- border-radius:8px;
- cursor: pointer;
- }
- .btnRegister:hover {
- background:azure;
- border:red 1px solid;
- color: red;
- width:100px;
- padding:10px;
- font-size:20px;
- margin-left:22px;
- border-radius:8px;
- cursor: pointer;
- }
- .text_label {
- font-size:20px;
- font-weight:bold;
- color:blue;
- font-family:Helvitica;
- text-align:center;
- }
- .table_data {
- width: 86%;
- margin:10px;
- }
- </style>
Output:
This is to add user data.
After saving the user data in the database.
Share us your thoughts and comments below. Thank you so much for dropping by and reading this tutorial post. For more updates, don’t hesitate and feel free to visit this website more often and please share this with your friends or email me at [email protected]. Practice Coding. Thank you very much.Add new comment
- 497 views