AngularJS Save Selected Options (ng-option) using PHP/MySQLi
Submitted by nurhodelta_17 on Thursday, January 11, 2018 - 17:25.
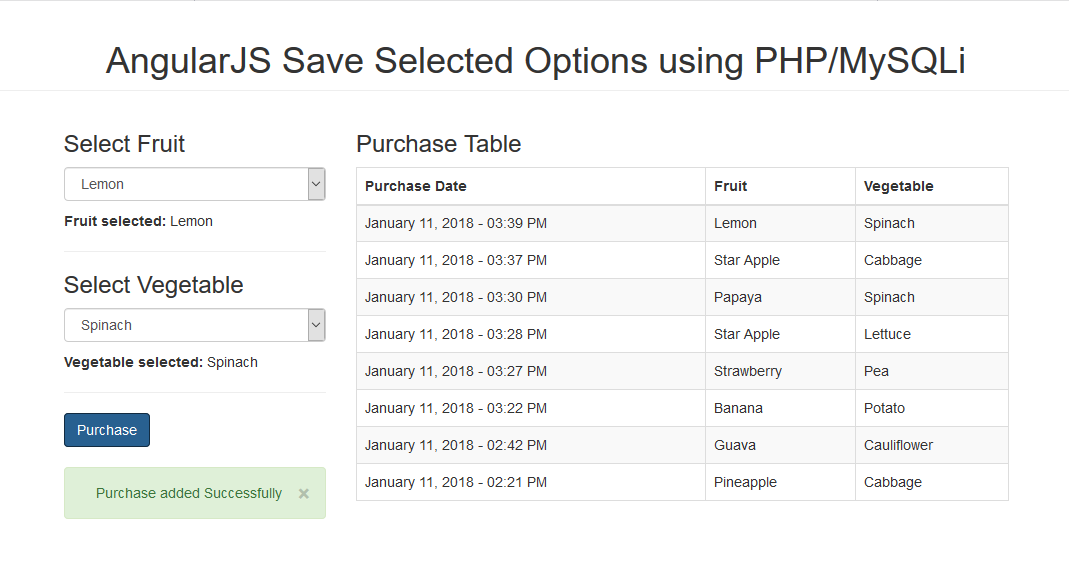
Getting Started
I've used CDN for Bootstrap and Angular JS in this tutorial so you need internet connection for them to work. In the previous tutorial, we have tackled on how to Dynamically Add Options. In this tutorial, we are going to save this selected option.Creating our Database
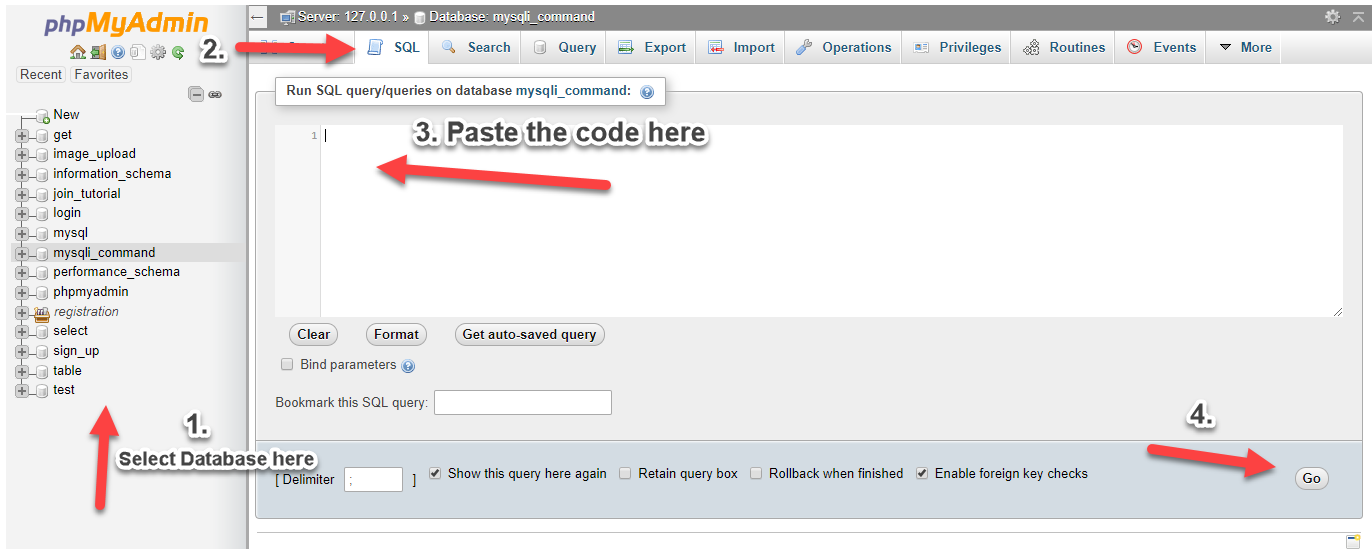
First, we're gonna create our database and insert data for our options. 1. Open phpMyAdmin. 2. Click databases, create a database and name it as angular. 3. After creating a database, click the SQL and paste the below codes. See image below for detailed instruction.- (1, 'Apple'),
- (2, 'Orange'),
- (3, 'Strawberry'),
- (4, 'Pineapple'),
- (5, 'Star Apple'),
- (7, 'Banana'),
- (8, 'Lemon'),
- (9, 'Mango'),
- (10, 'Guava'),
- (11, 'Watermelon'),
- (12, 'Avocado'),
- (13, 'Apricot'),
- (14, 'Blackberry'),
- (15, 'Coconut'),
- (16, 'Melon'),
- (17, 'Papaya'),
- (18, 'Peach'),
- (19, 'Pomelo'),
- (20, 'Grapes');
- (1, 9, 4, '2018-01-11 14:21:16'),
- (2, 8, 10, '2018-01-11 14:42:57'),
- (3, 2, 7, '2018-01-11 15:22:34'),
- (4, 6, 3, '2018-01-11 15:27:44'),
- (5, 10, 5, '2018-01-11 15:28:29'),
- (6, 4, 17, '2018-01-11 15:30:57'),
- (7, 9, 5, '2018-01-11 15:37:16'),
- (8, 4, 8, '2018-01-11 15:39:10');
index.html
This is our index which contains our form and table.- <!DOCTYPE html>
- <html lang="en" ng-app="app">
- <head>
- <meta charset="utf-8">
- <link href="https://maxcdn.bootstrapcdn.com/bootstrap/3.3.7/css/bootstrap.min.css" rel="stylesheet">
- </head>
- <body ng-controller="myController">
- <div class="container">
- <div class="row">
- <div class="col-md-3 col-md-offset-1" ng-init="fetch()">
- <form name="purchaseForm" novalidate>
- <select ng-model="selectedFruit" ng-options="f.fruitname for f in fruits" class="form-control" placeholder="Select Fruit" required>
- </select>
- <hr>
- <select ng-model="selectedVegetable" ng-options="v.vegetablename for v in vegetables" class="form-control" required>
- </select>
- <hr>
- </form>
- <div class="alert alert-success text-center" ng-show="success" style="margin-top: 20px">
- {{ message }}
- </div>
- <div class="alert alert-danger text-center" ng-show="error" style="margin-top: 20px">
- {{ message }}
- </div>
- </div>
- <div class="col-md-7" ng-init="fetchpurchase()">
- <table class="table table-bordered table-striped">
- <thead>
- <tr>
- <tr>
- </thead>
- <tbody>
- <tr ng-repeat="purchase in purchases">
- </tr>
- </tbody>
- </table>
- </div>
- </div>
- </div>
- </body>
- </html>
angular.js
This contains our angular.js scripts.- var app = angular.module('app', []);
- app.controller('myController', function($scope, $http){
- $scope.success = false;
- $scope.error = false;
- $scope.fetch = function(){
- $http.get('fetch.php').success(function(data){
- $scope.fruits = data.fruits;
- $scope.vegetables = data.vegetables;
- });
- }
- $scope.fetchpurchase = function(){
- $http.get('fetchpurchase.php').success(function(data){
- $scope.purchases = data;
- });
- }
- $scope.purchase = function(){
- $scope.newPurchase = [];
- //inserting our selected object
- $scope.newPurchase.push($scope.selectedVegetable);
- $scope.newPurchase.push($scope.selectedFruit);
- $http.post('purchase.php', $scope.newPurchase)
- .success(function(data){
- if(data.error){
- $scope.error = true;
- $scope.success = false;
- $scope.message = data.message;
- }
- else{
- $scope.success = true;
- $scope.error = false;
- $scope.message = data.message;
- $scope.fetchpurchase();
- }
- console.log(data);
- });
- }
- $scope.clearMsg = function(){
- $scope.success = false;
- $scope.error = false;
- }
- });
- //convert mysql data to angular date format
- app.filter('dateToISO', function() {
- return function(input) {
- input = new Date(input).toISOString();
- return input;
- };
- });
fetch.php
Our PHP api that fetches data from our MySQL database.- <?php
- $conn = new mysqli('localhost', 'root', '', 'angular');
- //for fruits
- $sql = "SELECT * FROM fruits";
- $fquery=$conn->query($sql);
- while($frow=$fquery->fetch_array()){
- $output['fruits'][] = $frow;
- }
- //for vegetables
- $sql = "SELECT * FROM vegetables";
- $vquery = $conn->query($sql);
- while($vrow=$vquery->fetch_array()){
- $output['vegetables'][] = $vrow;
- }
- ?>
purchase.php
This is our PHP api in adding the selected options into our MySQL Database.- <?php
- $conn = new mysqli('localhost', 'root', '', 'angular');
- //getting vegetableid
- //note that the first object our $scope.newPurchase is vegetable
- $vegetable = $data[0];
- $vid = $vegetable->vegetableid;
- //getting fruitid
- $fruit = $data[1];
- $fid = $fruit->fruitid;
- $sql = "INSERT INTO purchases (vegetableid, fruitid, date_purchase) VALUES ('$vid', '$fid', NOW())";
- $query = $conn->query($sql);
- if($query){
- $out['message'] = "Purchase added Successfully";
- }
- else{
- $out['error'] = true;
- $out['messge'] = "Cannot add Purchase";
- }
- ?>
fetchpurchase.php
Lastly, this is our another PHP api that fetches data from our MySQL Database.- <?php
- $conn = new mysqli('localhost', 'root', '', 'angular');
- $sql = "SELECT * FROM purchases LEFT JOIN vegetables ON vegetables.vegetableid=purchases.vegetableid LEFT JOIN fruits ON fruits.fruitid=purchases.fruitid ORDER BY date_purchase DESC";
- $query = $conn->query($sql);
- while($row = $query->fetch_array()){
- $output[] = $row;
- }
- ?>
Add new comment
- 209 views