Creating a Simple Java Applet
Submitted by pavel7_7_7 on Saturday, February 8, 2014 - 18:51.
In this article you will find information about the creating of simple applet using java.awt.
Java applet is a small application created using Java language. The user starts applet from the web-browser and it's executed by the Java Virtual machine. The parameters of the applet are received from the web page and they can be used during the applet execution.
We will create an Applet, that takes some information from the menu of choice lists and inputs the result of our choice.
The first step to create an applet is to derive our class from Applet class. That's why we need to make the next import:
The
And now, lets create a button with text:
I decided to set a special background for my choice lists. I created my own color and set it as a background color:
Now, I want to set the size of my list. In the applet should be 3 choice list, so the width of one is
The same action are performed on other two choices:
Now,I add this elements to the applet's frame:
The next step is to initialize the button
And now we can set size and add action listener to the send button:
The class, that implements ActionListener interface must override
method. Eclipse can generate this method automatically. Now, we will finish the implementation of applet's GUI and then will override the necessary method.
The last step is to add info text area to the applet:
As an example of overriding another applet method, I change the background of frame in method is called when an applet needs to be painted. It's just an example:
The GUI is finished. Now we can override the actionPerformed method. Because of the fact, we have only one item, that can produce events, we have no need to check, what is the source of the event. That's why the overridden method looks very simple:
Here, we get the selected items from all choice lists and set a String to the textArea according to the collected data.
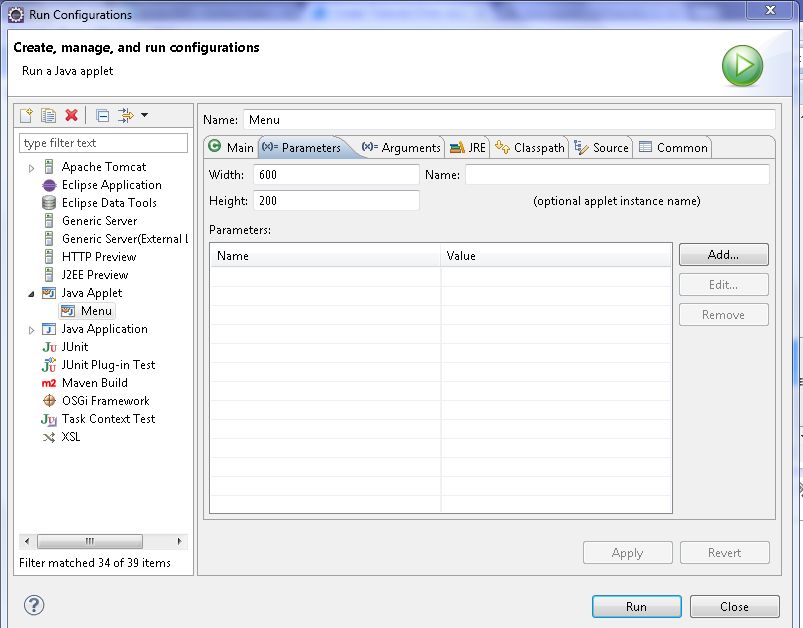
To run an applet with the specified parameters, you need to chose from menu "Run" "Run configurations" options and input all the parameters in the parameters page:
 You can specify an list of parameters such as "font","sontSize","background" ... on the web page, that will be used by your applet.
You can try this code by yourself. As an exercise, add new item to the choice list and any other buttons to get info separately from all lists.
You can specify an list of parameters such as "font","sontSize","background" ... on the web page, that will be used by your applet.
You can try this code by yourself. As an exercise, add new item to the choice list and any other buttons to get info separately from all lists.
import java.applet.*;
Now we can declare the applet class:
public class Menu extends Applet
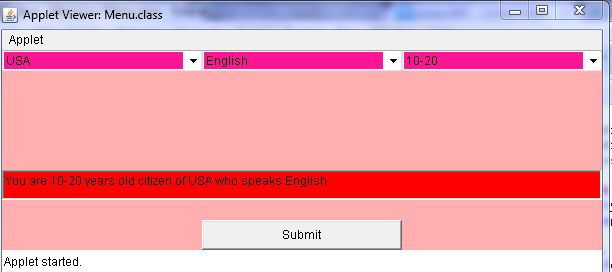
The Menu applet consists of three choice lists, a button and a text area to output the result of the choice:
The initialization of applet's components should be done in the
init() method.
The applet can take some parameters from the web page. The parameters can be uploaded into the program by using String getParameter(String paramName) method.
We will get two parameters from the web page - height and width of the applet:
The
parseInt(String) method is called because of the fact the getParameter(String) method returns String representation of the parameter. We will use the height and width variables to set the size of the applet:
- resize(width,height);
resize(int,int) method resizes the applet's frame.
Now we need to initialize the applet's components. This is the initialization of choice components:
The text area must be initially empty:
- send.setLabel("Submit");
The next step is to add elements to the choice list. For this,
add method can be used:
- country.add("Moldova, Republic of");
- country.add("Russian Federation");
- country.add("Ukraine");
- country.add("Romania");
- country.add("Belarus");
- country.add("USA");
- country.add("UK");
width/3.This can be done by calling setBounds(int x,int y, int width,int height):
- country.setBounds(0, 0,width/3,50);
- language.setBackground(darkPink);
- language.add("Russian");
- language.add("Moldavian");
- language.add("Ukrainian");
- language.add("English");
- language.add("Belarusian");
- language.setBounds(width/3, 0,width/3,50);
- age.setBackground(darkPink);
- age.add("0-10");
- age.add("10-20");
- age.add("20-30");
- age.add("30-40");
- age.add("40-50");
- age.add("50 and more");
- age.setBounds(2*width/3, 0,width/3,50);
- add(age);
- add(country);
- add(language);
- send</send>. The purpose of this button is to show the selection from the choice lists. That's why we need to add action listener to this button.
- The applet class will be the listener, so we need to change the class definition to:
- <java>
- public class Menu extends Applet implements ActionListener
- send.setBounds(width/3, 170, width/3, 30);
- send.addActionListener(this);
- add(send);
- info.setBounds(0, 120, width, 30);
- add(info);
paint. It's really not so useful, because the - // TODO Auto-generated method stub
- info.setText("You are "+age.getSelectedItem()+" years old citizen of "+country.getSelectedItem()+" who speaks "+language.getSelectedItem());
- }
You can specify an list of parameters such as "font","sontSize","background" ... on the web page, that will be used by your applet.
You can try this code by yourself. As an exercise, add new item to the choice list and any other buttons to get info separately from all lists.