Sending an HTML with Attachment Mail using PHP Tutorial

In this tutorial, you will learn how to Send an HTML with an Attachment Mail using PHP Language without using PHP Libraries/Plugins. The main purpose of the tutorial is to provide a reference for IT/CS Students or new programmers to enhance their programming knowledge using the PHP Mail Function. Here, snippets are provided and a sample source code file that demonstrates the objective of this tutorial is free to download.
What is PHP mail() (Mail Function)?
PHP comes with mail() (mail function) which is used for sending mails from PHP Script. This function helps the developer provide their end-users with a way to notify them. It is commonly used for sending notifications, newsletters, and verification codes.
How to Send an HTML and Attachment Mail using PHP mail()?
Using the Content-Type: multipart/mixed mail header, we can create a PHP Script that will allow sending mail that contains HTML content with an Attachment.
Below are the sample snippets of a simple web application that demonstrate this tutorial's objective.
Setup Sendmail in XAMPP
For those who are using XAMPP, here are the following steps for the mailing setup using Google's SMTP.
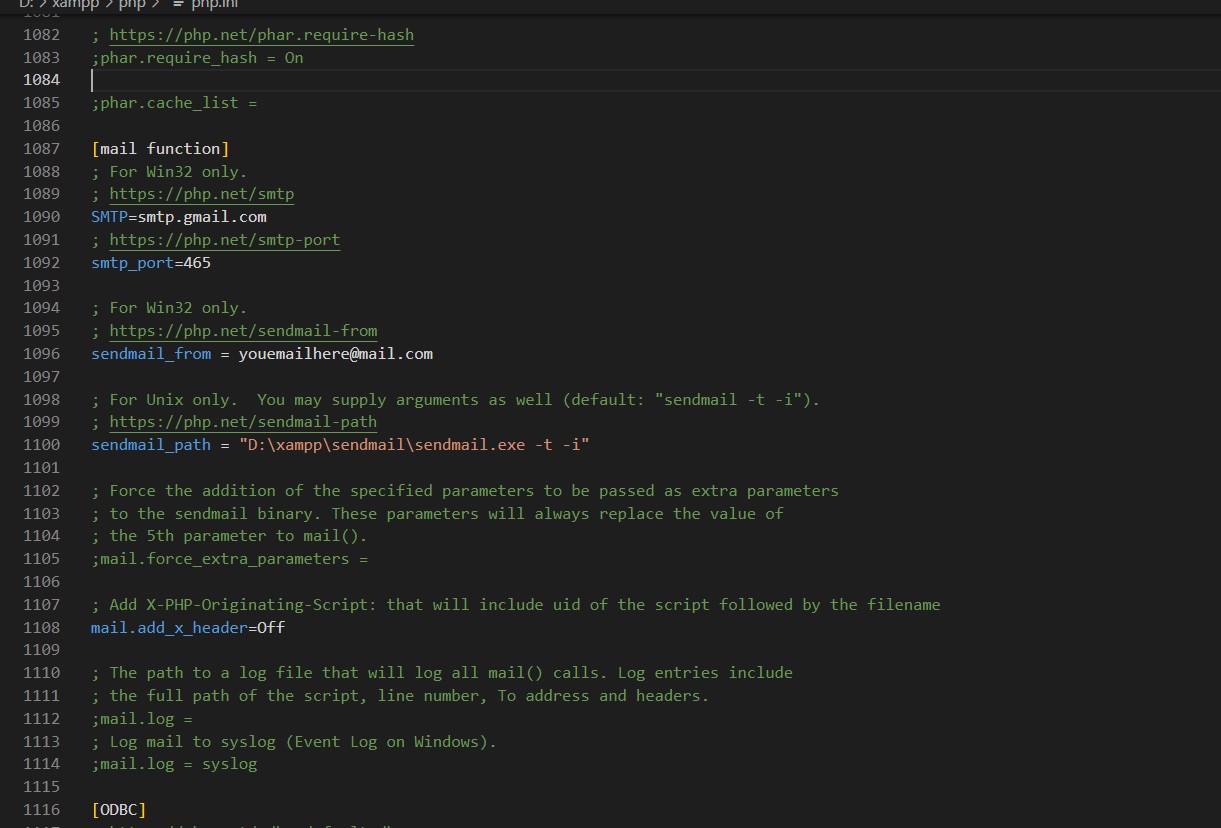
- Open your XAMPP's php.ini file and follow the image below. File Path (xampp/php)
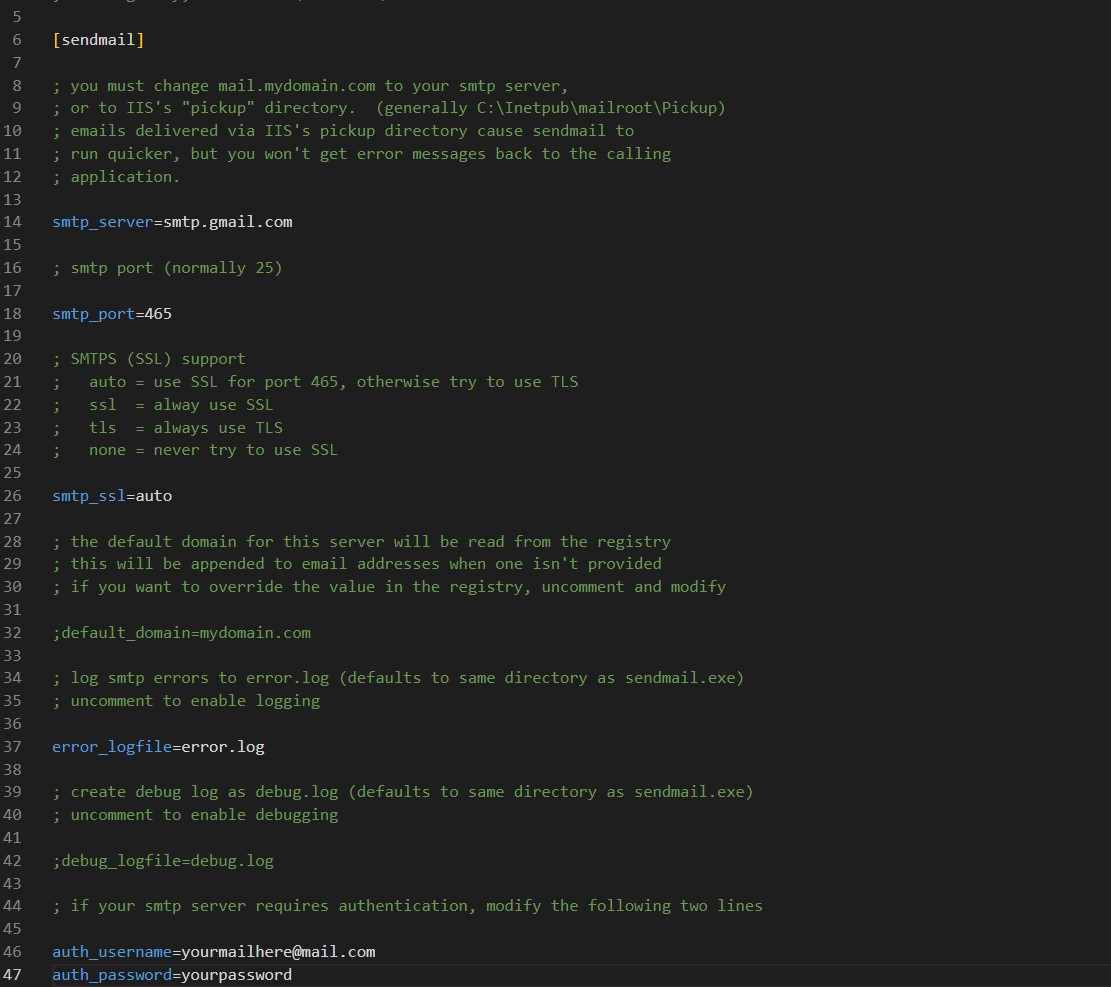
- Open your XAMPP's sendmail.ini file and follow the image below. File Path (xampp/sendmail)
Interface
Here is the sample snippet for the sample web application's page interface. The page contains a simple mailing form that contains the relevant input fields for sending mail. The snippet uses CDNs for loading the external libraries (Bootstrap, jQuery, and Summernote) which means an internet connection is a must while using the script to run it properly.
index.php
- <!DOCTYPE html>
- <html lang="en">
- <head>
- <meta charset="UTF-8">
- <meta http-equiv="X-UA-Compatible" content="IE=edge">
- <meta name="viewport" content="width=device-width, initial-scale=1.0">
- <link rel="stylesheet" href="https://cdnjs.cloudflare.com/ajax/libs/font-awesome/6.2.0/css/all.min.css" integrity="sha512-xh6O/CkQoPOWDdYTDqeRdPCVd1SpvCA9XXcUnZS2FmJNp1coAFzvtCN9BmamE+4aHK8yyUHUSCcJHgXloTyT2A==" crossorigin="anonymous" referrerpolicy="no-referrer" />
- <link rel="stylesheet" href="https://cdnjs.cloudflare.com/ajax/libs/summernote/0.8.20/summernote-lite.min.css" integrity="sha512-ZbehZMIlGA8CTIOtdE+M81uj3mrcgyrh6ZFeG33A4FHECakGrOsTPlPQ8ijjLkxgImrdmSVUHn1j+ApjodYZow==" crossorigin="anonymous" referrerpolicy="no-referrer" />
- <link rel="stylesheet" href="https://cdn.jsdelivr.net/npm/[email protected]/dist/css/bootstrap.min.css" integrity="sha384-Zenh87qX5JnK2Jl0vWa8Ck2rdkQ2Bzep5IDxbcnCeuOxjzrPF/et3URy9Bv1WTRi" crossorigin="anonymous">
- <script src="https://cdn.jsdelivr.net/npm/[email protected]/dist/js/bootstrap.bundle.min.js" integrity="sha384-OERcA2EqjJCMA+/3y+gxIOqMEjwtxJY7qPCqsdltbNJuaOe923+mo//f6V8Qbsw3" crossorigin="anonymous"></script>
- <style>
- html, body{
- min-height:100%;
- width:100%;
- }
- .table-holder{
- width:100%;
- max-height:65vh;
- overflow:auto;
- }
- .table>thead{
- position:sticky;
- top:0;
- background:white;
- z-index: 1;
- }
- </style>
- </head>
- <body>
- <nav class="navbar navbar-expand-lg navbar-dark bg-primary bg-gradient">
- <div class="container">
- <div>
- </div>
- </div>
- </nav>
- <div class="container-fluid px-5 my-3" id="SampleApp">
- <div class="col-lg-6 col-md-10 col-sm-12 mx-auto">
- <div class="d-flex w-100 justify-content-center">
- <hr class="w-50">
- </div>
- </div>
- <div class="col-lg-8 col-md-10 col-sm-12 mx-auto">
- <div class="card rounded-0 shadow" id="dataSheetCard">
- <div class="card-header rounded-0">
- <div class="d-flex w-100 justify-content-between">
- <div class="col-auto flex-shrink-1 flex-grow-1">
- </div>
- </div>
- </div>
- <div class="card-body rounded-0">
- <div class="container-fluid">
- <form action="sendMail.php" method="POST" enctype="multipart/form-data" id="mail-form">
- <div class="mb-3">
- <input type="email" name="recepient" id="recepient" class="form-control form-control-sm rounded-0" required>
- </div>
- <div class="mb-3">
- <input type="text" name="subject" id="subject" class="form-control form-control-sm rounded-0" required>
- </div>
- <div class="mb-3">
- </div>
- <div class="mb-3">
- <input class="form-control form-control-sm rounded-0" id="attach_file" name="attach_file" type="file" required>
- </div>
- <div class="mb-3">
- <div class="d-grid">
- </div>
- </div>
- </form>
- </div>
- </div>
- </div>
- </div>
- </div>
- </body>
- </html>
JavaScript
The following snippet is a JavaScript file for initiating the HTML Text Editor into the mail message text area. The script requires the Summernote Library. You can also use your preferred input text editor.
app.php
- $(document).ready(function(){
- $('#message').summernote({
- height:"20vh",
- toolbar: [
- ['style', ['bold', 'italic', 'underline', 'clear']],
- ['font', ['strikethrough', 'superscript', 'subscript']],
- ['fontsize', ['fontsize']],
- ['color', ['color']],
- ['para', ['ul', 'ol', 'paragraph']],
- ['height', ['height']]
- ]
- })
- })
PHP Script
Here is the PHP snippet that contains the PHP Script for sending an email using the data filled from the mail form. The script requires a POST Method request in order to process the mail using the required Post Data.
sendMail.php
- <?php
- if($_SERVER['REQUEST_METHOD'] == "POST"){
- $subject = $_POST['subject'];
- $recepient = $_POST['recepient'];
- $message = "<html><body>".$_POST['message']."</body></html>";
- $file_dir = "uploads/";
- }
- $file_name = ($_FILES['attach_file']['name']);
- /**
- * Check filename if has duplicate
- */
- $i = 0;
- while(true){
- $tmp_name = $path['filename'].($i > 0 ? "_$i" : "").".".$path['extension'];
- $i++;
- }else{
- $file_name = $tmp_name;
- break;
- }
- }
- if($upload){
- $file_path = $file_dir.$file_name;
- /**
- * Sending Mail
- */
- //File to attach on mail
- // a random hash will be necessary to send mixed content
- $eol = "\r\n";
- // Mail Main Header
- $headers .= "MIME-Version: 1.0" . $eol;
- $headers .= "Content-Type: multipart/alternative; boundary=\"" . $separator . "\"" . $eol;
- $headers .= "Content-Transfer-Encoding: 7bit" . $eol;
- // HTML Message
- $body = "--" . $separator . $eol;
- $body .= "MIME-Version: 1.0" . $eol;
- $body .= "Content-Type: text/html;charset=UTF-8" . $eol;
- $body .= "Content-Transfer-Encoding: 8bit" . $eol;
- $body .= $eol. ($message) . $eol . $eol;
- // Attachment
- $body .= "--" . $separator . $eol;
- $body .= "Content-Type: application/octet-stream; name=\"" . ($file_name) . "\"" . $eol;
- $body .= "Content-Transfer-Encoding: base64" . $eol;
- $body .= "Content-Disposition: attachment" . $eol;
- $body .= $attached_content . $eol;
- $body .= "--" . $separator . "--";
- try{
- // Sending mail
- echo "<script>alert('Mail has been sent successfully!'); location.replace('./');</script>";
- } catch (Exceptions $err){
- }
- }else{
- echo "<script>alert('Uploading File Failed!'); location.replace(document.referrer);</script>";
- }
- }else{
- echo "<script>alert('File Attachment is required!'); location.replace(document.referrer);</script>";
- }
- }
- ?>
Snapshots
Here are the snapshots of the result of the snippet that I provided above.
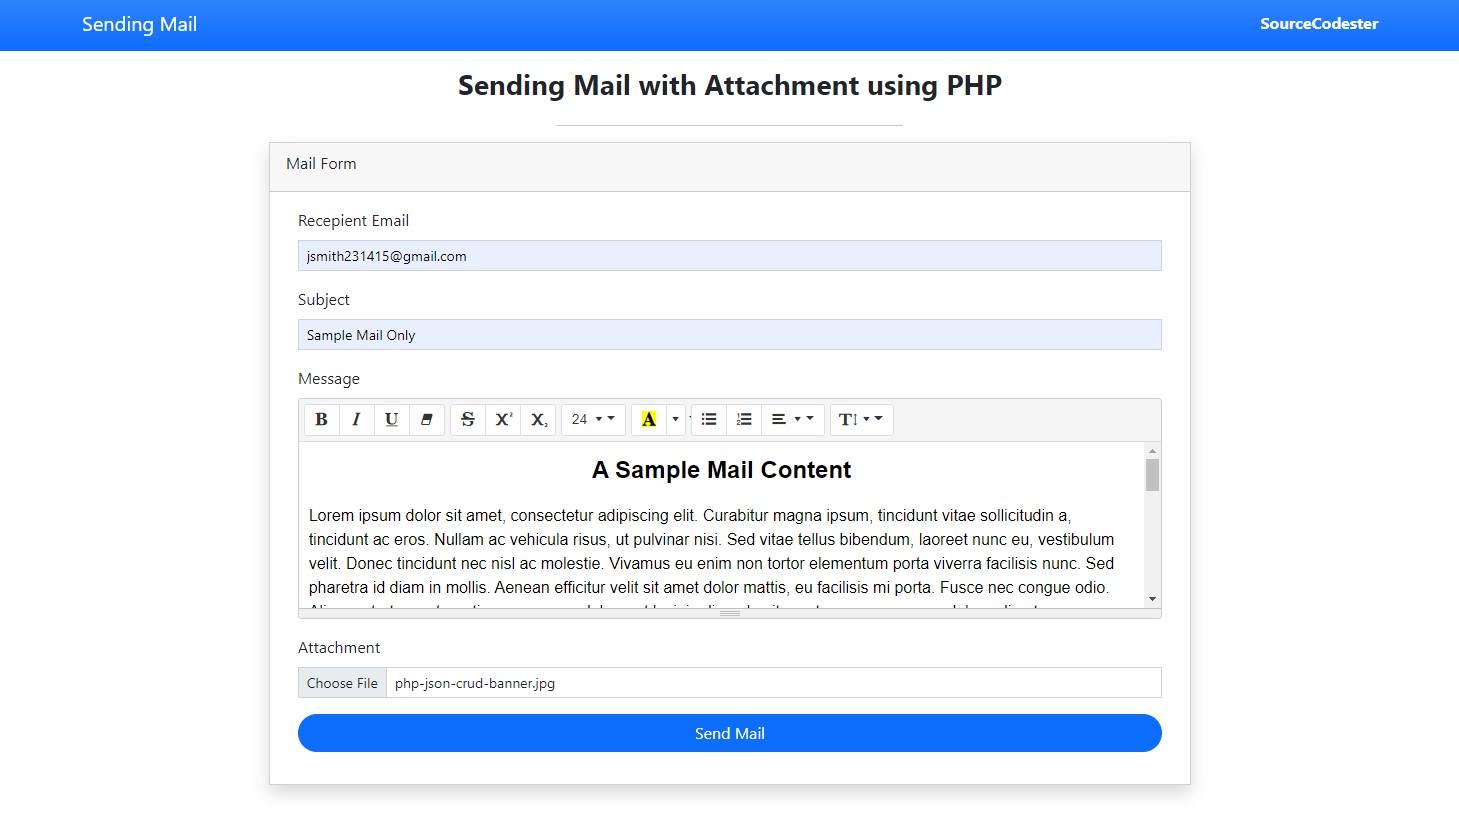
Mailing Form Page
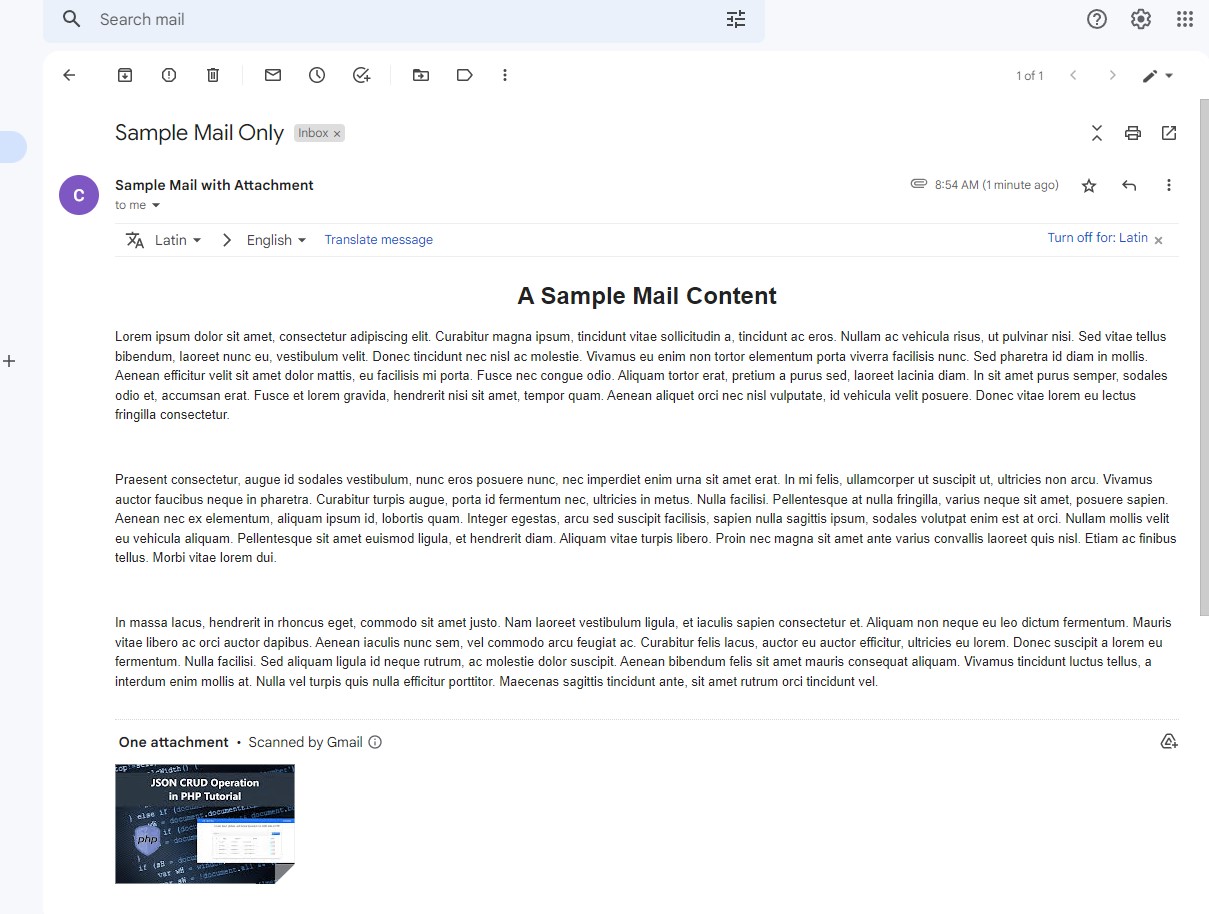
Sample Sent Mail Output
That's it. I have also provided the complete source code zip file that I created for this tutorial. You can download it by clicking the Download Button below this article.
That's the end of this tutorial. I hope this Sending an HTML with Attachment Mail using PHP Tutorial helps you with what you are looking for and that you'll find this useful for your current and future PHP Projects.
Explore more on this website for more Tutorials and Free Source Codes.
Happy Coding:)
Add new comment
- 870 views