Configuring MySQL Database Connection using PHP OOP Approach Tutorial
Introduction
In this tutorial, we will tackle about Configuring MySQL Database using PHP Object-Oriented Programming (OOP) Approach. This topic can be helpful to those new to PHP Language especially the beginners to learn how to create a MySQL Database Connection using PHP OOP. This tutorial can be also helpful for learning to develop web applications using MVC (Model-View-Controller) whereas the Model and controllers are commonly structured or written using OOP.
What is OOP?
OOP stands for Object-Oriented Programming. It is a programming paradigm based on object concepts. It organizes software's design around data or objects.
PHP OOP is written using objects which are the instance of classes. Here's a sample PHP Script for writing an OOP code.
- <?php
- Class MyClass{
- private $variable;
- function set_var_value($value){
- $this->variable = $value;
- }
- function get_var_value(){
- return $this->variale;
- }
- }
- ?>
The objects can be accessed or called like the following snippets:
- <?php
- $my_class = new MyCLass();
- // Set Variable Value
- $my_class->set_var_value("Sample Value");
- // Getting value
- print($my_class->get_var_value());
- ?>
Now, I will show you a basic technique for configuring your site MySQL Database Connection using OOP Approach. The class we'll be creating will be named as "Database Class".
Features of the program that we will be creating
- Creating a Database If not existing yet.
- Database Connection
- Automatically creates a database table
- Inserting a sample data
- Fetching Data from the Database
Getting Started
To run the script on your local machine, kindly download and install virtual server software such as XAMPP and WAMP. Make sure to start the Apache and MySQL servers before proceeding to the coding part of this tutorial. To do that using XAMPP or WAMP, open the software's Control Panel and start the said servers.
Creating the Database Class
Here's the following script for creating the Database Class in PHP. The script contains all the code that is needed for connecting to the database.
- <?php
- Class Database{
- private $dbname;
- private $tblname;
- private $host;
- private $username;
- private $password;
- private $conn;
- function __construct(){
- // Database Name
- $this->dbname = 'dummy_db';
- // Table Name
- $this->tblname = 'members';
- // Host Name
- $this->host = 'localhost';
- // DB Username
- $this->username = 'root';
- // Database Name
- $this->password = '';
- $this->conn = new mysqli($this->host, $this->username, $this->password);
- // Creating the sample DB
- $db_sql = " CREATE DATABASE IF NOT EXISTS {$this->dbname}";
- $this->conn->query($db_sql);
- if(!$this->conn->error){
- $this->conn->close();
- // Open Databse Connection
- $this->conn = new mysqli($this->host, $this->username, $this->password, $this->dbname);
- if($this->conn->affected_rows >0){
- // Creating a sample table
- $tbl_sql = "CREATE TABLE IF NOT EXISTS `{$this->tblname}`
- ( `id` int(30) NOT NULL PRIMARY KEY AUTO_INCREMENT,
- `fullname` varchar(250) NOT NULL,
- `email` varchar(250) NOT NULL,
- `contact` varchar(250) NOT NULL,
- `address` text NOT NULL)";
- $this->conn->query($tbl_sql);
- if($this->conn->error){
- }else{
- // Inserting a sample data
- $data_sql = "INSERT IGNORE INTO `{$this->tblname}` (`id`, `fullname`, `email`, `contact`, `address`) VALUES
- (1, 'Mark Cooper', '[email protected]', '09123456789', 'Sample Address 101'),
- (2, 'Jane Doe', '[email protected]', '09123789456', 'Sample Address 102'),
- (3, 'Rebert Miller', '[email protected]', '09123564456', 'Sample Address 103')
- ";
- $this->conn->query($data_sql);
- if($this->conn->error){
- }
- }
- }
- }else{
- }
- }
- // Fetching Data From Database
- public function get_results($query= ""){
- // Returning Error if query String is Empty
- }else{
- $query = $this->conn->query($query);
- if($this->conn->error){
- }else{
- return $query;
- }
- }
- }
- // closing db connection
- function __destruct(){
- $this->conn->close();
- }
- }
- ?>
The snippets above contain commented lines to explain the purposes of the following lines.
Creating the Interface
The following script is the Main Page or the index page of our sample application. It contains an HTML and PHP script for displaying the elements and data on the page. I am using Bootstrap Framework v5 CDN on the script which means that an internet connection is a must upon browsing the sample application in order to load the page design scripts.
- <?php
- require_once "Database.php";
- $db = new Database();
- ?>
- <!DOCTYPE html>
- <html lang="en">
- <head>
- <meta charset="UTF-8">
- <meta http-equiv="X-UA-Compatible" content="IE=edge">
- <meta name="viewport" content="width=device-width, initial-scale=1.0">
- <link rel="stylesheet" href="https://cdn.jsdelivr.net/npm/[email protected]/dist/css/bootstrap.min.css" integrity="sha384-gH2yIJqKdNHPEq0n4Mqa/HGKIhSkIHeL5AyhkYV8i59U5AR6csBvApHHNl/vI1Bx" crossorigin="anonymous">
- </head>
- <body class="bg-primary bg-opacity-75">
- <div class="container-fluid my-5 py-4">
- <hr class="border-light">
- <div class="card rounded-0 mx-auto col-lg-8 col-md-10 col-sm-12 mt-3">
- <div class="card-header">
- </div>
- <div class="card-body">
- <div class="container-fluid">
- <table class="table table-striped table-bordered">
- <thead>
- <tr class="bg-primary text-light">
- </tr>
- </thead>
- <tbody>
- <?php
- $data = $db->get_results("SELECT * FROM `members` order by `id` asc");
- if($data->num_rows > 0):
- while($row = $data->fetch_assoc()):
- ?>
- <tr>
- </tr>
- <?php endwhile; ?>
- <?php endif; ?>
- </tbody>
- </table>
- </div>
- </div>
- </div>
- </div>
- </body>
- </html>
DEMO VIDEO
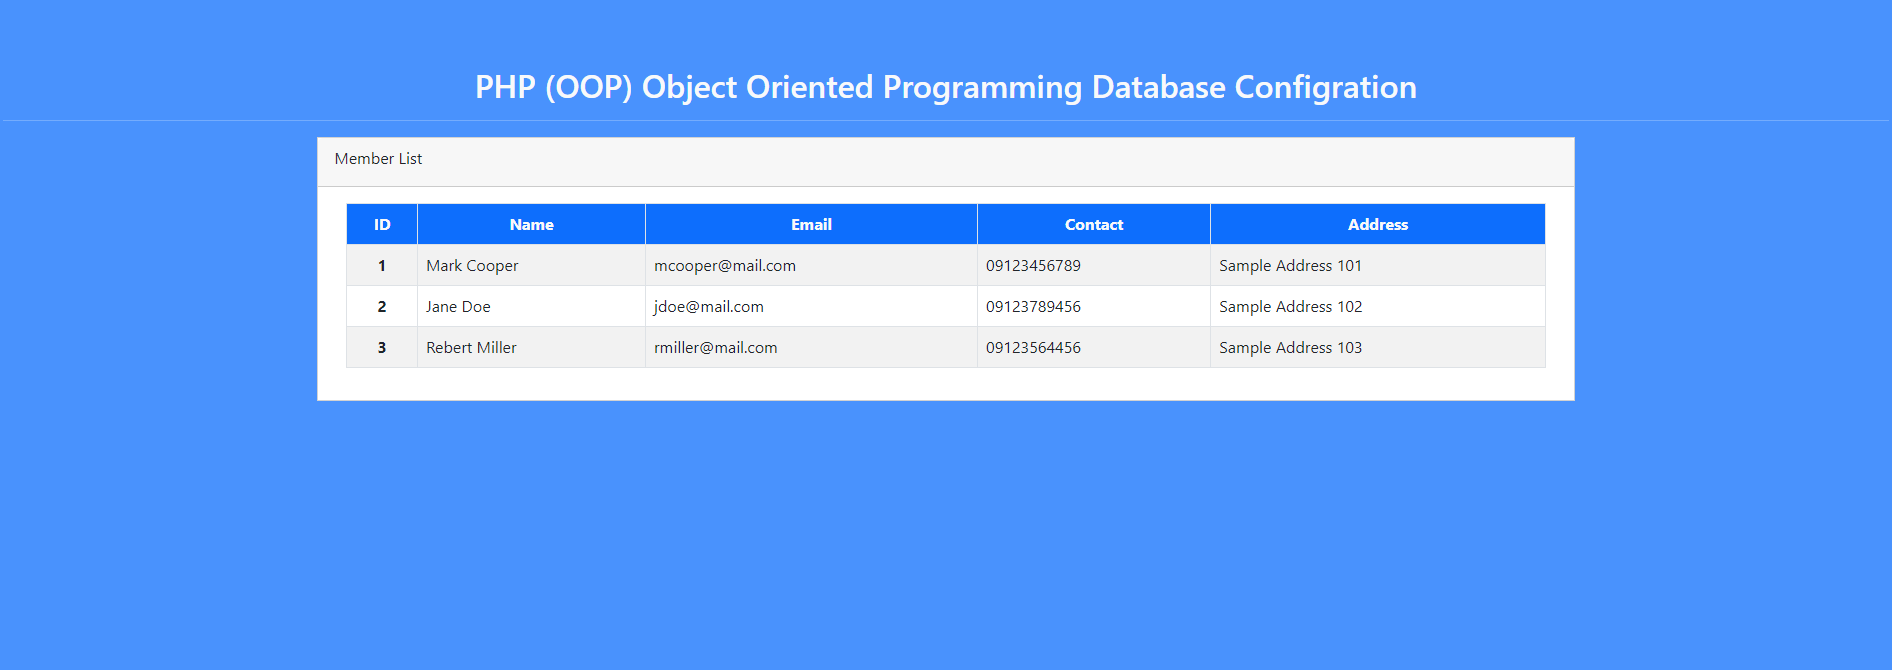
That's it! You can test the sample application on your end and check if it achieves our goal for this tutorial. To check if it works as it was planned, browse the application index page on your preferred browser. The database and data should be automatically added and the sample data will be shown in the table element of the page.
Result Snapshot

I also provided the working source code zip file that I created for this tutorial. You can download it by clicking the download button below this article. I hope this Configuring MYSQL Database Connection using PHP OOP Approach Tutorial will help you with what you are looking for and for your future projects.
Explore more on this website for more Tutorials and Free Source Codes.
Happy Coding :)
Comments
Add new comment
- Add new comment
- 2456 views

