How to Create Increment and Decrement Buttons with HTML, CSS, and JavaScript?

In this comprehensive tutorial, we will explore how to create Increment and Decrement Buttons using HTML, CSS, and JavaScript. This feature is widely used in web applications to enhance user interaction, especially for input fields requiring numeric values. By following this tutorial, you will gain valuable insights into implementing increment and decrement functionality effectively.
I will guide you step-by-step with practical examples and code snippets to help you achieve this feature. Whether you're building a shopping cart, a quantity selector, or any form requiring numeric inputs, this tutorial will provide a solid foundation. The techniques discussed here can also be a valuable addition to your toolkit for future projects, improving both functionality and user experience in your web applications.
Mastering this feature not only enhances your web development skills but also adds a polished and professional touch to your projects. Let’s dive in and learn how to implement these interactive buttons with ease!
Step 1:
To begin, we'll create the foundational HTML file that contains the necessary elements for our application. This file serves as the structure of our project, where we'll define the interface and key components for the increment and decrement functionality.
In this example, I save the following HTML script as index.html. Naming the file index.html is a common practice in web development, as it is typically recognized as the default entry point for most web applications. This ensures seamless accessibility when hosting the project on a web server.
- <!DOCTYPE html>
- <html lang="en">
- <head>
- <meta charset="UTF-8">
- <meta name="viewport" content="width=device-width, initial-scale=1.0">
- <link rel="stylesheet" href="style.css">
- </head>
- <body>
- <div id="main-wrapper">
- <div class="num-button-container">
- <input type="number" class="num-button-inp" value="1" min="0" max="100">
- </div>
- </div>
- </body>
- </html>
Step 2:
Next, we'll create the CSS file to define the styling and design for our application. This file will enhance the visual appeal and user experience by applying styles to key elements such as the increment and decrement buttons and the number input field.
In this tutorial, I save the following CSS code in a file named styles.css.
- @import url('https://fonts.googleapis.com/css2?family=Ubuntu+Mono:ital,wght@0,400;0,700;1,400;1,700&display=swap');
- * {
- font-family: "Ubuntu Mono", monospace;
- font-weight: 400;
- font-style: normal;
- }
- html,
- body {
- margin: unset;
- padding: unset;
- width: 100%;
- max-width: 100%;
- height: 100%;
- max-height: 100%;
- overflow: auto;
- background-image: linear-gradient(120deg, #a1c4fd 0%, #c2e9fb 100%);
- align-items: center;
- justify-content: center;
- }
- body {
- display: flex;
- flex-direction: column;
- }
- #main-wrapper{
- min-width: 300px;
- max-width: 500px;
- padding: 15px 20px;
- }
- #page-title{
- color:#fff;
- text-shadow: 0px 3px 5px #3a3a3a;
- margin-bottom: 75px;
- text-align: center;
- }
- .num-button-container{
- display: flex;
- width: 100%;
- justify-content: center;
- align-items: center;
- }
- /* Chrome, Safari, Edge, Opera */
- input.num-button-inp::-webkit-outer-spin-button,
- input.num-button-inp::-webkit-inner-spin-button {
- -webkit-appearance: none;
- margin: 0;
- }
- /* Firefox */
- input.num-button-inp[type=number] {
- -moz-appearance: textfield;
- }
- .num-button-inp{
- text-align: center;
- font-size: 15px;
- font-weight: 800;
- user-select: none;
- pointer-events: none;
- cursor: not-allowed;
- padding: 3px 5px;
- border-radius: 0px;
- border: unset;
- height: 34px;
- width: 50px;
- }
- /* Input Buttons */
- .num-button-dec,
- .num-button-inc
- {
- display: flex;
- align-items: center;
- justify-content: center;
- padding: 3px 3px;
- font-size: 16px;
- font-weight: 600;
- text-align: center;
- height: 30px;
- width: 50px;
- color: #fff;
- background: #169dff;
- border: 2px solid #1393ef;
- cursor: pointer;
- transition: all .15s ease-in-out;
- user-select: none;
- }
- .num-button-dec:hover,
- .num-button-inc:hover,
- .num-button-dec:active,
- .num-button-inc:active
- {
- background: #0a72bc;
- border: 2px solid #0a6aae;
- font-size: 18px;
- }
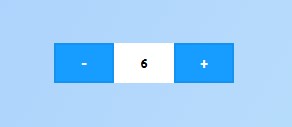
The provided HTML and CSS will result like the following image.
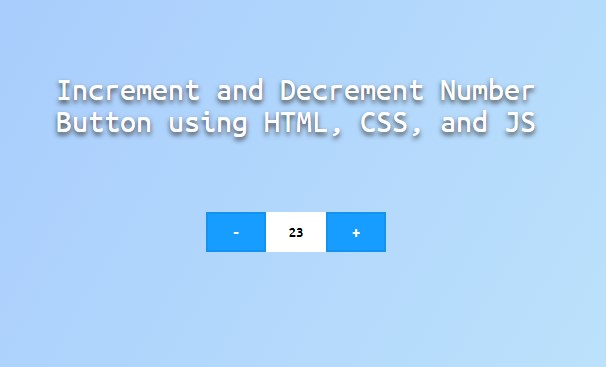
Here's the increment and decrement buttons and input field.
Step 3:
Lastly, let's create the JavaScript file for our application. This file will contain the logic that powers the functionality of the increment and decrement buttons, ensuring they operate seamlessly and update the value displayed in the input field dynamically.
I save the following JavaScript code in a file named script.js. The script.js file serves as the brain of our application, enabling users to interact with the buttons effortlessly. It captures user actions, processes the increment or decrement logic, and updates the number input field in real time. With this step, we bring the application to life, combining functionality with the structure and design established in the earlier steps.
- $(document).ready(function(){
- $(".num-button-container").each(function(){
- // Input
- var inp = $(this).find("input[type='number']");
- // Max and Min value
- var max = inp.attr("max") || null;
- var min = inp.attr("min") || null;
- var inc_btn = $(this).find(".num-button-inc");
- var dec_btn = $(this).find(".num-button-dec");
- var current_value = inp.val()
- // Increment Number
- inc_btn.on("click", function(e){
- e.preventDefault();
- if(max != null && (parseInt(current_value) + 1) > max)
- return;
- current_value++;
- inp.val(current_value)
- })
- // Decrement Number
- dec_btn.on("click", function(e){
- e.preventDefault();
- if(min != null && (parseInt(current_value) - 1) < min)
- return;
- current_value--;
- inp.val(current_value)
- })
- })
- })
There you have it! You can now test the functionality on your end by browsing the index.html on your preferred browser. I hope this Increment and Decrement Buttons with HTML, CSS, and JavaScript Tutorial will help you and will be useful for your future projects.
Explore more on this website for more Tutorials, Free Source Codes, and acticles covering various programming languages.