Creating a Simple Form with Multiple Step and validation using JavaScript and jQuery
In this tutorial, I will show how to Create a Simple Form with Multiple Step and validation using JavaScript and jQuery. The goal of this tutorial is to give you an idea to create the said form by Manipulating the HTML Elements. Here, we will be creating a simple form that contains a single form but has multiple steps. Each step has some required fields and some have field type validation. In the form, the user cannot proceed to the next step if there's an invalid field in the visible step.
Let's get started
I will be providing the source code scripts below with a little explnation about each files do. The source code that I will provide contains an HTML scripts that uses Bootstrap v5 Framework for the user interface design. Also, I have mentioned above that this tutorial source code uses jQuery (js library). To download the Bootstrap and jQuery click the following link below.
- Bootstrap: https://getbootstrap.com
- jQuery: https://jquery.com
Complie the download libraries into your source code directory. My libraries are compiled as follows:
  my_sc_root_path
      - css
        - bootstrap.min.css
      - js
        - bootstrap.min.js
        - jquery-3.6-0.min.js
Now, let's do the coding
Creating the Interface
First, we will be creating the interface of the application that we will creating. In your preferred text editor such as Notepadd== or Sublime Text, open a new file and save the file as index.html.
The file contains the HTML Scripts for the page, forms, text inputs, and buttons. In the form, you will see multiple fieldsets and we will be hide the fields later to achieve our goal for this tutorial.
- <!DOCTYPE html>
- <html lang="en">
- <head>
- <meta charset="UTF-8">
- <meta http-equiv="X-UA-Compatible" content="IE=edge">
- <meta name="viewport" content="width=device-width, initial-scale=1.0">
- <link rel="stylesheet" href="./css/bootstrap.min.css">
- <link rel="stylesheet" href="./css/styles.css">
- <style>
- </style>
- </head>
- <body class="bg-dark bg-gradient text-light">
- <main>
- <div class="col-lg-12">
- </div>
- <div class="container w-100">
- <div class="col-lg-12">
- <div class="row justify-content-center">
- <div class="col-lg-7 col-md-10 col-sm-12 col-sm 12">
- <div class="card rounded-0 shadow text-dark">
- <div class="card-body">
- <form action="" id="multiple-form" class="">
- <fieldset>
- <div class="form-group mb-3">
- <input type="text" name="firstname" id="firstname" class="form-control" required>
- </div>
- <div class="form-group mb-3">
- <input type="text" name="middlename" id="middlename" class="form-control">
- </div>
- <div class="form-group mb-3">
- <input type="text" name="lastname" id="lastname" class="form-control" required>
- </div>
- </fieldset>
- <fieldset>
- <div class="form-group mb-3">
- <input type="email" name="email" id="email" class="form-control" required>
- </div>
- <div class="form-group mb-3">
- <input type="text" name="contact" id="contact" class="form-control" required>
- </div>
- <div class="form-group mb-3">
- </div>
- </fieldset>
- <fieldset>
- <div class="form-group mb-3">
- </div>
- </fieldset>
- <hr>
- <div class="mt-2 d-flex w-100 justify-content-between">
- <div class="col-auto">
- </div>
- <div class="col-auto">
- </div>
- </div>
- </form>
- <fieldset id="data-holder">
- <div id="data">
- <dl>
- </dl>
- </div>
- <hr>
- <div class="text-center">
- </div>
- </fieldset>
- </div>
- </div>
- </div>
- </div>
- </div>
- </div>
- </main>
- </body>
- </html>
Creating the Custom CSS
Below file is a CSS (Cascading Style Sheet) file. It contains the custom CSS Script for the design of our Interface. Save the file as styles.css. In my case, this file is being stored inside the css directory.
- html,
- body {
- min-height: 100%;
- width: 100%;
- }
- main {
- display: block;
- min-height: 100%;
- overflow: auto;
- padding: 1em 0;
- }
- main * {
- font-family: Comic Sans MS;
- }
- #project-title {
- text-shadow: 3px 3px 7px #000;
- padding: 2.5em 1em !important;
- }
- #multiple-form fieldset {
- width: 100%;
- transition: all .2s ease-in-out
- }
- #multiple-form fieldset:not(fieldset:nth-child(1)) {
- display: none;
- }
- #prev-step,
- #submit,
- #data-holder {
- display: none;
- }
Creating the JS File
Lastly, this file is the final code file. It is a JS (JavaScript) file that contains the important script for this tutorial. It contains the function and scripts that manipulates our HTML Elements to acheive our Goal. This contains the buttons and form submission event listeners. Save this file as script.js and my case, this file is stored inside the js directory.
- // Initiate the script below on page window is succesffuly loaded
- $(function() {
- // Varialbles
- var current = 0;
- var prev = $('#prev-set')
- var next = $('#next-set')
- var form = $('#multiple-form')
- var fs = $('form#multiple-form fieldset')
- var fsCount = fs.length
- // Button Manipulation when changing Steps
- function vissible_change() {
- if ($('form#multiple-form fieldset:visible').index() == 0) {
- prev.hide()
- $('#submit').hide()
- }
- if ($('form#multiple-form fieldset:visible').index() > 0 && $('form#multiple-form fieldset:visible').index() <= (fsCount - 1)) {
- prev.show()
- next.show()
- $('#submit').hide()
- }
- if ($('form#multiple-form fieldset:visible').index() == (fsCount - 1)) {
- next.hide()
- $('#submit').show()
- }
- }
- // Next Step Click Event Listener
- next.click(function() {
- var currentField = fs[current]
- var is_valid = true;
- $('form#multiple-form fieldset:visible [required]').each(function() {
- if (!$(this).is(':valid')) {
- $(this).addClass('border-danger').focus()
- console.log($(this)[0].reportValidity())
- is_valid = false;
- return false;
- }
- })
- if (!is_valid)
- return false;
- if (current < (fsCount - 1)) {
- current++;
- if (!!fs[current]) {
- $(currentField).hide()
- $(fs[current]).show()
- vissible_change()
- $(fs[current]).find('input,textarea,select').first().focus()
- }
- }
- })
- // Previous Step Click Event Listener
- prev.click(function() {
- var currentField = fs[current]
- if (current > -1) {
- current--;
- if (!!fs[current]) {
- $(currentField).hide()
- $(fs[current]).show()
- vissible_change()
- }
- }
- })
- // DOM CSS Manipulation for Inputs that became valid from invalid
- $('form#multiple-form fieldset [required]').on('input', function() {
- $(this).removeClass('border-danger')
- })
- // Form Submit Event Listener
- form.submit(function(e) {
- e.preventDefault()
- $('#fullname_txt').text($('#lastname').val() + ', ' + $('#firstname').val() + ' ' + $('#middlename').val())
- $('#email_txt').text($('#email').val())
- $('#contactl_txt').text($('#contact').val())
- $('#address_txt').text($('#address').val())
- $('#other_txt').text($('#other').val())
- form.hide()
- $('#data-holder').show()
- })
- })
That's it! You can now test the source code on your end and see if it works as we planned.
Sample Result Snapshots
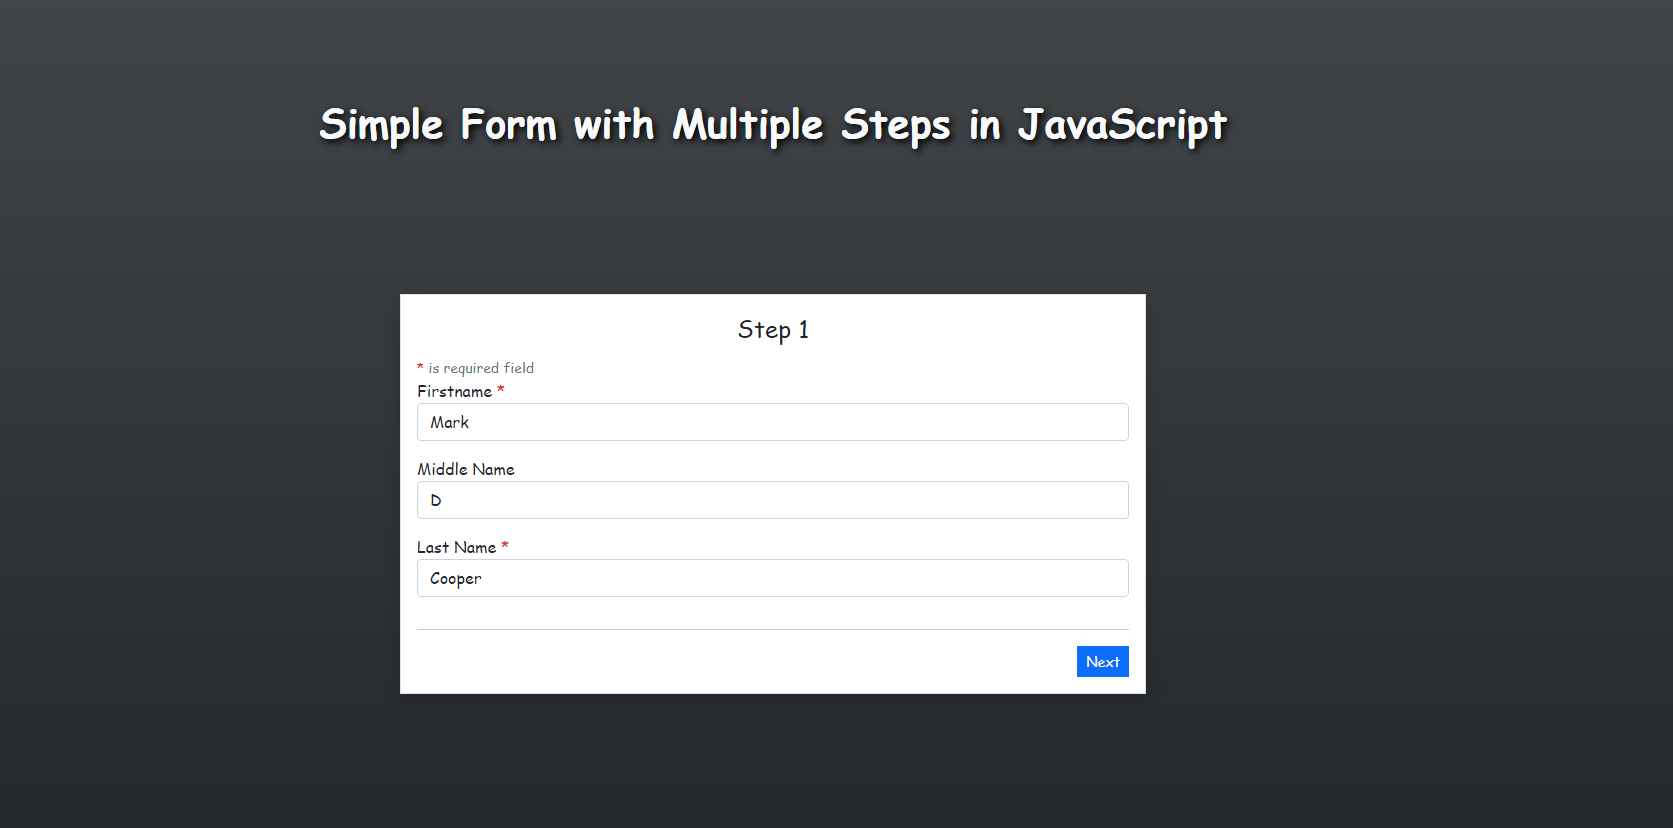
Step 1
This step display only the Next Button because this is only the first step of the form
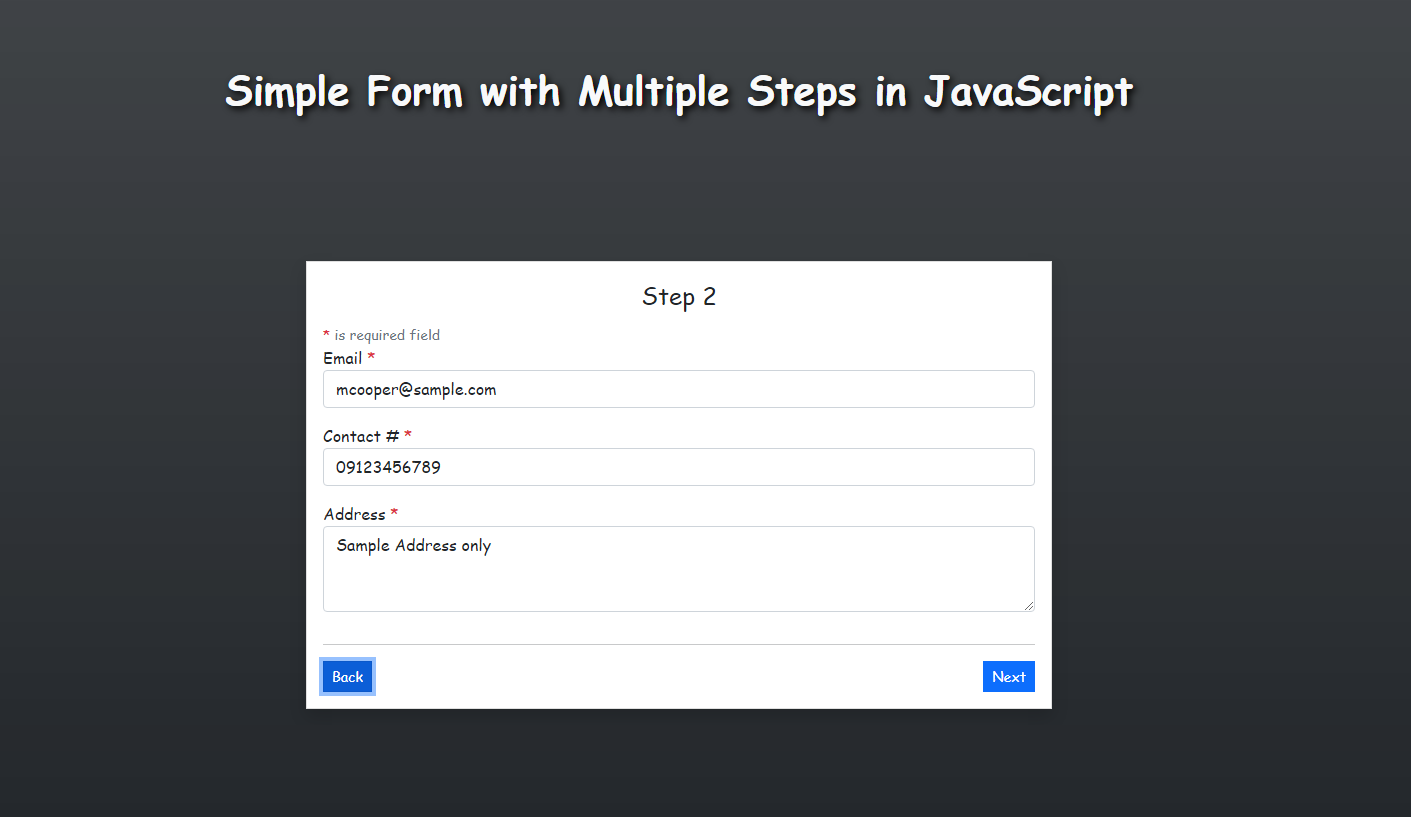
Step 2
This step display both the Back and Next buttons to allow user navigate from the previous step or to proceed to the next step
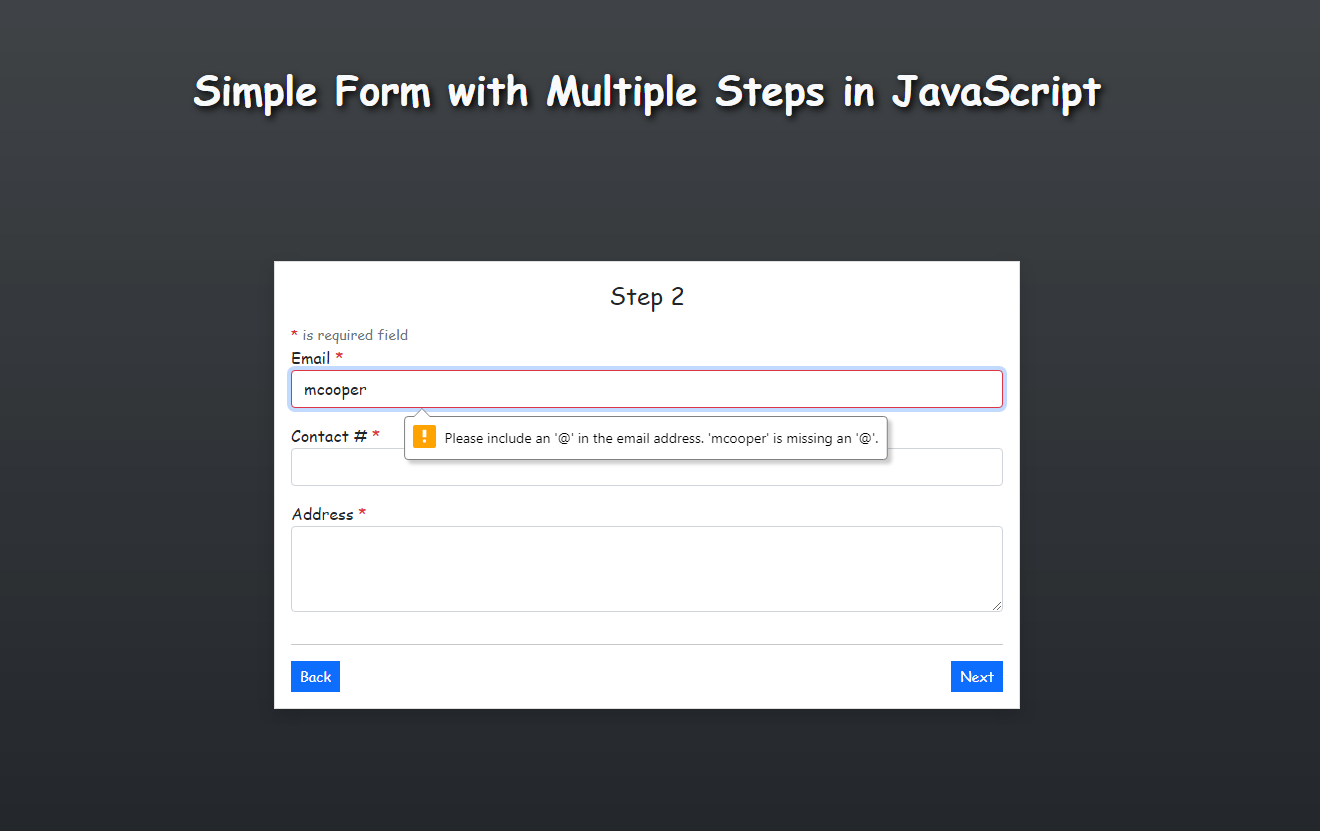
Field Validation
The application will return a validation message when user click the Next Button that has an Invalid field values on the current step.
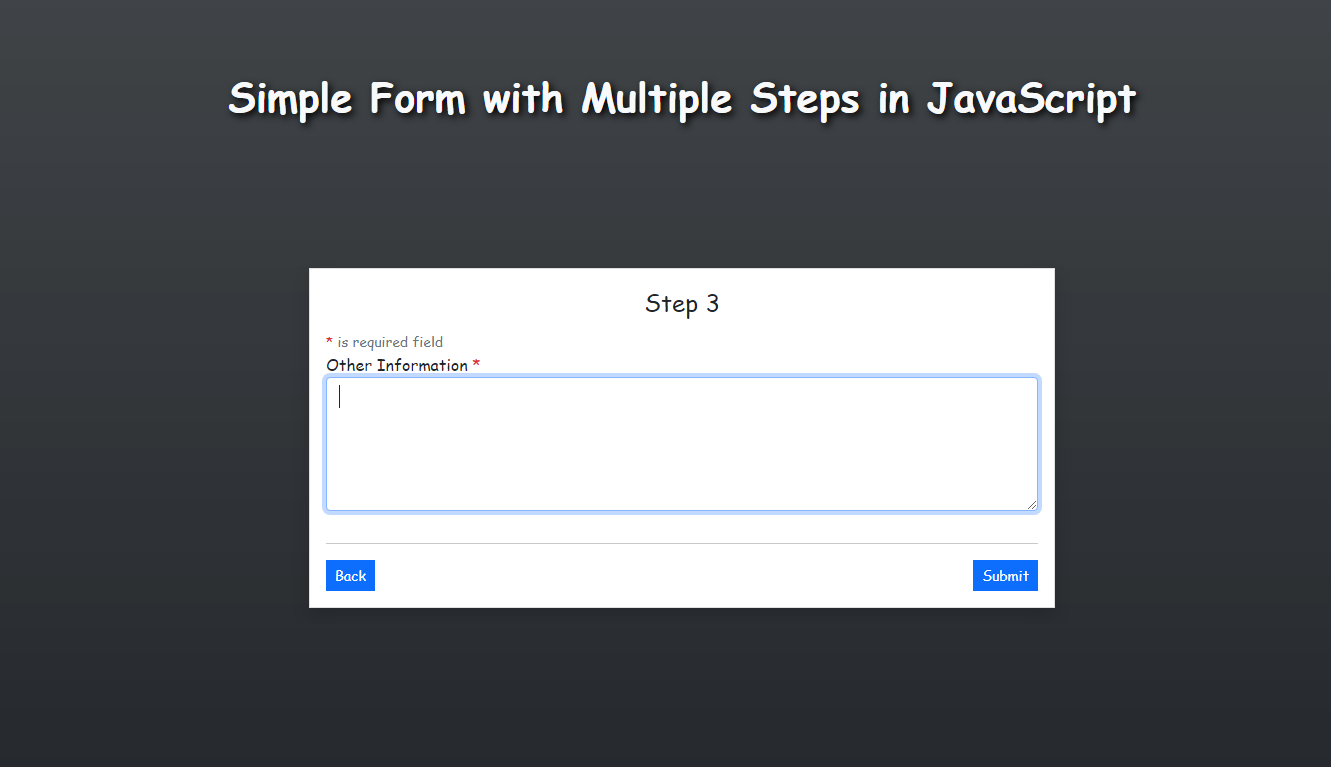
Step 3
This step displays the Submit Button because it is the last step of the form.
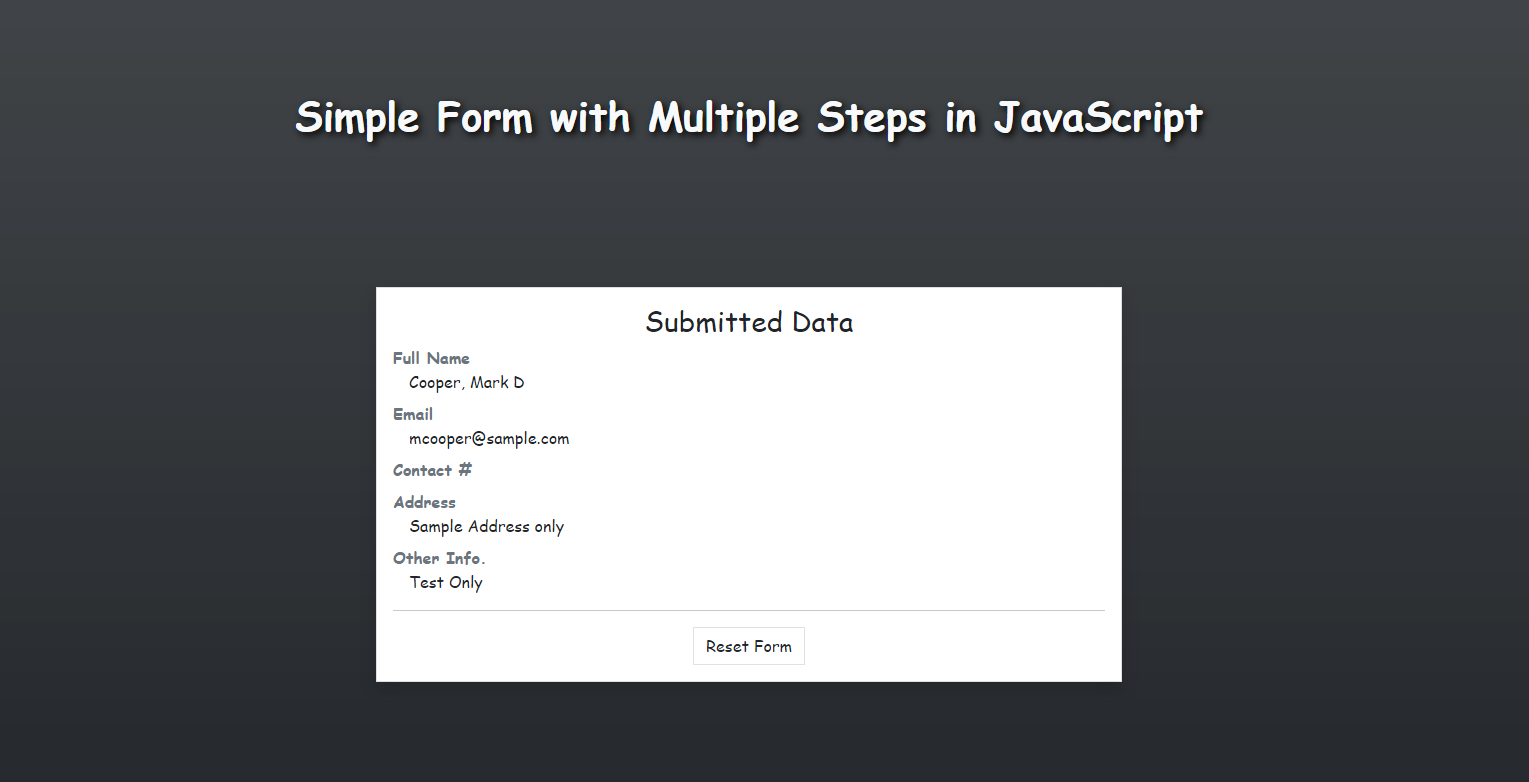
Success Submission
This page displays the submitted data.
If you encountered an error on your end, feel free to leave a comment below. You can also download the working source code that I provided for this tutorial. The download button is located below this article.
That's the end of this tutorial. I hope you'll find tutorial useful for your future Web Application Projects. Explore more on this website for more Free Source Codes and Tutorials.

