Step-by-Step Guide to Creating a Custom Select Field with Images Using HTML, CSS, and JavaScript from Scratch
In this tutorial, we’ll guide you through creating a Custom Select Field from scratch using HTML, CSS, and JavaScript. This step-by-step tutorial is designed to give you a reusable and customizable select dropdown feature that can enhance the user interface of your web application projects. Whether you’re a beginner or looking to refine your skills, this tutorial offers valuable insights for implementing interactive UI elements.
What does this Custom Select Field with Images Do?
The Custom Select Field with Images we’ll build in this tutorial transforms a standard HTML select dropdown into a visually appealing, interactive form component. Each option in this custom select field will include an image alongside its value, creating a more engaging and user-friendly interface. This feature is versatile and can be utilized in various web applications to enhance user experience and deliver a more modern, interactive design.
Let's start the coding part!
Step 1: Compile the Images
To get started, download the images you plan to use for the sample web application. Place these images in a dedicated folder within your application's root directory. For this tutorial, I’ve prepared 5 different color images and saved them in a folder named images. You can organize your assets similarly to maintain a clear and structured project layout.
Step 2: Creating the Interface
Now, let’s create the HTML file for our custom select field application. This file will define the essential elements for the frontend interface, including the application title and the default HTML select field. These elements will serve as the foundation for building and styling the custom dropdown functionality. Refer to the script below for a clearer understanding:
idex.html
- <!DOCTYPE html>
- <html lang="en">
- <head>
- <meta charset="UTF-8">
- <meta name="viewport" content="width=device-width, initial-scale=1.0">
- <link rel="stylesheet" href="https://fonts.googleapis.com/css2?family=Material+Symbols+Outlined:opsz,wght,FILL,[email protected],100..700,0..1,-50..200" />
- <link rel="stylesheet" href="style.css">
- </head>
- <body>
- <div id="main-wrapper">
- <div class="card">
- <div class="custom-select-field">
- <select name="colors" id="colors" class="custom-select-dd">
- </select>
- </div>
- </div>
- </div>
- </body>
- </html>
Step 3: Styling the Interface
Next, let’s create the Cascading Style Sheets (CSS) file. This file will define the design, structure, and layout of the application's interface. It also includes styling for the elements dynamically generated by the JavaScript functionality. Refer to the CSS script below to see how these styles bring the custom select field to life.
style.css
- @import url('https://fonts.googleapis.com/css2?family=Ubuntu:ital,wght@0,300;0,400;0,500;0,700;1,300;1,400;1,500;1,700&display=swap');
- * {
- font-family: "Ubuntu", serif;
- font-weight: 400;
- font-style: normal;
- box-sizing: border-box;
- }
- html, body {
- margin: unset;
- padding: unset;
- height: 100%;
- min-height: 100%;
- width: 100%;
- min-width: 100%;
- overflow: auto;
- }
- body {
- display: flex;
- flex-flow: column wrap;
- justify-content: center;
- align-items: center;
- background-color: #4290fb;
- background-image: linear-gradient(242deg, rgba(131, 204, 255, 1) 0.4%, rgba(66, 144, 251, 1) 100.3%);
- color: #fff;
- margin-bottom: 25px;
- }
- #main-wrapper{
- width: 100%;
- max-width: 600px;
- padding: 20px 30px;
- flex-basis: content;
- }
- #app-title{
- width: 100%;
- font-size: 25px;
- font-weight: 700;
- letter-spacing: 1px;
- margin-bottom: 25px;
- text-shadow: 3px 3px 7px #00000094;
- text-align: center;
- }
- .card{
- width: 100%;
- padding: 15px 20px;
- border-radius: 5px;
- box-shadow: 3px 5px 7px #00000094;
- background-color: #fff;
- color: #1b1b1b;
- }
- /*
- Custom Select Field Styles
- */
- .custom-select-field {
- position: relative;
- width: 100%;
- margin-bottom: 5px;
- }
- .custom-select-field label.custom-select-label {
- display: block;
- width: 100%;
- color: #404040;
- font-size: 15px;
- font-weight: 500;
- letter-spacing: 1px;
- margin-bottom: 10px;
- user-select: none;
- }
- .custom-select-field select.custom-select-dd {
- display: none;
- }
- .custom-select-field div.custom-select-selected,
- .custom-select-field div.custom-select-option
- {
- display: flex;
- width: 100%;
- padding: 5px 15px;
- cursor: pointer;
- }
- .custom-select-field div.custom-select-selected{
- position: relative;
- border: 1px solid #dedede;
- box-shadow: 3px 3px 5px #00000069;
- border-radius: 3px;
- padding: 10px 15px;
- padding-right: 25px;
- }
- .custom-select-field div.custom-select-selected::after{
- content: "";
- position: absolute;
- width: 7px;
- height: 7px;
- right: 15px;
- rotate: 45deg;
- border: 2px solid #9e9e9e;
- border-left: unset;
- border-top: unset;
- transition: all .2s ease-in-out;
- translate: 50% 50%;
- }
- .custom-select-field.menu-shown div.custom-select-selected::after{
- rotate: 225deg;
- }
- .custom-select-field div.custom-select-options
- {
- display: none;
- position: absolute;
- width: calc(100% - 4px);
- border: 1px solid #dedede;
- background: #fff;
- transform: translate(2px, -4px);
- box-shadow: 3px 3px 5px #00000052;
- border-bottom-left-radius: 5px;
- border-bottom-right-radius: 5px;
- }
- .custom-select-field.menu-shown div.custom-select-options{
- display: block;
- animation-duration: .1s;
- animation-name: CustomSelectSlideDown;
- max-height: 200px;
- overflow: auto;
- }
- @keyframes CustomSelectSlideDown {
- 0%{
- height: 0;
- overflow: hidden;
- }
- 100%{
- height: 100%;
- overflow: hidden;
- /* overflow: auto; */
- }
- }
- .custom-select-field div.custom-select-option{
- border-bottom: 1px solid #dedede;
- }
- .custom-select-field div.custom-select-option:hover{
- background: #40b7fc46;
- }
- .custom-select-field div.custom-select-option.selected{
- background: #41a0d646;
- }
- .custom-select-field div.custom-select-option:nth-last-child(1){
- border-bottom: unset;
- }
- .custom-select-field .custom-select-option-img {
- display: flex;
- width: 25px;
- height: 20px;
- overflow: hidden;
- margin-right: 10px;
- }
- .custom-select-field .custom-select-option-img img{
- width: 100%;
- height: 100%;
- object-fit: cover;
- object-position: center center;
- user-select: none;
- pointer-events: none;
- }
- .custom-select-field .custom-select-option-text.custom-select-none-selected {
- color: #a8a1a1;
- font-weight: 400;
- font-style: italic;
- letter-spacing: 1px;
- }
- .custom-select-field .custom-select-option-text{
- flex-grow: 1;
- flex-basis: min-content;
- font-size: 15px;
- font-weight: 500;
- color: #4b4b4b;
- user-select: none;
- pointer-events: none;
- }
Step 4: Creating the Main Function
Finally, let's create the JavaScript file for our application. This file contains all the functions and methods that power our Custom Select Field. The script dynamically generates custom select fields for every select element found in the HTML interface.
The JavaScript is written in an Object-Oriented Programming (OOP) style, utilizing class objects and methods for better structure and reusability.
Upon successful page load, the script initializes the Custom Select Field with Images interface. It also includes event listener functions that enhance the functionality of the custom select field, making it more efficient, user-friendly, and interactive for the end-user. Refer to the JS code below for a clearer understanding.
script.js
- /**
- * Custom Select Class
- */
- class CustomSelectImg {
- constructor() {
- }
- init() {
- const $self = this;
- document.querySelectorAll(".custom-select-field").forEach(function (el, idx) {
- var _createdTemplate = $self.createTemplate(el, idx);
- el.append(_createdTemplate);
- $self.clickEvent(el);
- $self.SelectOption(el);
- document.addEventListener("click", e => {
- if (el.classList.contains('menu-shown')) {
- if (el.querySelectorAll(".custom-select-container").length > 0) {
- if (!el.querySelector(".custom-select-container").contains(e.target)) {
- $self.ShowHideMenu(el)
- }
- }
- }
- })
- document.addEventListener("keypress", e => {
- if (el.classList.contains('menu-shown')) {
- if (el.querySelectorAll(".custom-select-container").length > 0) {
- if (!el.querySelector(".custom-select-container").contains(e.target)) {
- $self.ShowHideMenu(el)
- }
- }
- }
- })
- el.querySelector("select").addEventListener("change", function (e) {
- e.preventDefault()
- var selected = this.value
- if (selected == "") {
- el.querySelector(".custom-select-selected").innerHTML = (`
- <div class="custom-select-option-text custom-select-none-selected">Select Here...</div>
- `)
- } else {
- el.querySelector(`.custom-select-options .custom-select-option[data-value="${selected}"]`).click()
- }
- })
- })
- }
- /**
- * Create Dropdown template
- */
- createTemplate(el, idx) {
- var select = el.querySelector("select")
- var id = "CustomSelectDD" + (select.getAttribute("id") || select.getAttribute("name") || ("CustomSelect" + idx))
- var options = select.querySelectorAll("option")
- var customSelect = document.createElement('div')
- customSelect.setAttribute("id", id);
- customSelect.setAttribute("class", "custom-select-container");
- customSelect.innerHTML = (`
- <div class="custom-select-selected"></div>
- <div class="custom-select-options"></div>
- `);
- if (options.length > 0) {
- for (var i = 0; i < options.length; i++) {
- var optionItem = document.createElement("div")
- optionItem.setAttribute("class", "custom-select-option")
- var optEl = options[i]
- var imgSrc = optEl.dataset.img || "";
- optionItem.dataset.value = optEl.getAttribute("value") || optEl.innerText;
- optionItem.dataset.imgSrc = imgSrc
- optionItem.innerHTML = (`
- <div class="custom-select-option-img"><img src="${imgSrc}" alt="Custom Select Option (${optEl.innerText})"></div>
- <div class="custom-select-option-text">${optEl.innerText}</div>
- `)
- if (select.value == (optEl.getAttribute("value") || optEl.innerText)) {
- optionItem.classList.add("selected");
- }
- customSelect.querySelector(".custom-select-options").append(optionItem)
- }
- }
- if (select.querySelectorAll("option[selected]").length > 0) {
- var SelOptEl = select.querySelector("option[selected]")
- var SelImgSrc = SelOptEl.dataset.img || "";
- customSelect.querySelector(".custom-select-selected").innerHTML = (`
- <div class="custom-select-option-img"><img src="${SelImgSrc}" alt="Custom Select Option (${SelOptEl.innerText})"></div>
- <div class="custom-select-option-text">${SelOptEl.innerText}</div>
- `)
- } else {
- customSelect.querySelector(".custom-select-selected").innerHTML = (`
- <div class="custom-select-option-text custom-select-none-selected">Select Here...</div>
- `)
- }
- return customSelect;
- }
- /**
- * Select Field Click Event
- */
- clickEvent(el) {
- const $self = this;
- if (!!el.querySelector("label.custom-select-label")) {
- el.querySelector("label.custom-select-label").addEventListener("click", function () {
- $self.ShowHideMenu(el)
- })
- }
- if (!!el.querySelector(".custom-select-selected")) {
- el.querySelector(".custom-select-selected").addEventListener("click", function () {
- $self.ShowHideMenu(el)
- })
- }
- }
- /**
- * Show/Hide Menu (options)
- */
- ShowHideMenu(el) {
- const $self = this;
- var shownClass = el.classList.contains('menu-shown')
- if (shownClass) {
- el.classList.remove('menu-shown')
- } else {
- el.classList.add('menu-shown')
- }
- }
- /**
- * Option Selected Event
- */
- SelectOption(el) {
- const $self = this;
- el.querySelectorAll(".custom-select-option").forEach(function (optionEL) {
- optionEL.addEventListener("click", function (e) {
- e.preventDefault();
- var data = optionEL.dataset
- if (el.querySelectorAll('.custom-select-option.selected').length > 0) {
- el.querySelector('.custom-select-option.selected').classList.remove("selected");
- }
- optionEL.classList.add('selected');
- el.querySelector(`select`).value = data.value || optionEL.querySelector(".custom-select-option-text") || "";
- el.querySelector(".custom-select-selected").innerHTML = (`
- <div class="custom-select-option-img"><img src="${data.imgSrc}" alt="Custom Select Option (${optionEL.querySelector(".custom-select-option-text").innerText})"></div>
- <div class="custom-select-option-text">${optionEL.querySelector(".custom-select-option-text").innerText}</div>
- `)
- $self.ShowHideMenu(el)
- })
- })
- }
- }
- const __CustomSelect = new CustomSelectImg();
- window.onload = function () {
- __CustomSelect.init();
- }
Snapshots
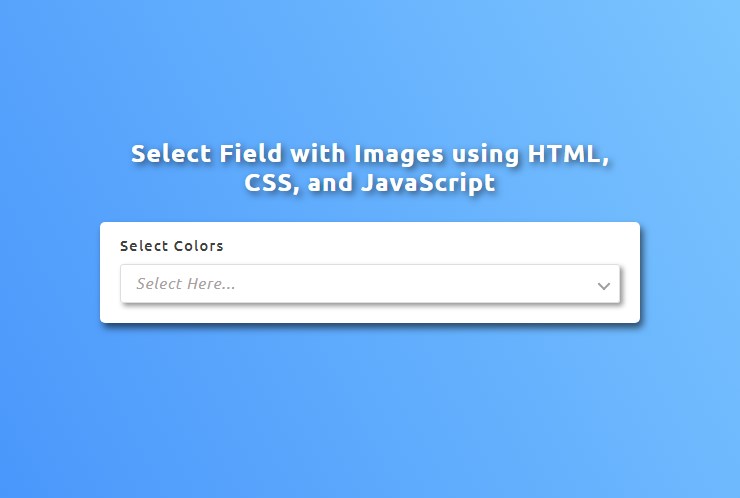
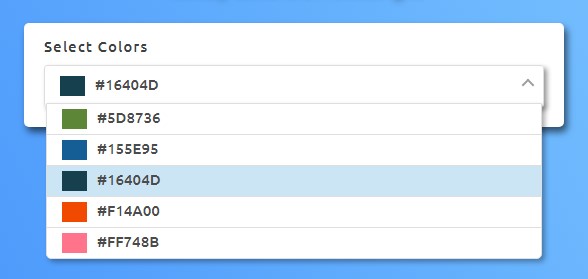
Here are some screenshots showcasing the results of the source code provided above, as seen on my end.
Page Loaded

Custom Select's Options Menu Shown

Custom Select's Option is Selected

The complete source code zip file is available for free download on this website. Feel free to download and modify it to suit your needs. You can find the download button located below this article.
There you have it! I hope this Step-by-Step Guide on Creating a Custom Select Field with Images Using HTML, CSS, and JavaScript helps you achieve your goals and provides valuable insights for your future web application projects.
Explore more on this website for additional Tutorials, Free Source Code, and Articles covering a wide range of programming languages.
Happy Coding =)
Add new comment
- 246 views

