How Session Works and How to create it PHP, MySQLi
Submitted by nurhodelta_17 on Saturday, August 19, 2017 - 16:58.
Language
This tutorial will teach you basic knowledge about php session and an example on how to create one.
A session is a method used to store data in a variable that can be used in all pages in a website/php program. Most of the time, sessions are used to determine the user that access that system. In this tutorial, I will give you an idea on how to create a session to determine the user upon login.
 Notice that we have declared a function "session_start()". This function determines that the session has started and a session has been created. Without this function, sessions won't work.
Creating our Database
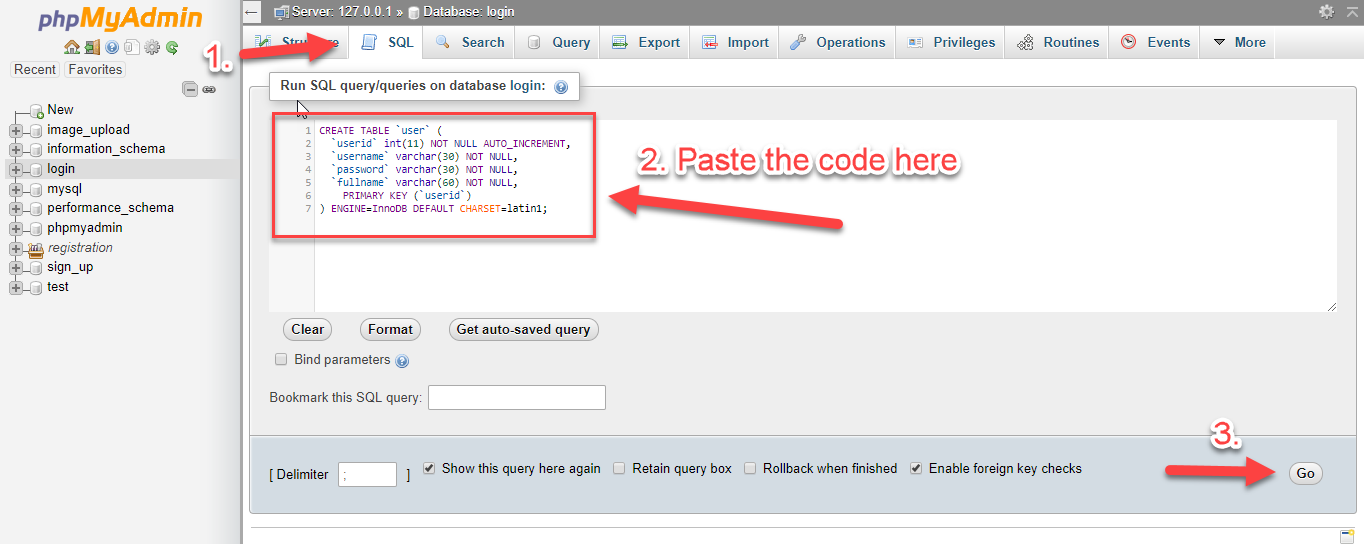
First, we're going to create a database that will store our data. 1. Open phpMyAdmin. 2. Click databases, create a database and name it as "login". 3. After creating a database, click the SQL and paste the below code to create a table. See image below for detailed instruction.- CREATE TABLE `user` (
- `userid` INT(11) NOT NULL AUTO_INCREMENT,
- `username` VARCHAR(30) NOT NULL,
- `password` VARCHAR(30) NOT NULL,
- `fullname` VARCHAR(60) NOT NULL,
- PRIMARY KEY (`userid`)
- ) ENGINE=InnoDB DEFAULT CHARSET=latin1;

Inserting Data into our Table
Next, we insert data into our database for us to determine the user. In this tutorial, we are going to insert 2 rows in our table to differentiate both users and for us to further understand how session works. 1. Click the database "login" that we created earlier. 2. Click SQL and paste the below code to insert the data.- INSERT INTO `user` ( `username`, `password`, `fullname`) VALUES
- ('user1', 'user1', 'neovic devierte'),
- ('user2', 'user2', 'lee ann');
Creating our Connection
Next, we create a database connection and save it as "conn.php". This file will serve as our bridge between our form and our database.- <?php
- // Check connection
- {
- }
- ?>
Creating our Login Form
Next step is creating our login form and name it "index.php". In this form, the user will input his/her username and password and we're going to determine that user upon submission with the use of session. To create the form, open your HTML code editor and paste the code below after the tag.Creating our Login Script
Next step is to create our login script and name it "login.php". This script will validate the user's input and determine whether the user exists in our table or not. If the user is found, the script will store the id of the user through session. To create the script, open your HTML code editor and paste the code below after the tag.- <?php
- include('conn.php');
- $username=$_POST['username'];
- $password=$_POST['password'];
- $query=mysqli_query($conn,"select * from `user` where username='$username' && password='$password'");
- if ($numrows==0){
- $_SESSION['message']="User not found!";
- }
- else{
- $_SESSION['id']=$row['userid'];
- }
- ?>
Creating our Destination Page
Lastly, we create a destination page if the user existed in our table and name it "success.php". This page will also show to details of the user found. To create the script, open your HTML code editor and paste the code below after the tag.Note: Due to the size or complexity of this submission, the author has submitted it as a .zip file to shorten your download time. After downloading it, you will need a program like Winzip to decompress it.
Virus note: All files are scanned once-a-day by SourceCodester.com for viruses, but new viruses come out every day, so no prevention program can catch 100% of them.
FOR YOUR OWN SAFETY, PLEASE:
1. Re-scan downloaded files using your personal virus checker before using it.
2. NEVER, EVER run compiled files (.exe's, .ocx's, .dll's etc.)--only run source code.
Add new comment
- 1497 views

