Connecting MySQL Database using Visual Basic.NET
Submitted by joken on Thursday, August 29, 2013 - 16:11.
In this tutorial I am going to show you the process on how to connect Basic using MySQL Database. To begin with, you need to download the MySQL Connector/NET first from this link http://dev.mysql.com/downloads/connector/odbc/. After downloading, you need to install it so the connector will now available to use under the Reference.
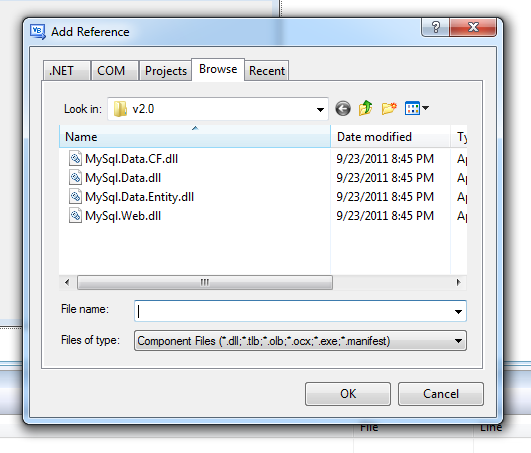
Now let’s begin creating our application using VB.NET (I’m Using VB Express 2008 edition). And this time you need to add a reference using MySQL Connector. On the solution explorer, right click the project menu and choose “Add Reference” and click the Browse Tab and browse the installation folder where the connector was installed. (i.e. ”MySQL.Data.dll”)
 To have a reference to “System.Data.dll”. Now Import the Connector/Net to use its namespace.
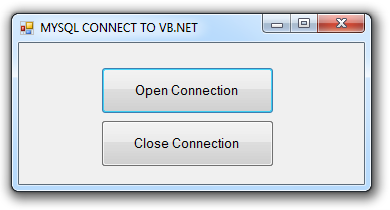
Now let’s design the form by adding two Buttons and name the first button as “Open Connection” and the other button is “Close Connection”. The form should look same in the image below.
 This time let’s start adding code to “Open Connection” button. To add code, just double click this button. Then we need to add the MySQLConnection object under Public class. It will look like the code below.
Next were going to set the Connection String (same on MS Access connection string). For example this is my Connection sting:
After setting up our connection string, we can now add our next line of code. This code will simply open the connection to our database. But following the good programming habit we need to put some error trapping if something wrong occur in our program. So we will use Try, Catch and finally method.
For Open Connection button under ConnectionString just add this code:
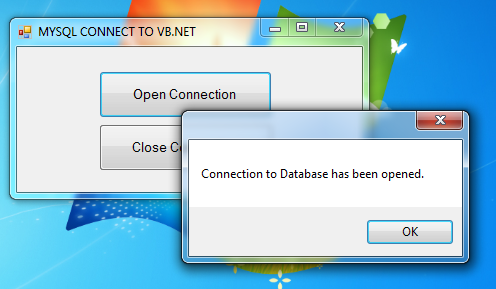
The code above is used for opening a connection and when the program detects that the connection is successfully opened, the program will show a message box saying “Connection to Database has been opened."), else if something went wrong the program will catch the error and display it using the MessageBox function, and Finally MysqlConn.Dispose() will free the resources used.
Next, add this code in “Close the Connection” button:
And This is all you code look like:
Then save the application and try it.
Successful openning of Connection:
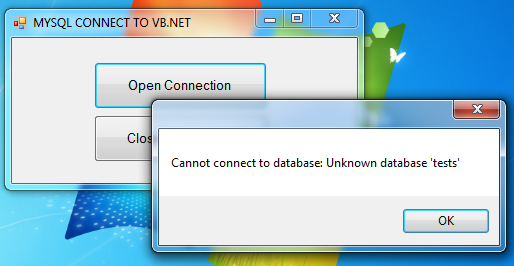
 Else if you out some error in database name or in user id:

 To have a reference to “System.Data.dll”. Now Import the Connector/Net to use its namespace.
- Imports MySql.Data.MySqlClient
- Public Class VBMYSQL
 This time let’s start adding code to “Open Connection” button. To add code, just double click this button. Then we need to add the MySQLConnection object under Public class. It will look like the code below.
- Imports MySql.Data.MySqlClient
- Public Class VBMYSQL
- Dim MysqlConn As New MySqlConnection
- MysqlConn.ConnectionString = ("server=localhost;user id=root;password=;database=test")
- Try
- MysqlConn.Open()
- MessageBox.Show("Connection to Database has been opened.")
- Catch myerror As MySqlException
- MessageBox.Show("Cannot connect to database: " & myerror.Message)
- Finally
- MysqlConn.Dispose()
- End Try
- Try
- MessageBox.Show("Connection to Database has been Closed.")
- Catch myerror As MySqlException
- MessageBox.Show("Cannot connect to database: " & myerror.Message)
- Finally
- MysqlConn.Dispose()
- End Try
- Imports MySql.Data.MySqlClient
- Public Class VBMYSQL
- Dim MysqlConn As New MySqlConnection
- Private Sub btnOpenConn_Click(ByVal sender As System.Object, ByVal e As System.EventArgs) Handles btnOpenConn.Click
- MysqlConn.ConnectionString = ("server=localhost;user id=root;password=;database=test")
- Try
- MysqlConn.Open()
- MessageBox.Show("Connection to Database has been opened.")
- Catch myerror As MySqlException
- MessageBox.Show("Cannot connect to database: " & myerror.Message)
- Finally
- MysqlConn.Dispose()
- End Try
- End Sub
- Private Sub btnCloseConn_Click(ByVal sender As System.Object, ByVal e As System.EventArgs) Handles btnCloseConn.Click
- Try
- MessageBox.Show("Connection to Database has been Closed.")
- Catch myerror As MySqlException
- MessageBox.Show("Cannot connect to database: " & myerror.Message)
- Finally
- MysqlConn.Dispose()
- End Try
- End Sub
- End Class
 Else if you out some error in database name or in user id:

Comments
Add new comment
- Add new comment
- 2198 views
