Simple Poll UI using HTML, CSS, and JavaScript Tutorial
Within this guide, we'll delve into the creation of a straightforward Polling System user interface (UI) along with its core functionality. Our aim is to provide valuable insights to aspiring web developers, offering a practical guide on constructing a basic web application utilizing HTML, CSS, and JavaScript. In this tutorial, we'll share the source code for a basic web application that aligns with the objectives of this instructional material.
What is Polling Systems?
A Polling System represents a web application or a critical feature found in various applications, resembling a voting system designed for collecting opinions and facilitating decision-making processes. This system or feature typically enables numerous participants or voters to choose from the listed options, ultimately leading to a decision favored by the majority.
Essential Requirements
Please make sure to download and install the following if they are not already present on your computer:
- Text Editor: We recommend using VS Code, Sublime Text, or Notepad++
- Web Browser with JavaScript Support: We suggest using Chrome, Mozilla Firefox, or MS Edge
We will utilize CDN links to load the Bootstrap and jQuery libraries. The inclusion of the Bootstrap Framework will significantly enhance our ability to create a user-friendly application with excellent mobile responsiveness.
Time to Start Coding...
Creating the Index File
Our initial step involves the creation of the application's index file. Begin by launching your text editor and establish a new HTML file, naming it index.html. Next, refer to the provided source code to load the required libraries and craft the user interface components.
- <!DOCTYPE html>
- <html lang="en">
- <head>
- <meta charset="UTF-8">
- <meta name="viewport" content="width=device-width, initial-scale=1.0">
- <!-- Bootstrap CSS -->
- <link href="https://cdn.jsdelivr.net/npm/[email protected]/dist/css/bootstrap.min.css" rel="stylesheet" integrity="sha384-T3c6CoIi6uLrA9TneNEoa7RxnatzjcDSCmG1MXxSR1GAsXEV/Dwwykc2MPK8M2HN" crossorigin="anonymous">
- <link rel="stylesheet" href="styles.css">
- <!-- jQuery JS -->
- <!-- Bootstrap JS -->
- <script src="https://cdn.jsdelivr.net/npm/[email protected]/dist/js/bootstrap.bundle.min.js" integrity="sha384-C6RzsynM9kWDrMNeT87bh95OGNyZPhcTNXj1NW7RuBCsyN/o0jlpcV8Qyq46cDfL" crossorigin="anonymous"></script>
- </head>
- <body>
- <main>
- <div class="col-lg-3 col-md-5 col-sm-8 col-12">
- <div class="card rounded-0 shadow mb-3">
- <div class="card-body">
- <div class="container-fluid">
- <!-- Poll List -->
- <ul class="list-group my-2">
- <!-- Poll Items -->
- <li class="list-group-item list-group-item-action">
- <div class="poll-item-container" data-item="HTML">
- <div class="progress poll-item-progress" role="progressbar" aria-label="Example with label" aria-valuenow="0" aria-valuemin="0" aria-valuemax="100">
- </div>
- </div>
- </li>
- <li class="list-group-item list-group-item-action">
- <div class="poll-item-container" data-item="CSS">
- <div class="progress poll-item-progress" role="progressbar" aria-label="Example with label" aria-valuenow="0" aria-valuemin="0" aria-valuemax="100">
- </div>
- </div>
- </li>
- <li class="list-group-item list-group-item-action">
- <div class="poll-item-container" data-item="JS">
- <div class="progress poll-item-progress" role="progressbar" aria-label="Example with label" aria-valuenow="0" aria-valuemin="0" aria-valuemax="100">
- </div>
- </div>
- </li>
- <!-- Poll Items -->
- </ul>
- <!-- Poll List -->
- <!-- Number of Voters or Responders -->
- <div class="d-flex justify-content-end flex-wrap">
- </div>
- <!-- End of Number of Voters or Responders -->
- </div>
- </div>
- </div>
- <!-- Buttons for voting -->
- <div class="card rounded-0 shadow">
- <div class="card-body">
- <div class="container-fluid">
- <div class="btn-group w-100 mt-1">
- </div>
- </div>
- </div>
- </div>
- <!-- End of Buttons for voting -->
- </div>
- </main>
- </body>
- </html>
Creating the CSS File
Now, it's time to craft the CSS file that will house the supplementary styling script for further enhancing the application's design. Begin by creating a new CSS file and saving it with the name styles.css. Remember, this file is also linked and loaded within the index.html file.
- @import url('https://fonts.googleapis.com/css2?family=Exo+2:ital,wght@0,100;0,200;0,300;0,400;0,500;1,100;1,200;1,300;1,400;1,500&display=swap');
- *{
- font-family: 'Exo 2', sans-serif;
- }
- html,body{
- height: 100%;
- width: 100%;
- }
- main{
- height: 100%;
- width: 100%;
- background-color: #0093E9;
- background-image: linear-gradient(160deg, #0093E9 0%, #80D0C7 100%);
- display: flex;
- flex-direction: column;
- align-items: center;
- justify-content: center;
- }
- .poll-item-title{
- display: flex;
- flex-flow: row wrap;
- justify-content: space-between;
- }
- .poll-item-progress{
- height: 7px;
- }
Creating the JS File
Finally, it's time to generate the JavaScript file that contains the functions and event listeners crucial for the operation of our Polling System. Begin by creating a new JS file and save it with the name script.js.
- const voteBTN = document.querySelectorAll('.vote-btn')
- let pollData = localStorage.getItem('Polls') || '{}'
- pollData = JSON.parse(pollData)
- function vote(item){
- if(!!pollData[item])
- pollData[item] = pollData[item] + 1;
- else
- pollData[item] = 1;
- update_poll_data()
- }
- function update_poll_data(){
- localStorage.setItem('Polls', JSON.stringify(pollData))
- update_progress()
- }
- voteBTN.forEach(el=>{
- el.addEventListener('click', function(e){
- e.preventDefault()
- var item = el.dataset.item || null
- if(item != null)
- vote(item)
- })
- })
- function update_progress(){
- var total = 0;
- var items = [];
- Object.entries(pollData).map(item=>{
- items.push(item[0])
- total += parseInt(item[1])
- })
- if(document.getElementById('total-votes') != null)
- document.getElementById('total-votes').innerText = total.toLocaleString('en-US', {style: 'decimal', maximumFractionDigits:2});
- items.forEach(item => {
- // Skip If the Item does not Exists
- if(document.querySelectorAll(`.poll-item-container[data-item="${item}"]`) == null)
- return;
- var container = document.querySelector(`.poll-item-container[data-item="${item}"]`)
- var percentage = pollData[item] || 0
- percentage = percentage > 0 ? ((percentage / total) * 100) : 0;
- percentage = percentage.toLocaleString('en-US', {style: 'decimal', maximumFractionDigits:2})
- if(container.querySelector('.poll-item-percentage') != null)
- container.querySelector('.poll-item-percentage').innerText = `${percentage}%`
- if(container.querySelector('.poll-item-progress') != null)
- container.querySelector('.poll-item-progress').setAttribute('aria-valuenow', percentage)
- if(container.querySelector('.poll-item-progress .progress-bar') != null)
- container.querySelector('.poll-item-progress .progress-bar').style.width = `${percentage}%`
- })
- }
- window.onload = function(){
- update_progress()
- }
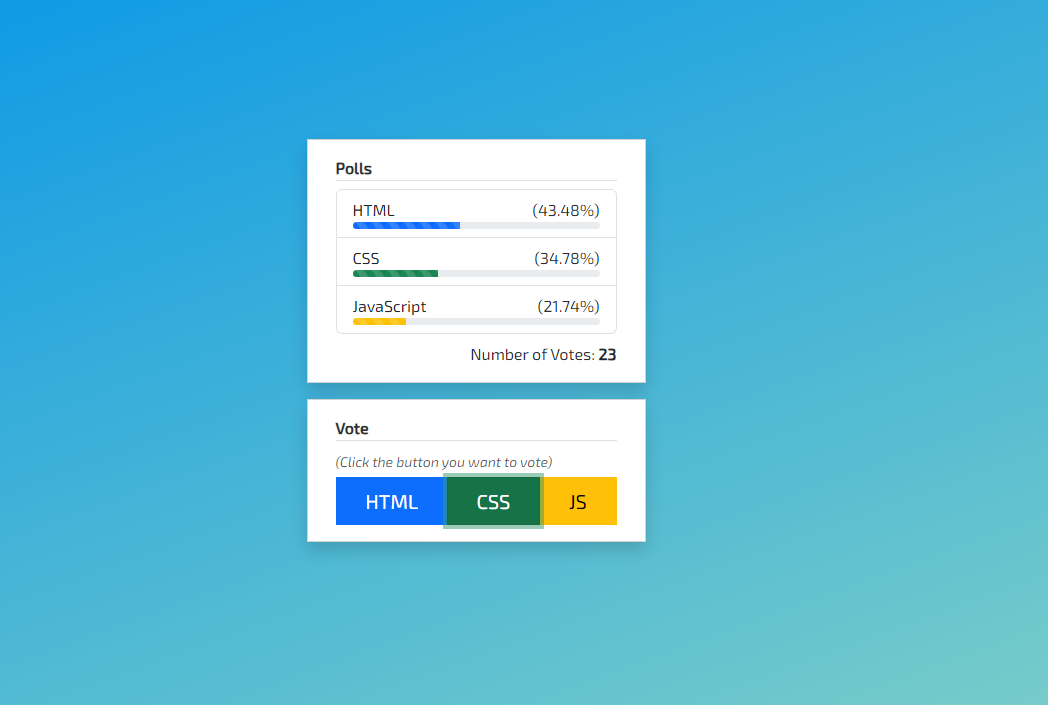
The source code shared above will yield a result similar to the illustration below:
And there you have it! You can now test the functionality of the Simple Polling System User Interface created with HTML, CSS, and JavaScript. I hope this tutorial will be beneficial and prove valuable for your forthcoming web application endeavors.
Explore further on this website for additional Tutorial Resources, Open Source Code Samples, and Informative Articles spanning a wide range of programming languages.
You might also want to download the following Source Codes:
- Simple Polling System in Python using Django Framework
- Judging Management System using PHP and MySQL


