C# Tutorial
Skype4COMLib Skype API Auto Response in C#
Introduction:
This tutorial is on how to use the Skype4ComLib Libaries in C# .NET to access our Skype program on our computer.SKYPE4COMLib:
To use the Skype libaries you need to first obtain them via .NET Framework installation of 4.0 or later. I am using 4.5 for this tutorial, then you want to create a new Console/Form application in Visual Studio for a C# application. Right click on your application in the 'Solution/Package Explorer', click on 'Add', then 'Reference', select 'COM' from the side tabs, and choose 'SKYPE4COMLib Libary'.Buffer Overflow Attack Protection in C# .NET
Introduction:
This tutorial is on how to secure your application in C# from Buffer Overflow Attacks.What's a Buffer Overflow Attack? (BTA)
A buffer overflow attack is when the user purposefully enters too much data in such a way that the program will spill the data across different memory locations which will cause unexpected behaviour such as opening another vulnerability for the attack to exploit. This works through the use of user input.Switch Statements in C#
Introduction:
This tutorial is on how to use Switch statements in C#.Switch:
A switch statement allows a single variable or static piece of data to be checked for mulitple conditions, essentially like a long 'else if' statement but a lot more compact and with slightly more flexability.Case:
To use a switch statement there are a few other keywords we need to learn first, one of which is 'case'. Case is a possible value of the variable or value being 'switched', this must be of the same data type as the value being switched and must be followed by a colon. BreakDrawing Strings via the Graphics Object in C#
Introduction:
This tutorial is on how to draw text in .NET (C#/Visual Basic).Labels, Textboxes?
I'm sure if you've not looked in to the 'graphics' (etc) objects in the .NET framework, you're thinking, why don't we just use labels or textboxes with their read-only property enabled. Labels and textboxes both have a surrounding area around the text which are both of different colours (however we could change this to the form background colour to give the effect of the backgrounds being removed), but would we create extra controls (labels, and textboxes) when we don't need to?For Each Loop in C# .NET
Introduction:
This tutorial will be on how to use a 'foreach' loop in C# .NET.
ForEach:
A ForEach loop in C# is used to iterate through a list of elements held within one location. An example of this could be a list of usernames which are allowed to login to the program.
HTTPWebRequest WebProxy Proxies in C#
Introduction:
This tutorial is on how to create a HTTPWebRequest in C# using a proxy connection.
Why Proxies?
Proxies are sometimes required in certain web scraping applications due to the sheer amount of data that needs to scraped. Some sites temporarily - or even permanently - block IP addresses which are requesting/receiving large amounts of data in a short time to avoid the website's full bandwidth being used on that single IP, and therefore stopping the site from going offline for all other users as well.
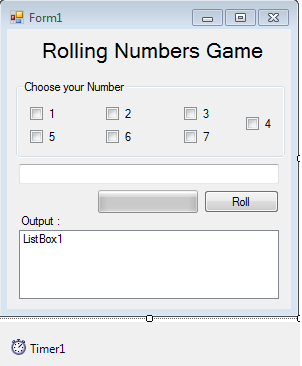
Random Rolling Numbers Game in C#
In this tutorial, we will create a game called Random Rolling Game using C# that is rolled randomly with its number and has a Progress Bar that serves as a timer.
1. Let's start with creating a Windows Form Application in C# for this tutorial by following the following steps in Microsoft Visual Studio: Go to File, click New Project, and choose Windows Application.
2. Design your interface like this:
 3.
3.
 3.
3.List Management in C#
Today in C#, I will teach you how to create a simple tool in C# to manage lists and listboxes.
So, now let's start this tutorial!
1. Let's start with creating a Windows Form Application for this tutorial by following the following steps in Microsoft Visual Studio 2010: Go to File, click New Project, and choose Windows Application.
2.
Config Creator in C#
Today in C#, i will teach you how to create a program that has a config creator in C#.
Now, let's start this tutorial!
1. Let's start with creating a Windows Form Application for this tutorial by following the following steps in Microsoft Visual Studio: Go to File, click New Project, and choose Windows Application.
2. Next, add two Textboxes named textbox1 that holds the property name and textbox2 for the property value. Insert two buttons named Button1 that adds property and Button2 for saving config.
3.


