Creating a Simple Dynamic Input using PHP and jQuery
In this tutorial, we will create a simple PHP web application that has a feature allowing the user to dynamically add inputs to the page to save the forms at once. We will be using the jQuery Plugin in order to meet our goal. Also, we will use the Bootstrap Framework to have a pleasant user interface.
So, let's get started...Getting Started
Requirements
- Download and Install the latest version if XAMPP
- Open the XAMPP's Control Panel and start the "Apache" and "MySQL".
- Prepare a text editor such as notepad++ and sublime text. Download and Install if necessary.
- Download Bootstrap Framework
- Download jQuery plugin
- Compile the Plugins/Libraries in a single folder and move it into the XAMPP's htdocs directory.
Creating the Database
Go to the PHPMyAdmin and create a new database naming "db_dynamic". Then copy the code below and paste it into the SQL tab's Text field and click "Go" button.
Database Connection
Open your text editor and create a new file in your web app directory and save it as connect.php. Copy the script below to the file and save it.
- <?php
- $conn = new mysqli('localhost', 'root', '', 'db_dynamic');
- if($conn->connect_error){
- }
- ?>
Creating the Interface
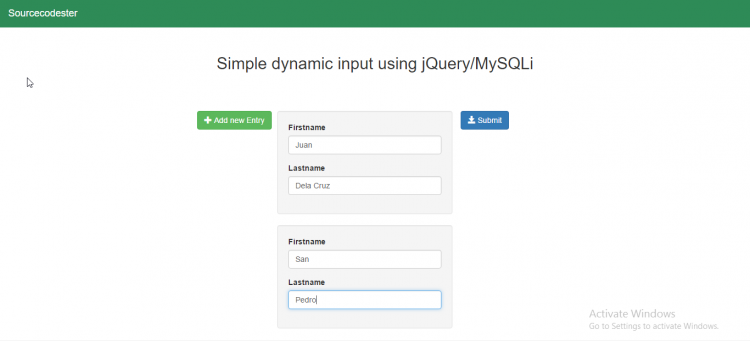
The below code is the default page when browsing our web application. This contains also the script for creating our dynamic inputs and display it into the interface. Save the file as index.php.
- <!DOCTYPE html>
- <html lang = "eng">
- <head>
- <meta charset = "UTF-8" />
- </head>
- <body>
- <nav class = "navbar navbar-default navbar-fixed-top">
- <div class = "container-fluid">
- <a class = "navbar-brand" href = "https://www.sourcecodester.com">Sourcecodester</a>
- </div>
- </nav>
- <br />
- <br />
- <br />
- <br />
- <center><h2>Simple dynamic input using jQuery/MySQLi</h2></center>
- <br />
- <br />
- <br />
- <div class = "row">
- <div class = "col-md-3">
- </div>
- <div class = "col-md-1" style = "margin-left:10px;" >
- <button class = "btn btn-success" id = "add"><span class = "glyphicon glyphicon-plus"></span> Add new Entry</button>
- <br />
- <br />
- </div>
- <form method = "POST" action = "save_data.php">
- <button class = "btn btn-primary" name = "submit" ><span class = "glyphicon glyphicon-save"></span> Submit</button>
- <div style = "margin-left:30px;" id = "input" class = "col-md-3">
- <div class = "well">
- <div class = "form-group">
- <label>Firstname</label>
- <input class = "form-control" type = "text" name = "firstname[]"/>
- </div>
- <div class = "form-group">
- <label>Lastname</label>
- <input class = "form-control" type = "text" name = "lastname[]"/>
- </div>
- </div>
- </div>
- </form>
- </div>
- </body>
- <script src = "js/jquery.js"></script>
- <script type = "text/javascript">
- $(document).ready(function(){
- $('#add').click(function(){
- $input = $('<div class = "well">'
- + '<div class = "form-group">'
- + '<label>Firstname</label>'
- + '<input class = "form-control" type = "text" name = "firstname[]" required = "required"/>'
- + '</div>'
- + '<div class = "form-group">'
- + '<label>Lastname</label>'
- + '<input class = "form-control" type = "text" name = "lastname[]" required = "required"/>'
- + '</div>');
- $input.fadeIn(1000).appendTo('#input');
- });
- });
- </script>
- </html>
The below code is the script fir the interface for our results page. This page displays the saved data in our database.
result.php
- <!DOCTYPE html>
- <html lang = "eng">
- <head>
- <meta charset = "UTF-8" />
- <link rel = "stylesheet" type = "text/css" href = "css/style.css" />
- <link rel = "stylesheet" type = "text/css" href = "css/bootstrap.css" />
- </head>
- <body>
- <nav class = "navbar navbar-default navbar-fixed-top">
- <div class = "container-fluid">
- <a class = "navbar-brand" href = "https://www.sourcecodester.com">Sourcecodester</a>
- </div>
- </nav>
- <br />
- <br />
- <br />
- <center><h2>How to create a dynamic input using jQuery/MySQLi</h2></center>
- <br />
- <br />
- <div class = "row">
- <div class = "col-md-3 ">
- </div>
- <div class = "col-md-6">
- <div>
- <center><a href = "index.php" class = "btn btn-success"><span class = "glyphicon glyphicon-log-out"></span> Back</a></center>
- <center><h3>Result</h3></center>
- <table class = "table table-bordered table-hover">
- <thead>
- <tr>
- <th>ID</th>
- <th>Firstname</th>
- <th>Lastname</th>
- </tr>
- </thead>
- <tbody>
- <?php
- require_once'connect.php';
- while ($fetch = $query->fetch_array()){
- ?>
- <tr>
- <td><?php echo $fetch['id']?></td>
- <td><?php echo $fetch['firstname']?></td>
- <td><?php echo $fetch['lastname']?></td>
- </tr>
- <?php
- }
- ?>
- </tbody>
- </table>
- </div>
- <div>
- </div>
- </body>
- <script src = "js/jquery.js"></script>
- </html>
Saving the Data
The below codes is the scripts for saving the data to our database.
save_data.php
- <?php
- require_once 'connect.php';
- foreach($_POST['firstname'] as $key=>$value){
- $firstname = $value;
- $lastname = $_POST['lastname'][$key];
- }
- }
- ?>
Demo
That's it! I hope this tutorial will help you with what you are looking for and for your future projects. Explore more on this website for more tutorials and free source codes.
Enjoy :)Note: Due to the size or complexity of this submission, the author has submitted it as a .zip file to shorten your download time. After downloading it, you will need a program like Winzip to decompress it.
Virus note: All files are scanned once-a-day by SourceCodester.com for viruses, but new viruses come out every day, so no prevention program can catch 100% of them.
FOR YOUR OWN SAFETY, PLEASE:
1. Re-scan downloaded files using your personal virus checker before using it.
2. NEVER, EVER run compiled files (.exe's, .ocx's, .dll's etc.)--only run source code.
Comments
Add new comment
- Add new comment
- 6195 views

