Prime Blocks - A Tetris Clone Game For Android/iOS Tutorial
Submitted by razormist on Wednesday, October 18, 2017 - 10:56.

In this tutorial I will show how to make an amazing game "Prime Blocks" using a Unity Game Engine and a C# script. Unity is an all purpose game engine that supports 2D and 3D graphics, drag and drop functionality and scripting through C#. UnityScript is a proprietary scripting language which is syntactically similar to JavaScript. Unity is notable for its ability to target games for multiple platforms. So let's get started and see for ourselves.
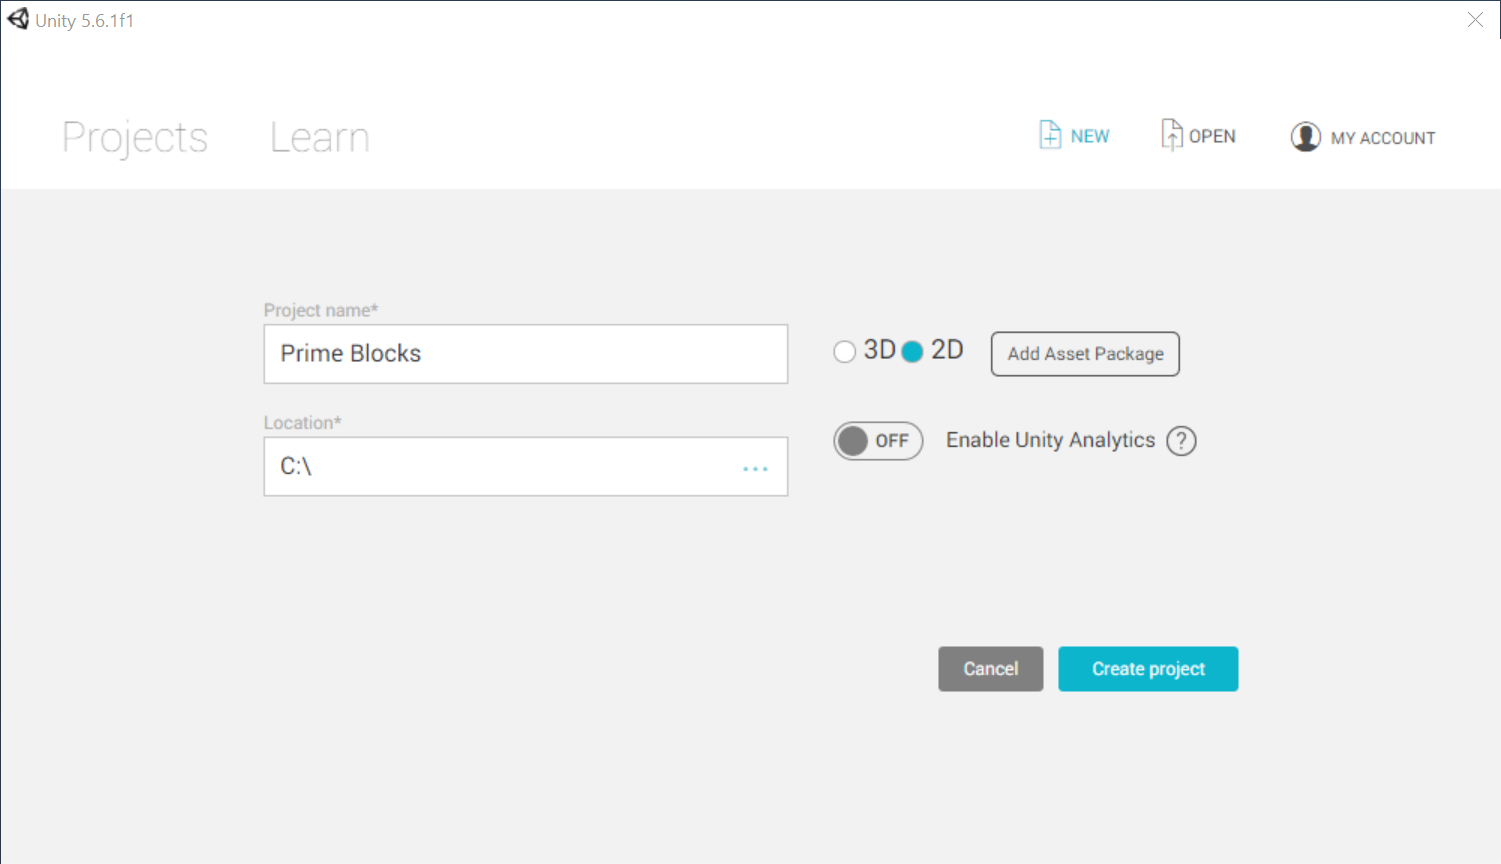
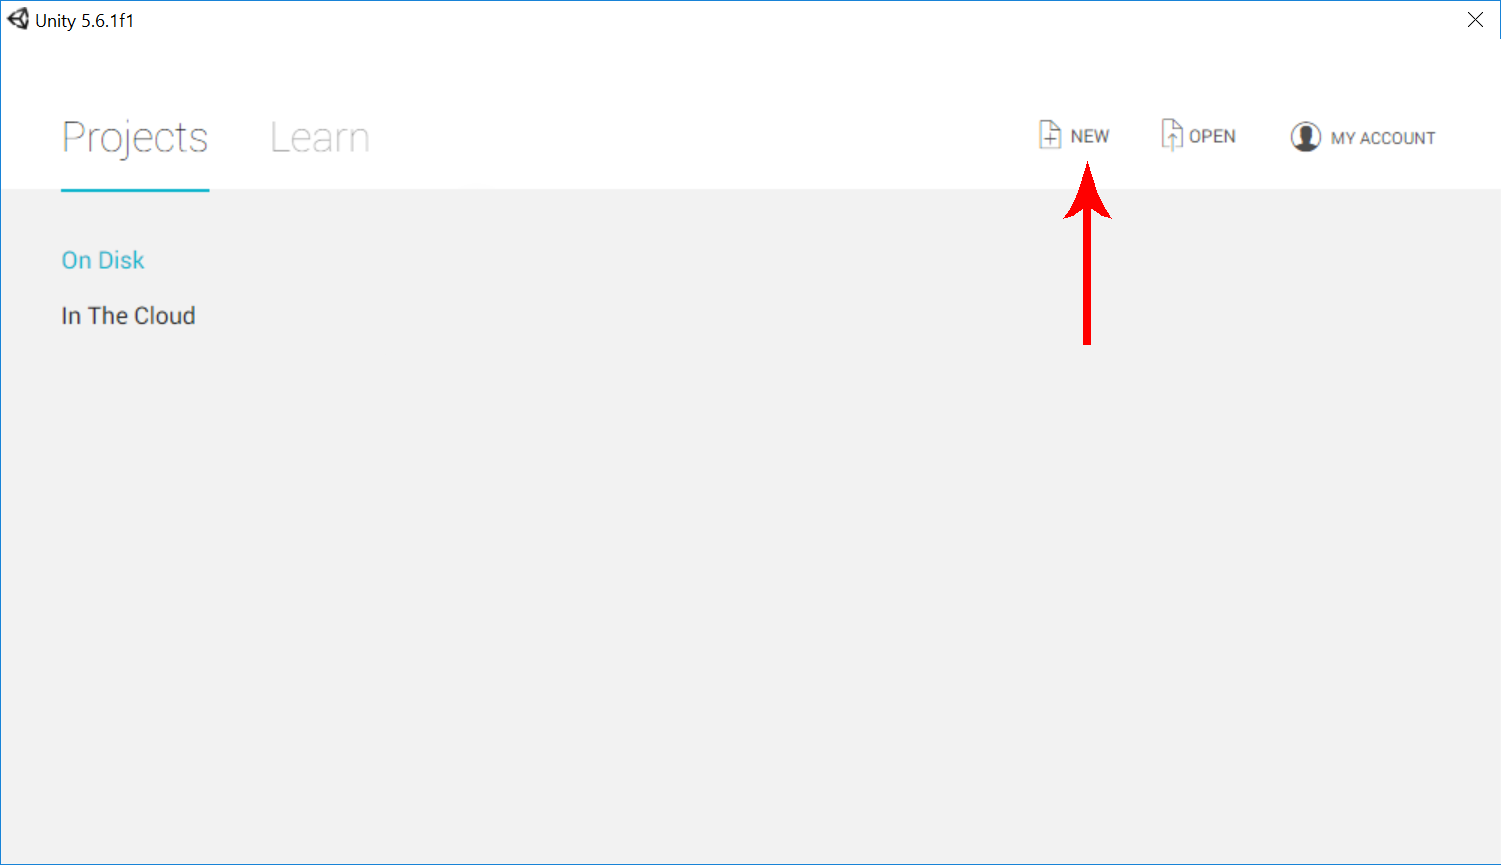 Then Click "NEW", then enter the project name "Prime Blocks ". After entering the name click the 2D button because the game will be make is in 2D environment, and after that place it into your desiganated directory.
 This is how the Unity Game Engine Environment look like.
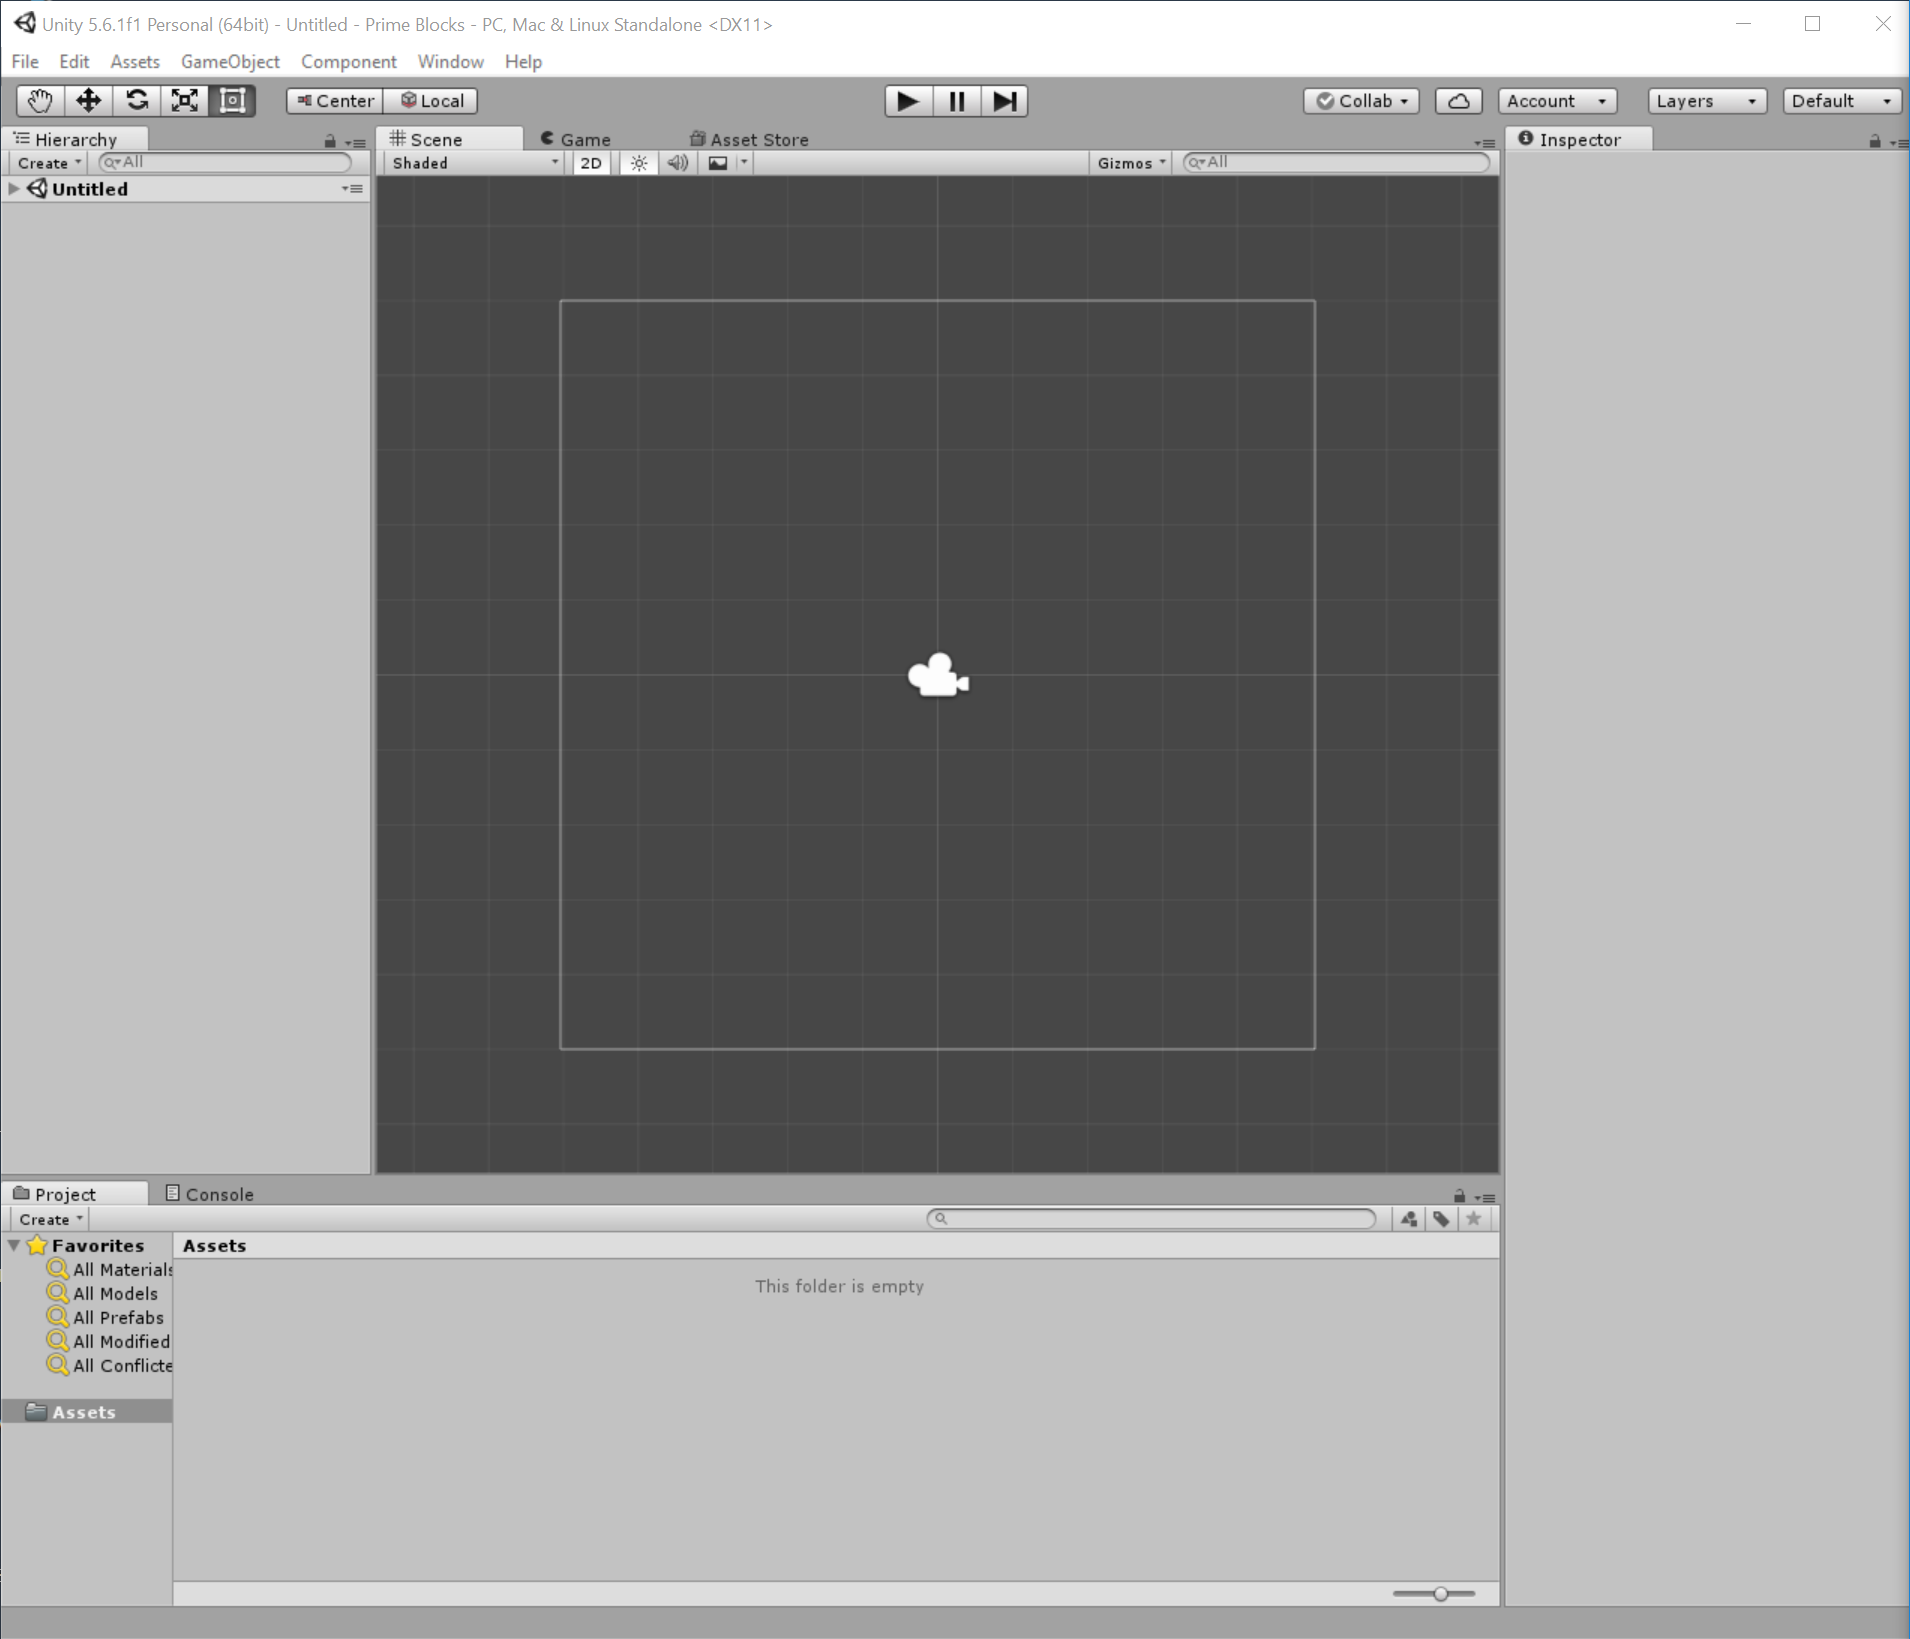 Now we are now ready to create our awesome game.
 Before working on the GameObject make sure to reset its transform to avoid conflict in the future.
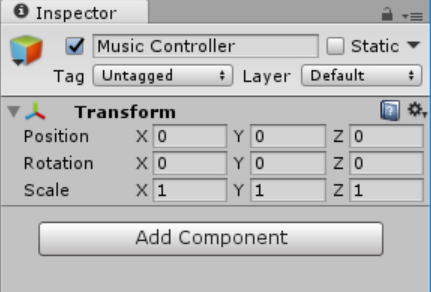
 After that rename your GameObject as "Game Controller" , then go to the Scripts directory and right click the mouse button, and select create then choose C# script.
 Save it as "GameController".
Note: To avoid script error make sure the name of your script has no space, because C# is case sensitive to white space.
Next open your newly created Script, you notice that there is already a block code in the script. By default the unity engine already created that part to make the developer at ease.
Now that everything is ready, we will now do our coding thing. First import this important modules.
Then kindly copy this blocks of code and paste it inside GameController class.
To make this work attach the script to the Game Controller object as a component, by dragging this to the Game Controller Inspector or by clicking add component then go to script and locate the GameController script.
Save it as "GameController".
Note: To avoid script error make sure the name of your script has no space, because C# is case sensitive to white space.
Next open your newly created Script, you notice that there is already a block code in the script. By default the unity engine already created that part to make the developer at ease.
Now that everything is ready, we will now do our coding thing. First import this important modules.
Then kindly copy this blocks of code and paste it inside GameController class.
To make this work attach the script to the Game Controller object as a component, by dragging this to the Game Controller Inspector or by clicking add component then go to script and locate the GameController script.
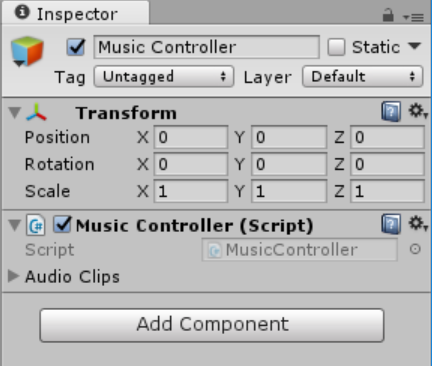
 Inside the Music Controller script, create a certain variable that we will use for our sounds.
Write this code inside the Music Controller class.
Then add this several methods to your script.
Next you need to attach the script to the Music Controller as a component, it is just the same like you did on Game Controller.
Inside the Music Controller script, create a certain variable that we will use for our sounds.
Write this code inside the Music Controller class.
Then add this several methods to your script.
Next you need to attach the script to the Music Controller as a component, it is just the same like you did on Game Controller.
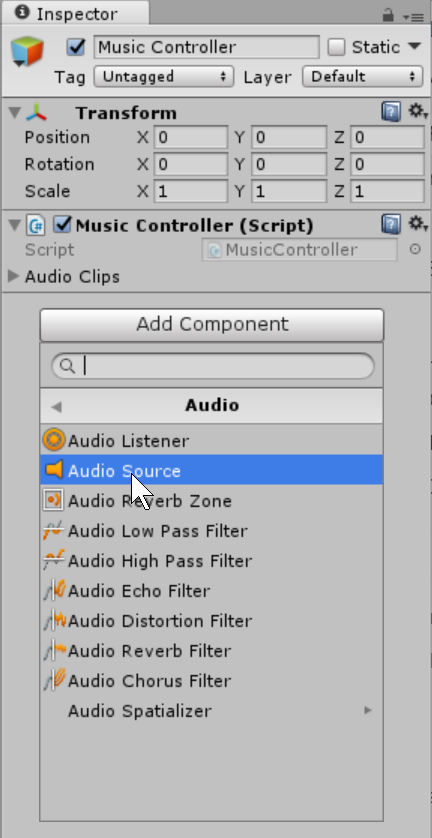
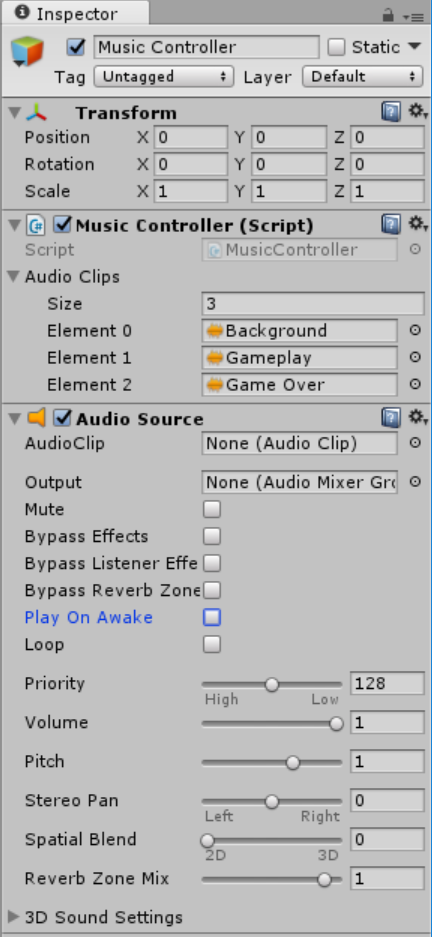
 After that add a new component called AudioSource. AudioSource manage the sounds of the game. And uncheck the Play On Wake because it will be done automatically with the script.
 Then from the sounds directory drag all the sound into the AudioClips array.
 Then rename Canvas as "Main Menu UI", and also Image as "Background". In the Main Menu UI set the values same as the image shown below.
 To make the Background Image locate your sprite from the Game UI directory then add it to the Background GameObject as a component.
 Now that we have the image we will now add two button, just like what you did on the image go to Main Menu UI right click on it select UI then choose Button. Duplicate the button then name them as "Start Button" and "Option Button".
See Image Below
Now that we have the image we will now add two button, just like what you did on the image go to Main Menu UI right click on it select UI then choose Button. Duplicate the button then name them as "Start Button" and "Option Button".
See Image Below
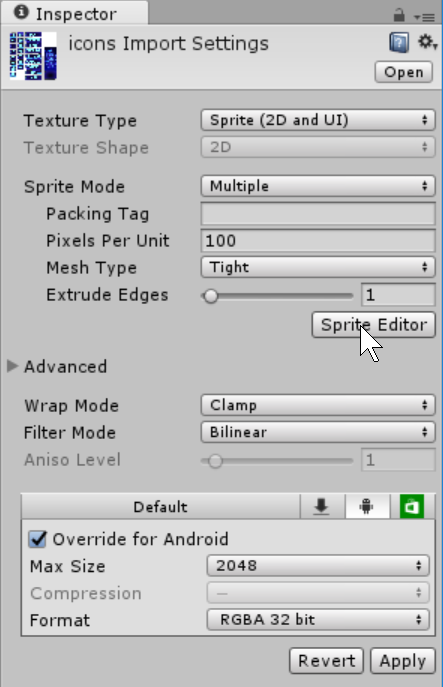
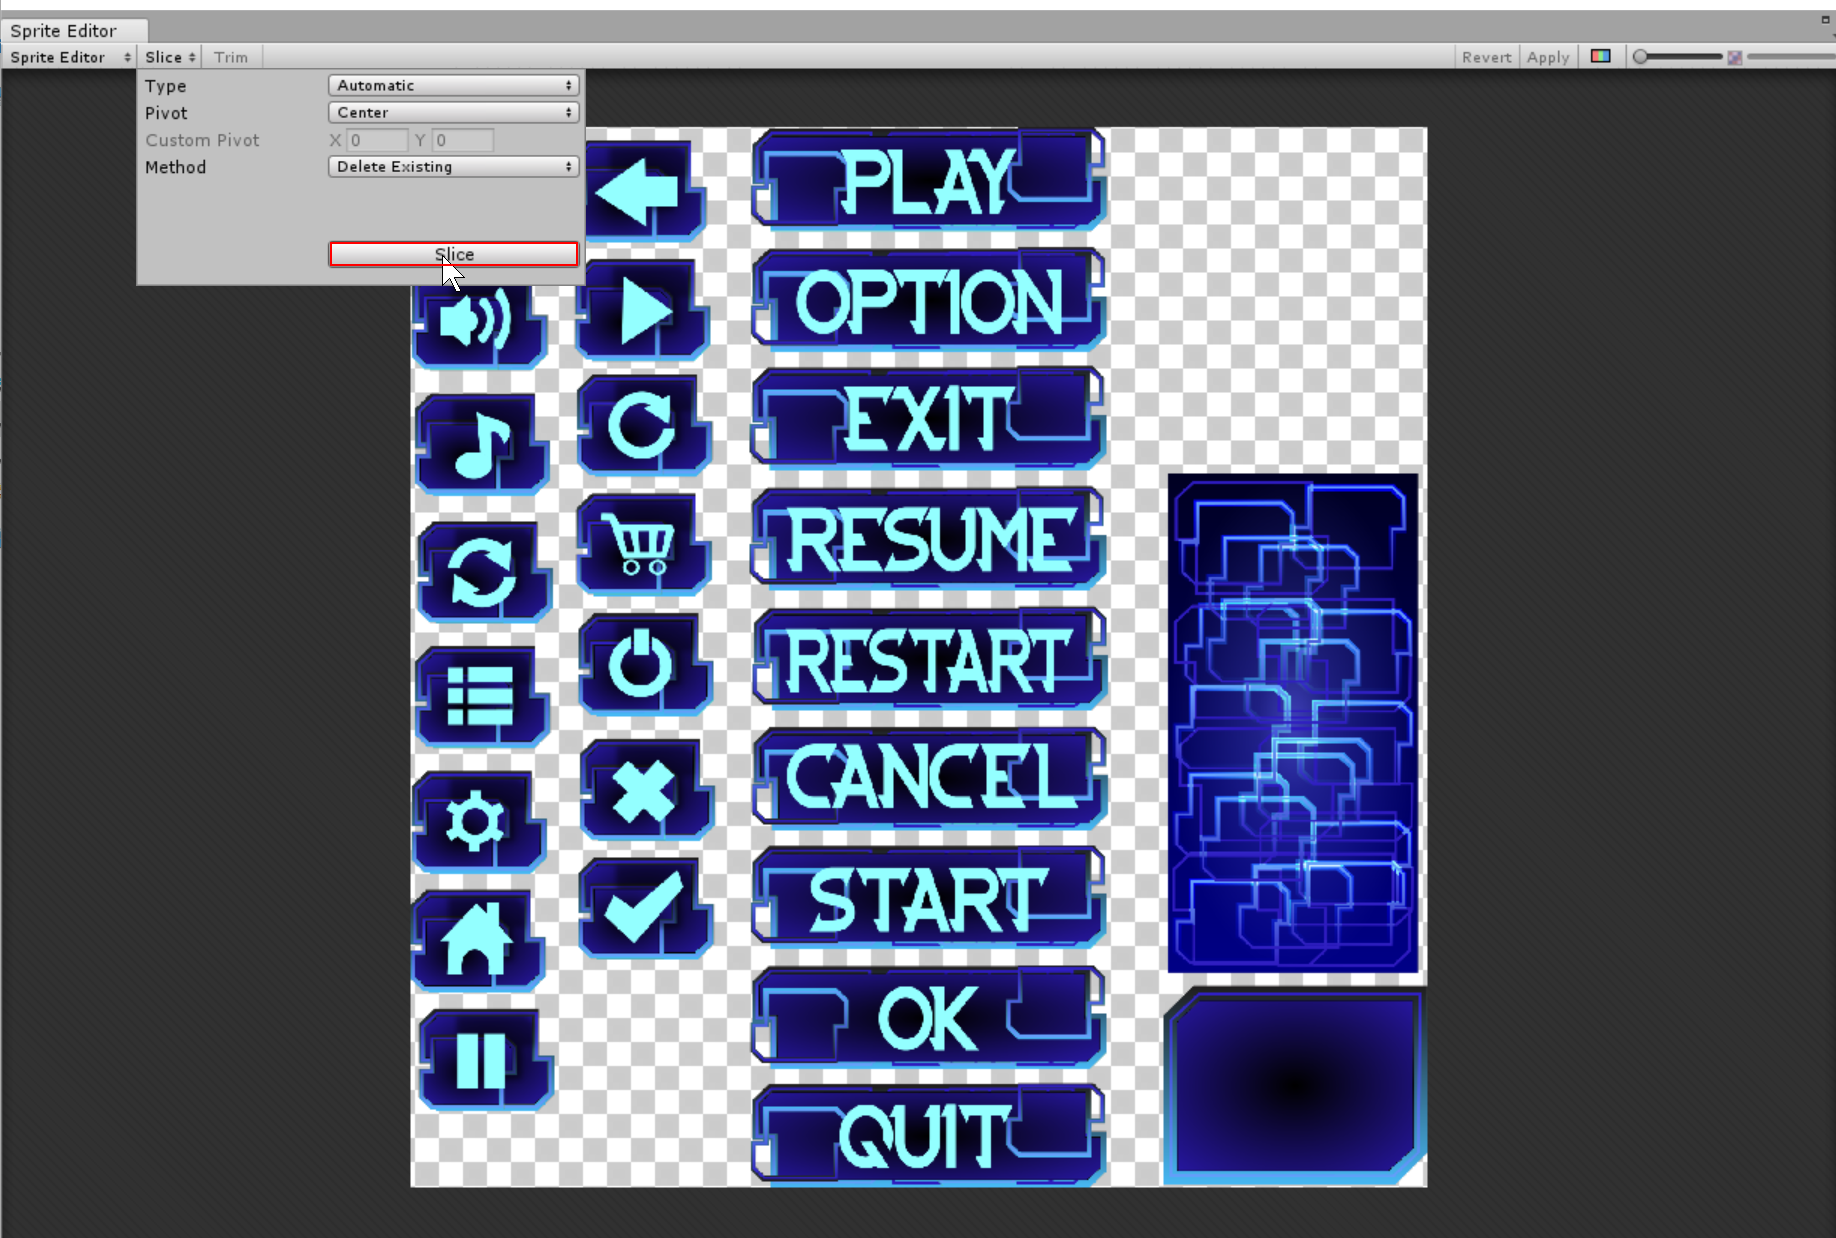
 Note: When slicing the sprite sheet into a several images you need to select first your image, then in Sprite Mode choose Multiple after that click Sprite Editor. A new Pop up window will appear from here click the Slice on the menu bar, then Slice. It will automatically slice the sheet of a sprite.
 Now that your sprites are ready remove the child text of button, then add a sprite to their components.
Then set the values of each GameObject base on the image below.
Now that your sprites are ready remove the child text of button, then add a sprite to their components.
Then set the values of each GameObject base on the image below.
 Then add a several children (Text, Button, Toggle) for the Option Panel. After that set the component values as show in the image below.

 Note: Delete the label text from the children of Toggle, because we will not be needed that for now. The font of the component is already included in the assets folder of the sourcecode file, just simply locate its directory to be able to use.
 Then add a several children (Text, Buttons) for the Exit Panel. After that set the component values as show in the image below.
 Then add this several methods to your script.
Note: When using a UI Components in the script you will just need to import some modules.
Then add this several methods to your script.
Note: When using a UI Components in the script you will just need to import some modules.
 Note: Make sure you attach the Main Menu Controller to each of the Buttons that you created, this will trigger the methods that we created from the script.
 Then for the Image
 Then after that add a text name it as "Difficulty Text", then set the values as shown below.
 Add a button then set its component as shown below
 Then add this several methods to your script.
After that attach the script to the Level Menu Controller GameObject, then also attach all the necessary Objects in the script.
Then add this several methods to your script.
After that attach the script to the Level Menu Controller GameObject, then also attach all the necessary Objects in the script.
 The Sprites that we will be needed is in the Sprite directory just locate the sprites and then create a GameObject then place them inside . After that name each of the the game object as Block L, Block O, Block Z, Block S, Block I, Block J, Block T.
Note: Before using the blocks make sure you set the Pixels Per Unit to 32 because the game we will make is about 1 pixel per unit block.
The Sprites that we will be needed is in the Sprite directory just locate the sprites and then create a GameObject then place them inside . After that name each of the the game object as Block L, Block O, Block Z, Block S, Block I, Block J, Block T.
Note: Before using the blocks make sure you set the Pixels Per Unit to 32 because the game we will make is about 1 pixel per unit block.
 Then add this several methods to your script.
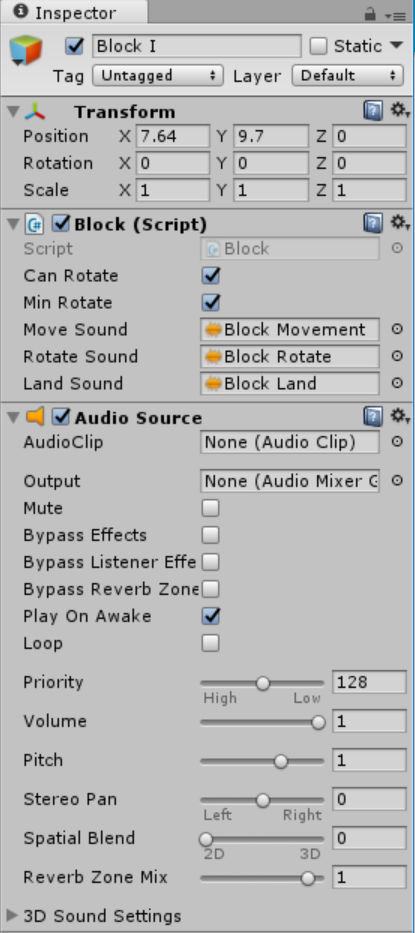
After that attached a AudioSource component and attach the script to each of the blocks, then drag all the needed sounds in the script.
Then add this several methods to your script.
After that attached a AudioSource component and attach the script to each of the blocks, then drag all the needed sounds in the script.
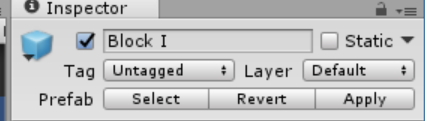
 After we're done making the blocks, you will need to prefabs each of the gameobject so that we can use it later. In the Resources Directory create a new directory name it as "Prefabs" then inside the Prefbas directory create again a new directory namely "Blocks". After making the directory drag all the GameObject inside the Blocks Directory as show in the image below.
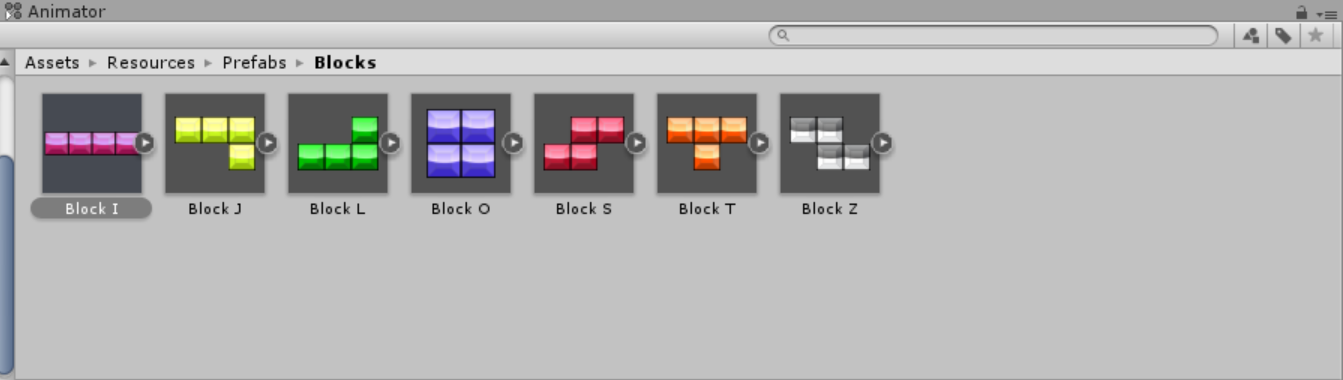 You'll notice that when you drag all the GameObjects in assets the name of the gameobject in the Hierarchy will turn blue, also will a add a new option in the inspector
 First thing to do is to adjust our camera set the value of its components as show below
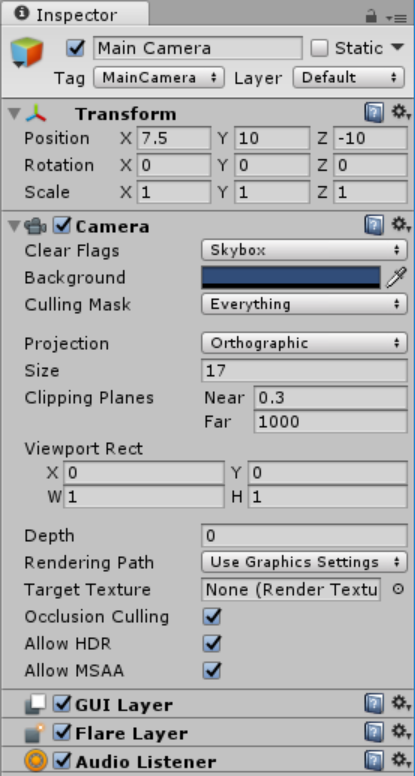 Note: We configure the Camera because our game itself is a grid base, when we spawn the blocks we just need to locate the absolute value of the x and y coordinate to place the block in exact position.
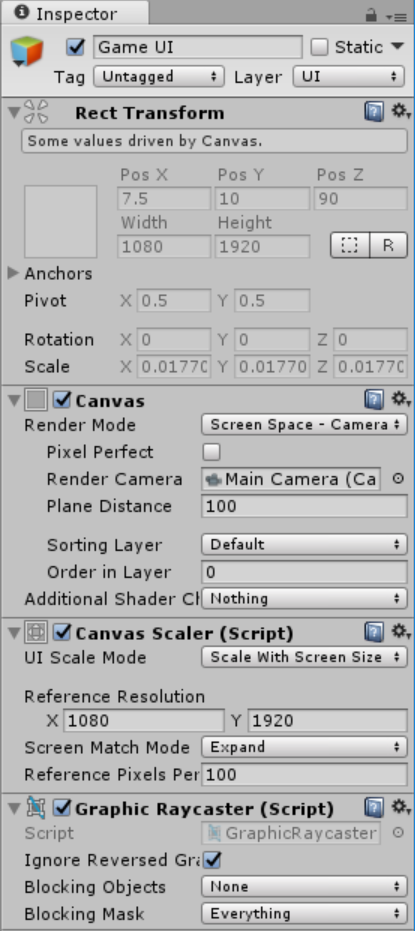
The Game UI take care the visual of the game, To do that go to GameObject then select the Image. Rename The canvas as "Game UI" and the image as "Background UI".
Note: We configure the Camera because our game itself is a grid base, when we spawn the blocks we just need to locate the absolute value of the x and y coordinate to place the block in exact position.
The Game UI take care the visual of the game, To do that go to GameObject then select the Image. Rename The canvas as "Game UI" and the image as "Background UI".
 Now we will add some Images to make the game stunning. Add at least 5 Images, then name as:
*Score Background
*Score Text Background
*Level Background
*Lines Background
*Preview Background
After that set all the component values as shown in the image.
Now we will add some Images to make the game stunning. Add at least 5 Images, then name as:
*Score Background
*Score Text Background
*Level Background
*Lines Background
*Preview Background
After that set all the component values as shown in the image.
 Then add a text GameObject the set its components same as the image below

 Then add a text GameObject the set its components same as the image below
 Then add a two text GameObject then set the components same as the image below

 Then add a two text GameObject then set the components same as the image below

 Then after that add a several images, this will display the blocks that will be drop later. Set its component values in the inspector same as the image shown below.

 This will be the output of the Game UI that we created.

 This will be the grid look like after you've done
 After that add a two panels inside the new canvas and name it as "Pause Panel Background" and "GameOver Panel Background". Then set it component as shown below
 Then add another panel called it "Pause Panel" and set its component as shown below
 Inside the Pause Panel add Text, and two Buttons, then set their components as shown in the image


 Then add another panel inside of it namely "GameOver Panel", then set its component as shown below
 Then add several components inside the new panel (2 Buttons, 2 Text), then set their components as shown below
 Then add additional text inside the score text name it as "Highscore Text", this will display when the player achieved a highscore.
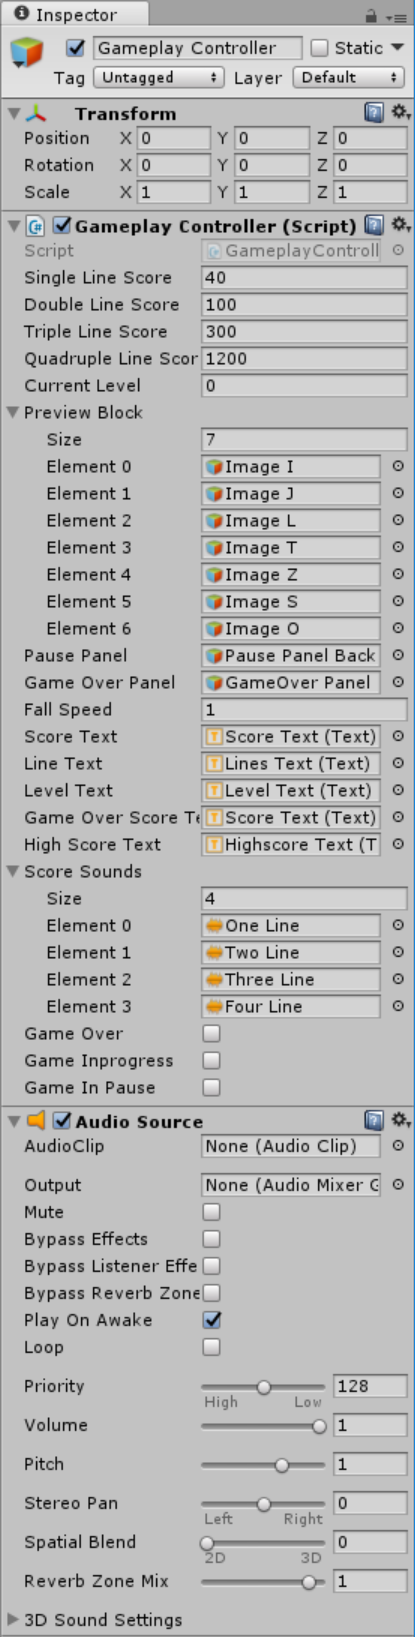
 Note: Don't forget to attach the Gameplay Controller in the buttons, and also attach all the needed components in the Gameplay Controller Script as shown below.
 After you're done select the Player Setting, then fill up the required information in order to build the application.
 Once you're done try to start the game by the clicking the play button
 Congratulations you successfully created the Tetris Clone Game. I hope that this simple tutorial help you develop your skills in building games. For more updates and tutorials just kindly visit this site. Enjoy Coding!!!
Getting Started
First you will need to download & install Unit Game Engine, here's the link for the https://store.unity.com/?_ga=2.171981603.1032904231.1505288244-474976023.1495297794 After the Unity Game Engine is Installed , open the unity game engine then we will get started. Here is the interface of the unity game engine when open.
Then Click "NEW", then enter the project name "Prime Blocks ". After entering the name click the 2D button because the game will be make is in 2D environment, and after that place it into your desiganated directory.
This is how the Unity Game Engine Environment look like.
Now we are now ready to create our awesome game.
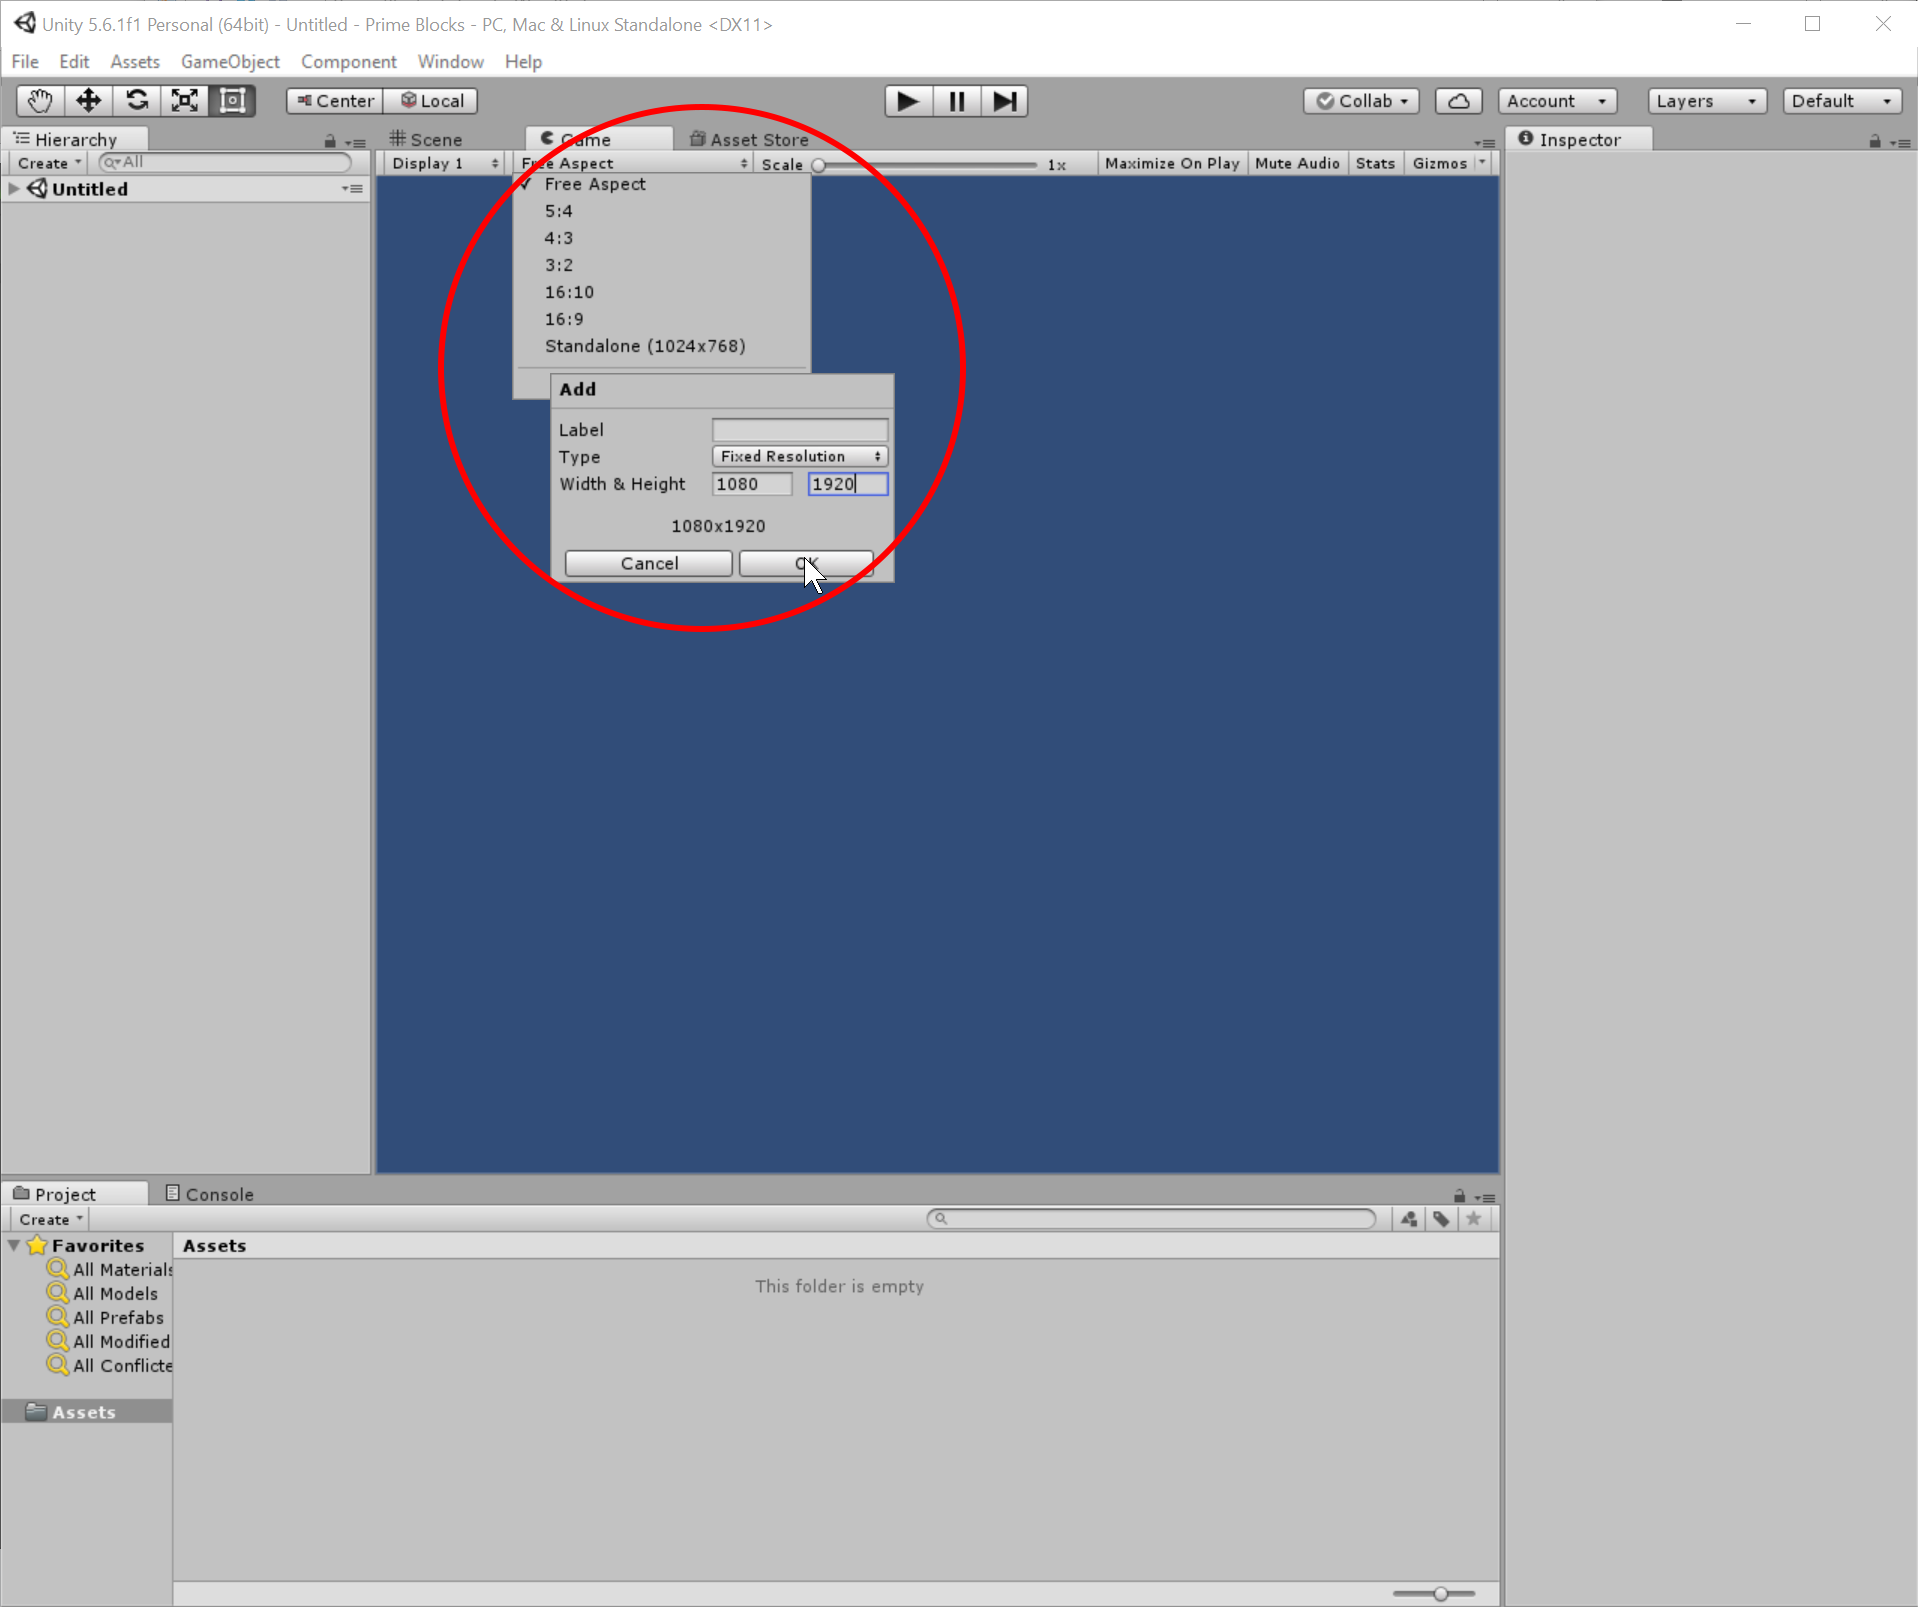
Game Resolution
First thing to do is to set up our Game resolution, to do that click the game tab then go to "Free Aspect" it is just below of Game tab. Then click the add button (the one that looks like +) and enter the value of each properties. For Width just make it "1080" so that we can have a great resolution for our game, then for Height leave it just "1920".
Categorize Our Assets
We will now then categorze our needed assets, so that we can avoid misplaces and hard to locate our files. Animation - This is where we put all our animator controller and animations Fonts - This where all our fonts is located Resources - This where we put all our prepab object that we will need to make a duplicating objects. Scenes - This is the we put all our scence objects. Scripts - This is where we put all our scripts. Sounds - The directory for our audio files. Sprites - All our images, and sprites can be located here. Note: All our needed assets is already include in the download file. To get the assets just click below the download button.Creating Main Menu
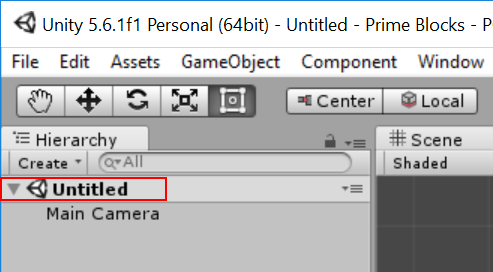
Creating Scenes
In the Unity environment you will notice an "Untitled" object in the Hierarchy area. That is the name of the scenes by default, to change it just simply press ctrl + s and save it as "Main Menu"
Creating Game Controller
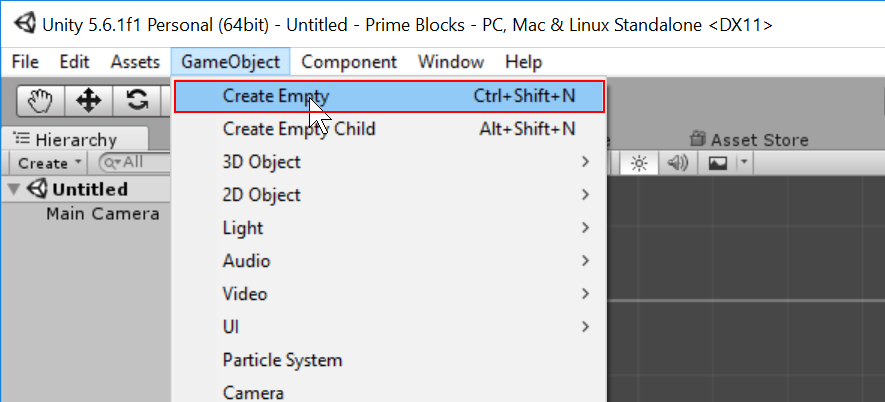
Now that we have the main menu scene we will now create the Game Controller. The Game Controller handles all the save data of our game. To do that just click "GameObject" tab, then a drop down will show up. Then in the sub menu click "Create Empty", a GameObject will appear in the Hierarchy.
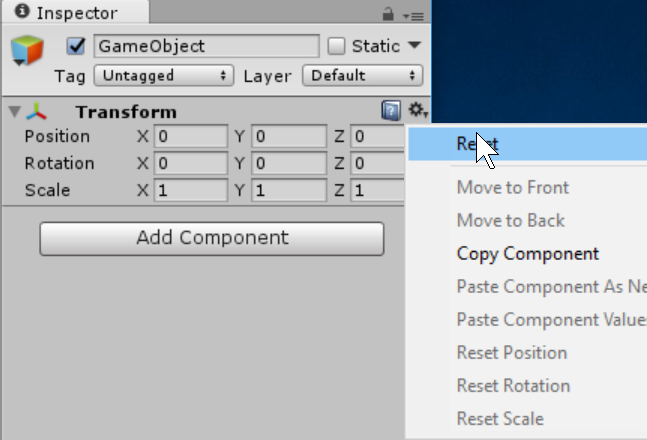
Before working on the GameObject make sure to reset its transform to avoid conflict in the future.
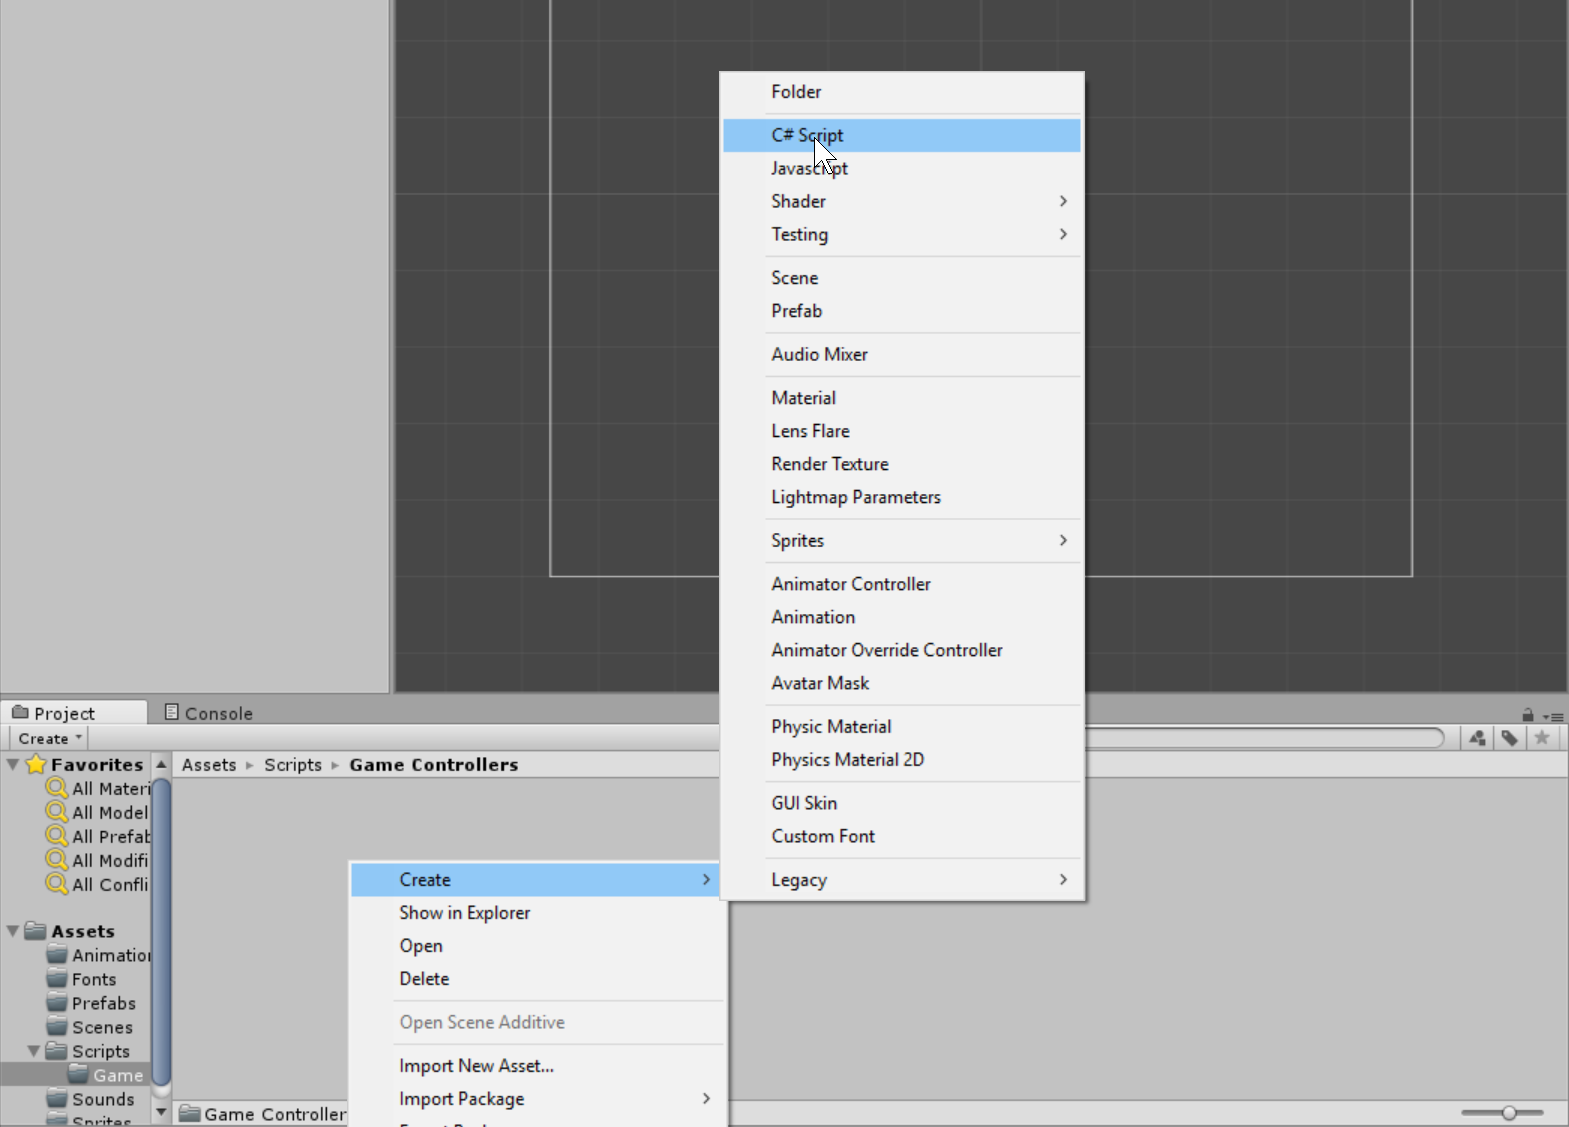
After that rename your GameObject as "Game Controller" , then go to the Scripts directory and right click the mouse button, and select create then choose C# script.
Save it as "GameController".
Note: To avoid script error make sure the name of your script has no space, because C# is case sensitive to white space.
Next open your newly created Script, you notice that there is already a block code in the script. By default the unity engine already created that part to make the developer at ease.
- using System.Collections;
- using System.Collections.Generic;
- using UnityEngine;
- public class GameController : MonoBehaviour {
- // Use this for initialization
- void Start () {
- }
- // Update is called once per frame
- void Update () {
- }
- }
- using System;
- using System.IO;
- using System.Runtime.Serialization.Formatters.Binary;
- public static GameController instance;
- public bool isMusicOn;
- public bool isGameStartedFirstTime;
- public int highScore;
- public int currentScore;
- public int currentLevel;
- private GameData data;
- void Awake(){
- CreateInstance ();
- InitializeGameVariables ();
- }
- // Use this for initialization
- void Start () {
- }
- void CreateInstance(){
- if (instance != null) {
- Destroy (gameObject);
- } else {
- instance = this;
- DontDestroyOnLoad (gameObject);
- }
- }
- void InitializeGameVariables(){
- Load ();
- if (data != null) {
- isGameStartedFirstTime = data.GetIsGameStartedFirstTime ();
- } else {
- isGameStartedFirstTime = true;
- }
- if (isGameStartedFirstTime) {
- isMusicOn = true;
- isGameStartedFirstTime = false;
- highScore = 0;
- data.SetIsMusicOn (isMusicOn);
- data.SetIsGameStartedFirstTime (isGameStartedFirstTime);
- data.SetHighScore (highScore);
- Save ();
- Load ();
- } else {
- highScore = data.GetHighScore ();
- isGameStartedFirstTime = data.GetIsGameStartedFirstTime ();
- isMusicOn = data.GetIsMusicOn ();
- }
- }
- public void Save(){
- FileStream file = null;
- try{
- file = File.Create(Application.persistentDataPath + "/save.dat");
- if(data != null){
- data.SetHighScore(highScore);
- data.SetIsGameStartedFirstTime(isGameStartedFirstTime);
- data.SetIsMusicOn(isMusicOn);
- bf.Serialize(file, data);
- }
- }catch(Exception e){
- Debug.LogException (e, this);
- }finally{
- if(file != null){
- file.Close ();
- }
- }
- }
- public void Load(){
- FileStream file = null;
- try{
- file = File.Open(Application.persistentDataPath + "/save.dat", FileMode.Open);
- data = bf.Deserialize(file) as GameData;
- }catch(Exception e){
- Debug.LogException (e, this);
- }finally{
- if(file != null){
- file.Close ();
- }
- }
- }
- [Serializable]
- class GameData{
- private bool isGameStartedFirstTime;
- private bool isMusicOn;
- private int highScore;
- public void SetIsGameStartedFirstTime(bool isGameStartedFirstTime){
- this.isGameStartedFirstTime = isGameStartedFirstTime;
- }
- public bool GetIsGameStartedFirstTime(){
- return this.isGameStartedFirstTime;
- }
- public void SetIsMusicOn(bool isMusicOn){
- this.isMusicOn = isMusicOn;
- }
- public bool GetIsMusicOn(){
- return this.isMusicOn;
- }
- public void SetHighScore(int highScore){
- this.highScore = highScore;
- }
- public int GetHighScore(){
- return this.highScore;
- }
- }
Creating Music Controller
The Music Controller handles all the sounds of the game, this is where you put your game sound clip as an array. Just like what you did on the Game Controller, create a new GameObject then name it as "Music Controller". Then create a new C# script name it as "MusicController".
Inside the Music Controller script, create a certain variable that we will use for our sounds.
Write this code inside the Music Controller class.
- public static MusicController instance;
- public AudioClip[] audioClips;
- [HideInInspector]
- public AudioSource audioSource;
- void Awake(){
- CreateInstance ();
- audioSource = GetComponent<AudioSource> ();
- }
- void CreateInstance(){
- if (instance != null) {
- Destroy (gameObject);
- } else {
- instance = this;
- DontDestroyOnLoad (gameObject);
- }
- }
- public void PlayBgMusic(){
- if(!audioSource.isPlaying){
- AudioClip bgMusic = audioClips [0];
- if(bgMusic){
- audioSource.clip = bgMusic;
- audioSource.loop = true;
- audioSource.volume = 0.6f;
- audioSource.Play ();
- }
- }
- }
- public void GameplaySound(){
- if(!audioSource.isPlaying){
- AudioClip gameplaySound = audioClips [1];
- if(gameplaySound){
- audioSource.clip = gameplaySound;
- audioSource.loop = true;
- audioSource.volume = 0.6f;
- audioSource.Play ();
- }
- }
- }
- public void StopAllSound(){
- if(audioSource.isPlaying){
- audioSource.Stop ();
- }
- }
After that add a new component called AudioSource. AudioSource manage the sounds of the game. And uncheck the Play On Wake because it will be done automatically with the script.
Then from the sounds directory drag all the sound into the AudioClips array.
Main Menu UI
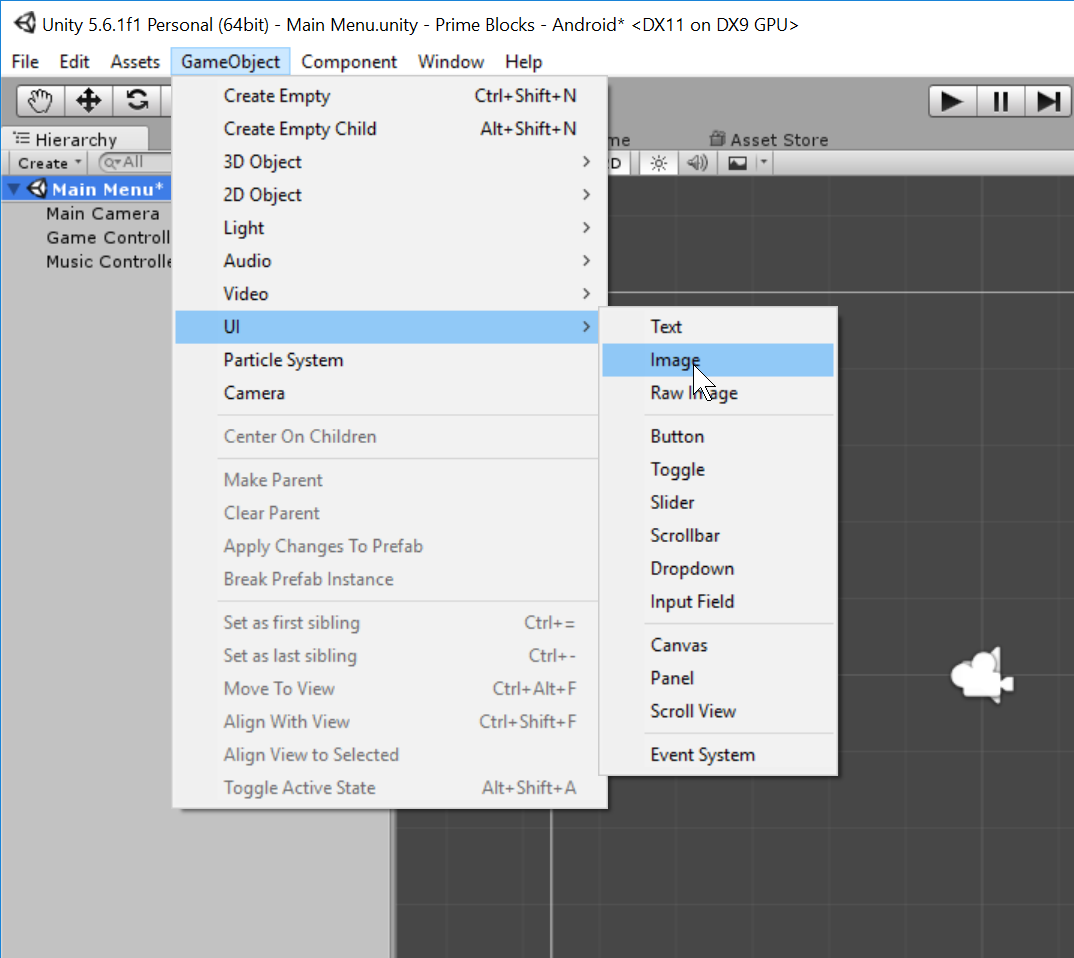
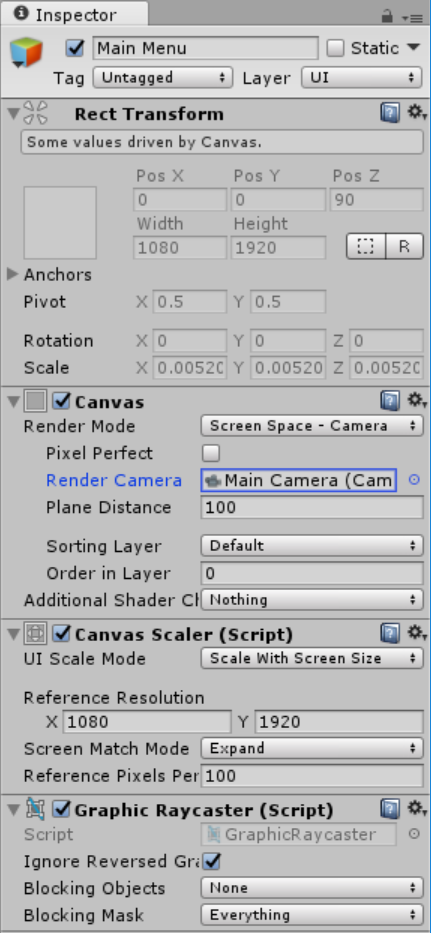
The Main Menu UI is a GameObject that hold a several Children component. To Create a UI click the GameObject menu then choose UI then Image. You notice that it automatically create a UI Canvas then your image as a child of it, and also a new object called EvenSytem. EventSystem handle all the trigger event such as when click the buttons, or toggles etc.
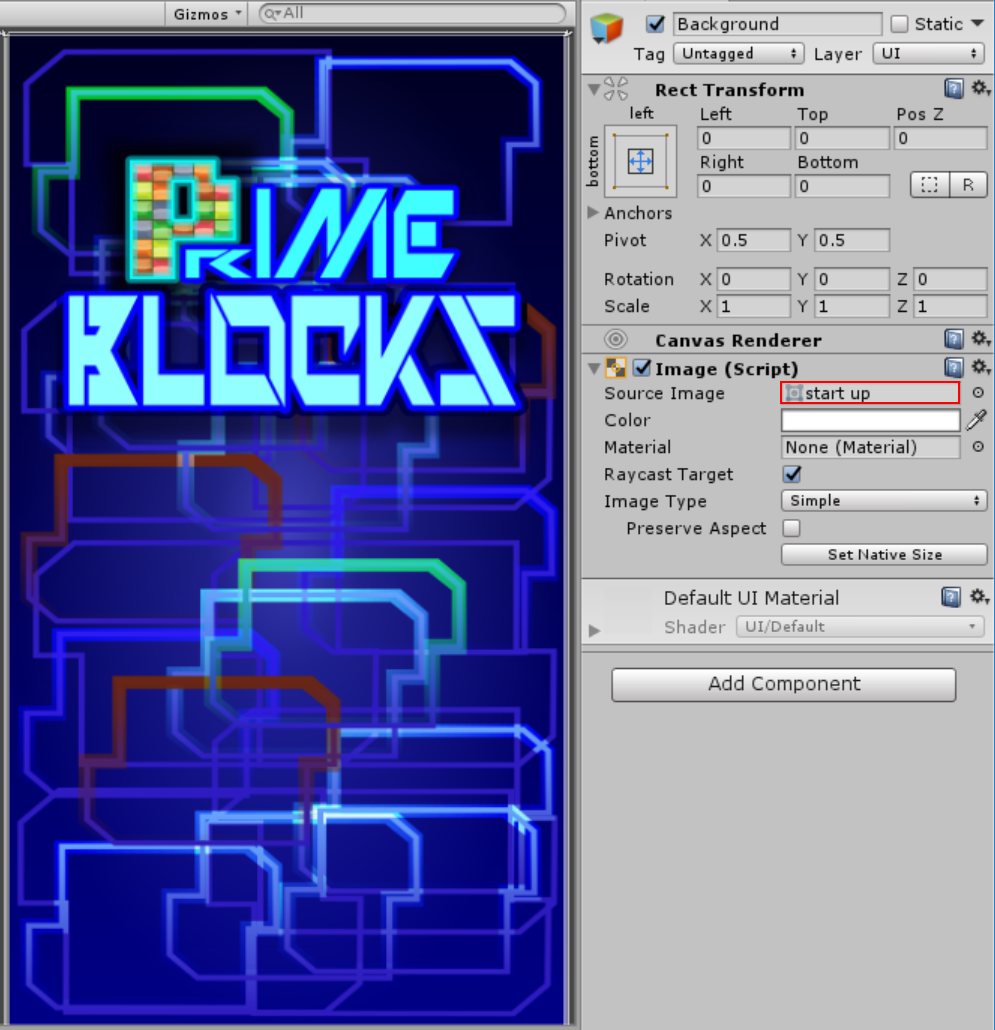
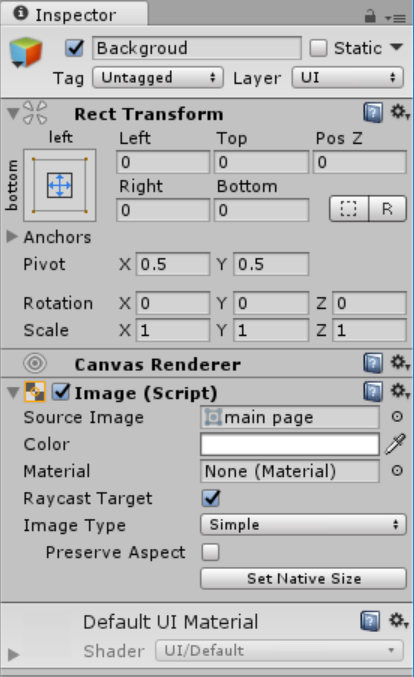
Then rename Canvas as "Main Menu UI", and also Image as "Background". In the Main Menu UI set the values same as the image shown below.
To make the Background Image locate your sprite from the Game UI directory then add it to the Background GameObject as a component.
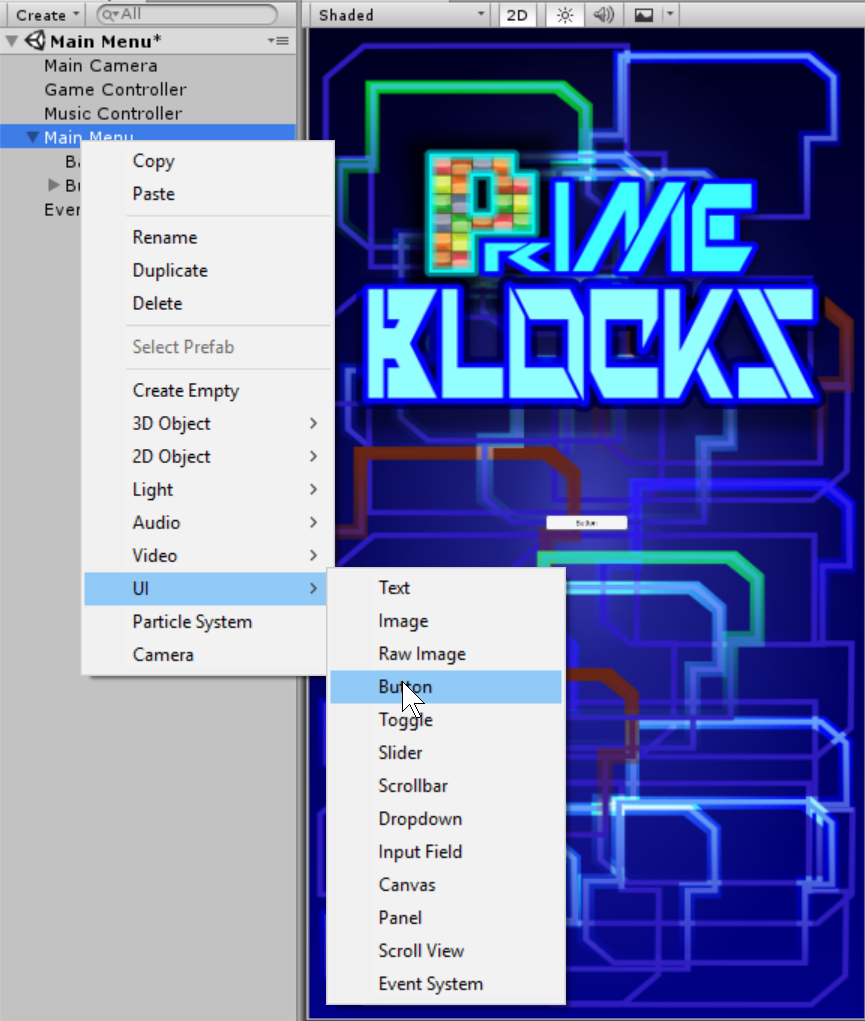
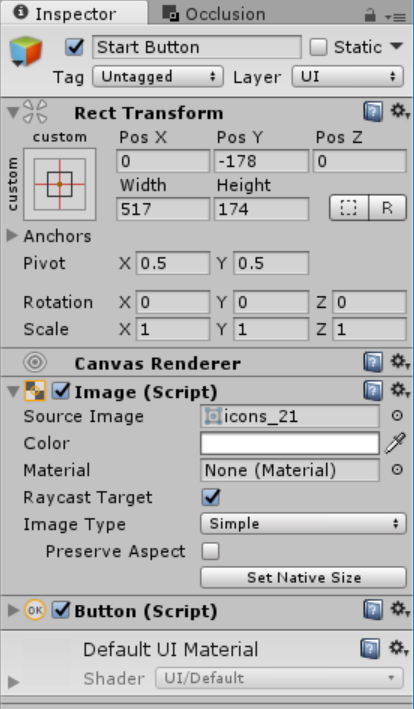
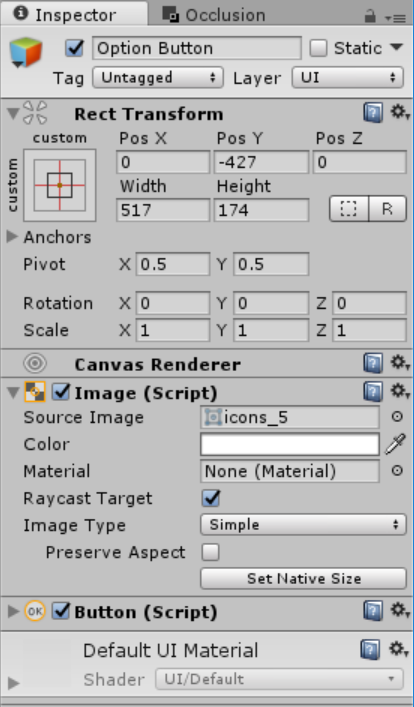
Now that we have the image we will now add two button, just like what you did on the image go to Main Menu UI right click on it select UI then choose Button. Duplicate the button then name them as "Start Button" and "Option Button".
See Image Below
Note: When slicing the sprite sheet into a several images you need to select first your image, then in Sprite Mode choose Multiple after that click Sprite Editor. A new Pop up window will appear from here click the Slice on the menu bar, then Slice. It will automatically slice the sheet of a sprite.
Now that your sprites are ready remove the child text of button, then add a sprite to their components.
Then set the values of each GameObject base on the image below.
Start Button
Option Button
Main Menu UI - Option Panel, Exit Panel
We will now add two panels in the game, to do that just simple go to the GameObject again then choose panel this time.Option Panel
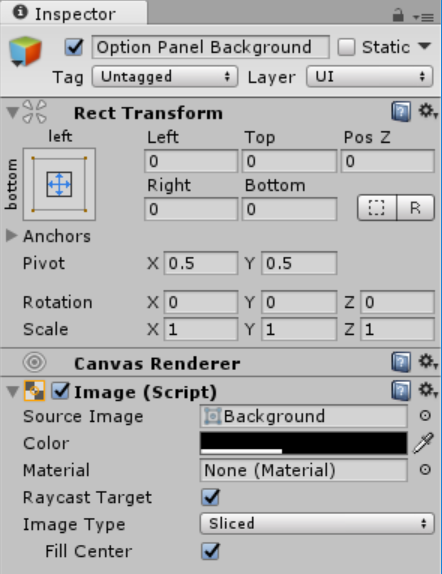
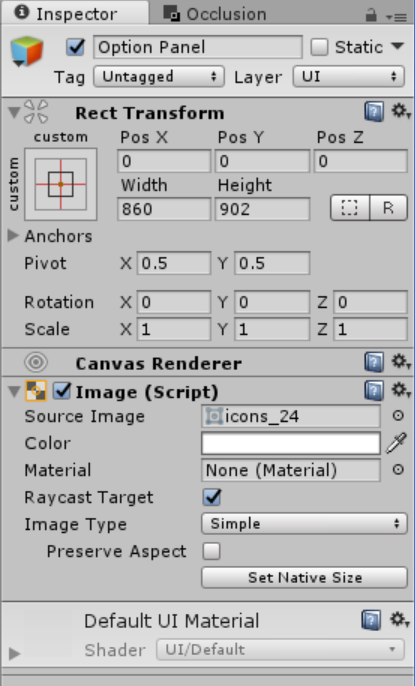
In the panel Inspector click color then change its color to #00000, this will act as a background for the panel. Then change its name as Option Panel Background after that add now add a new panel by just right clicking the gameobject then set its name as "Option Panel" and set the components as shown in the inspector below.Option Panel Background
Option Panel
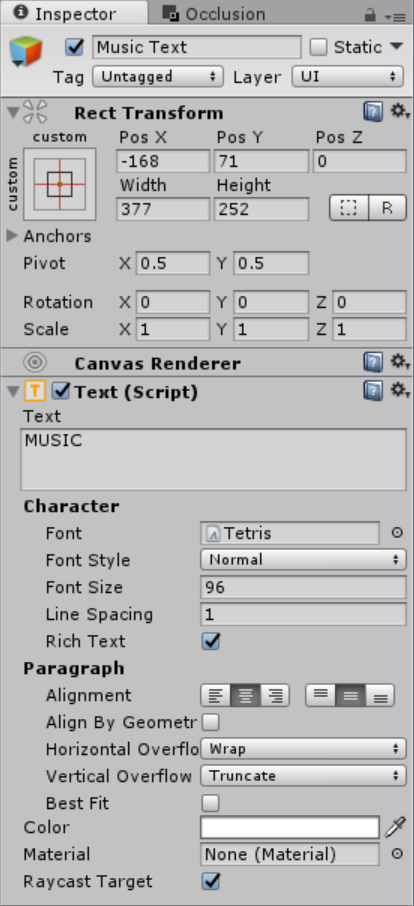
Then add a several children (Text, Button, Toggle) for the Option Panel. After that set the component values as show in the image below.
Text
Button
Toggle
Note: Delete the label text from the children of Toggle, because we will not be needed that for now. The font of the component is already included in the assets folder of the sourcecode file, just simply locate its directory to be able to use.
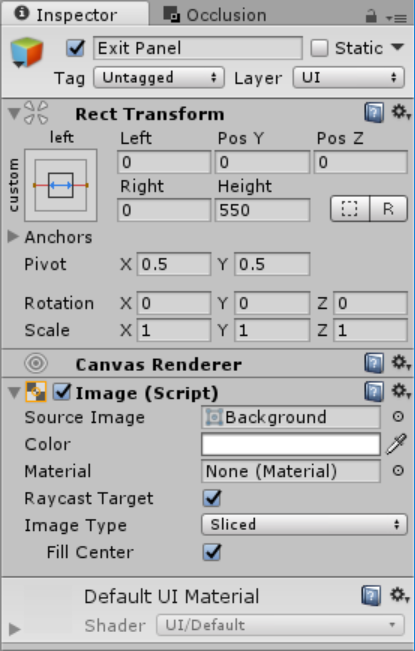
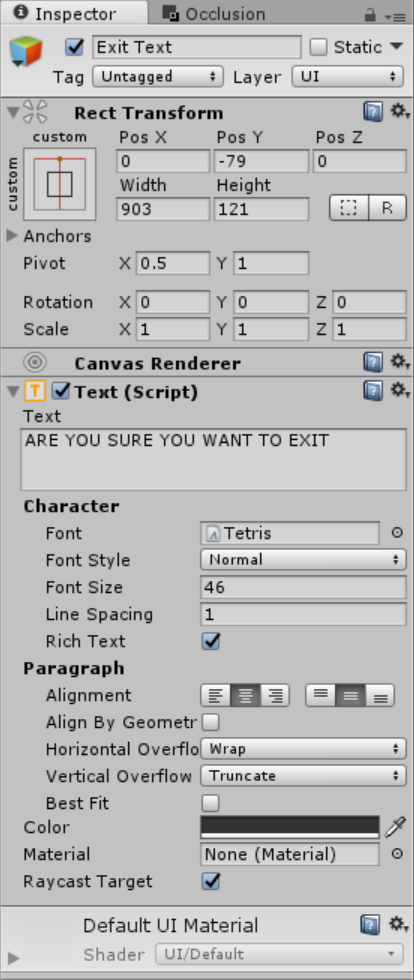
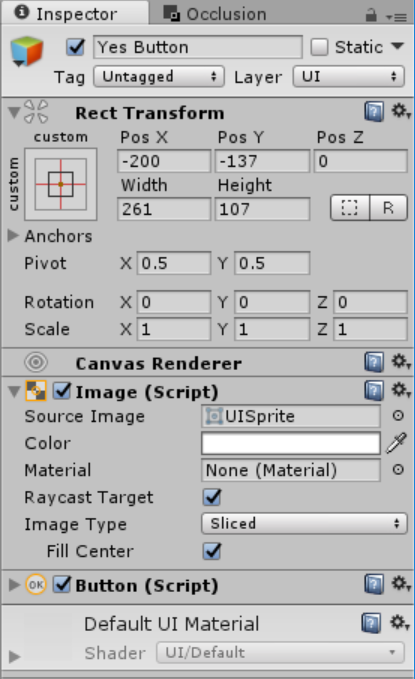
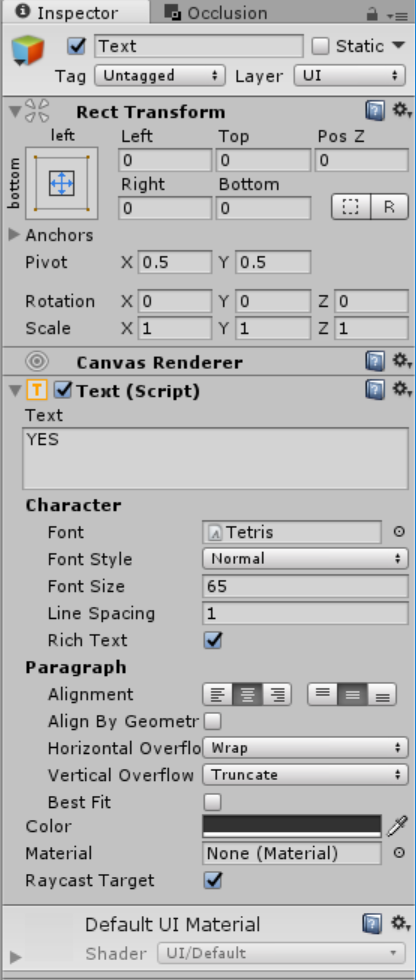
Exit Panel
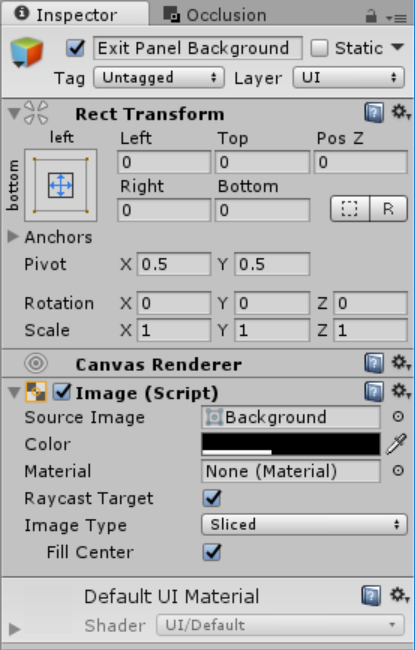
Now that we're done with with the other panel. Next we will now create the Exit Panel, exit panel take care of the prompt that closes the app. Just like what you did on the other panel, create new panel then name it as "Exit Panel Background". And create another panel by just right clicking the gameobject then set its name as "Exit Panel" and set the components as shown in the inspector below.Exit Panel Background
Exit Panel
Then add a several children (Text, Buttons) for the Exit Panel. After that set the component values as show in the image below.
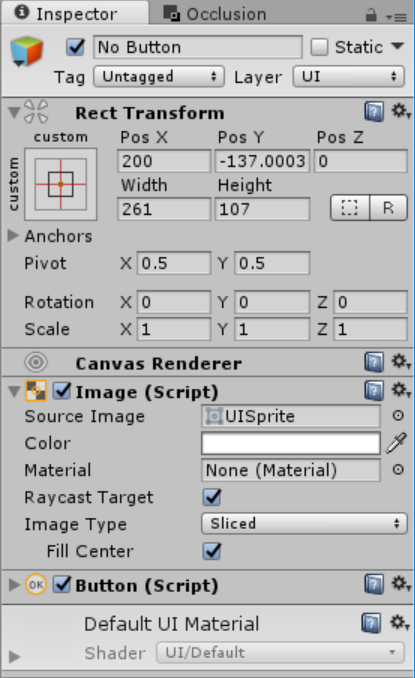
Text
Yes Button
No Button
Creating Main Menu Controller
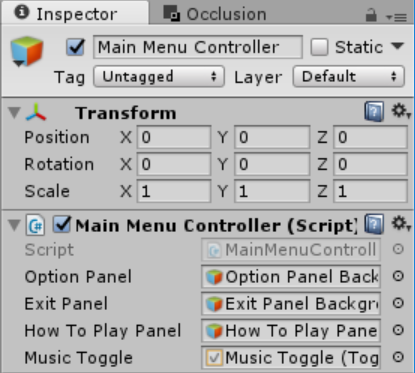
Now that we have the main menu ui ready we will now create the Main Menu Controller. The Main Menu Controller is the one that handles the option settings and where you start the game, and also trigger some events that necessary needed in the game. To this just simply create a new GameObject name it as Main Menu Controller. Create a script and name MainMenuController. Inside the Main Menu Controller script, create a certain variable that we will use. Write this code inside the Main Menu Controller class.- public GameObject optionPanel, exitPanel, howToPlayPanel;
- public Toggle musicToggle;
- // Use this for initialization
- void Start () {
- if (GameController.instance.isMusicOn) {
- MusicController.instance.PlayBgMusic ();
- musicToggle.isOn = true;
- } else {
- MusicController.instance.StopAllSound ();
- musicToggle.isOn = false;
- }
- }
- void Update(){
- if(Input.GetKeyDown(KeyCode.Escape)){
- if (exitPanel.activeInHierarchy) {
- exitPanel.SetActive (false);
- } else {
- exitPanel.SetActive (true);
- }
- if(optionPanel.activeInHierarchy){
- optionPanel.SetActive (false);
- }
- if(howToPlayPanel.activeInHierarchy){
- howToPlayPanel.SetActive (false);
- }
- }
- }
- public void StartButton(){
- SceneManager.LoadScene (SceneManager.GetActiveScene ().buildIndex + 1);
- }
- public void OptionButton(){
- optionPanel.SetActive (true);
- }
- public void CloseButton(){
- optionPanel.SetActive (false);
- }
- public void MusicButton(){
- if(musicToggle.isOn){
- MusicController.instance.PlayBgMusic ();
- GameController.instance.isMusicOn = true;
- GameController.instance.Save ();
- }else{
- MusicController.instance.StopAllSound ();
- GameController.instance.isMusicOn = false;
- GameController.instance.Save ();
- }
- }
- public void YesButton(){
- Application.Quit ();
- }
- public void NoButton(){
- exitPanel.SetActive (false);
- }
- public void HowToPlayButton(){
- howToPlayPanel.SetActive (true);
- }
- public void CloseHowToPlay(){
- howToPlayPanel.SetActive (false);
- }
using UnityEngine.UI;
And for loading some scenes you will also need this module
using UnityEngine.SceneManagement;
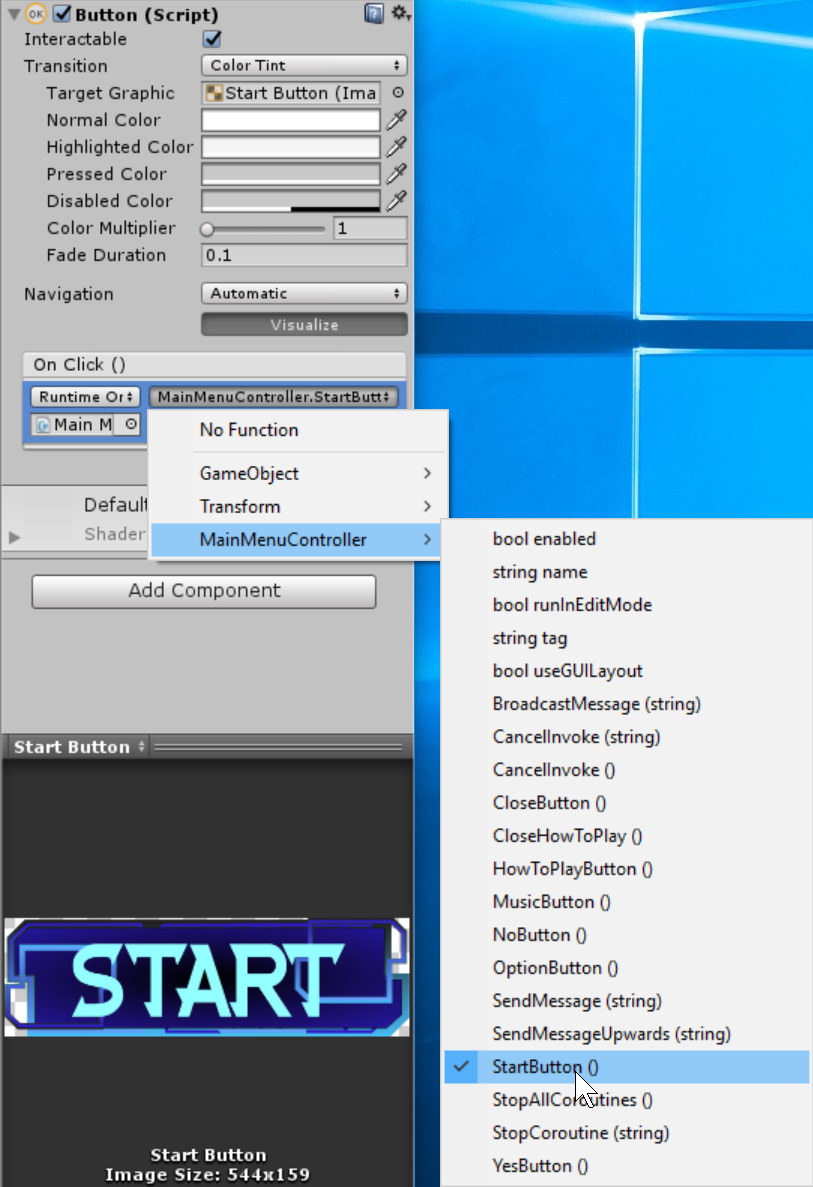
Attach the script to the MainMenuController object as a component, as shown in the image.
Note: Make sure you attach the Main Menu Controller to each of the Buttons that you created, this will trigger the methods that we created from the script.
Creating Level Menu
First create a new scene by pressing ctrl + n then save it in the scene directory as "Level Menu".Level Menu UI
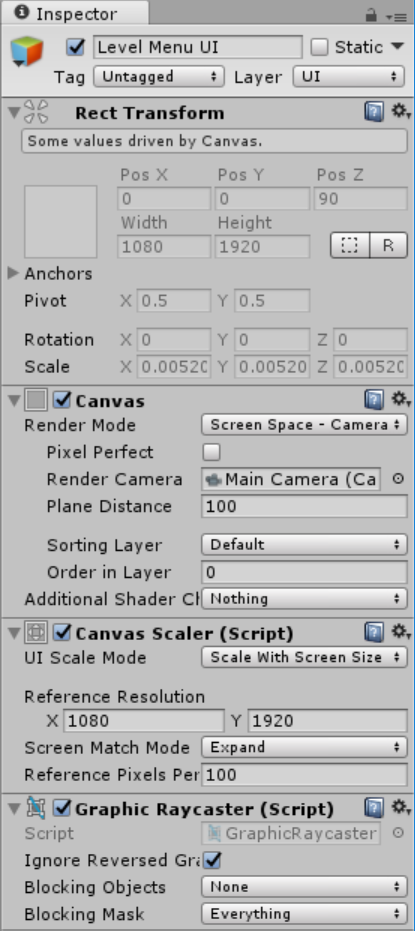
Next create a image and canvas will be created at the same time. Then rename the canvas as "Level Menu UI" and the image as "Background" Set the component value of the canvas as shown below
Then for the Image
Best Score Text
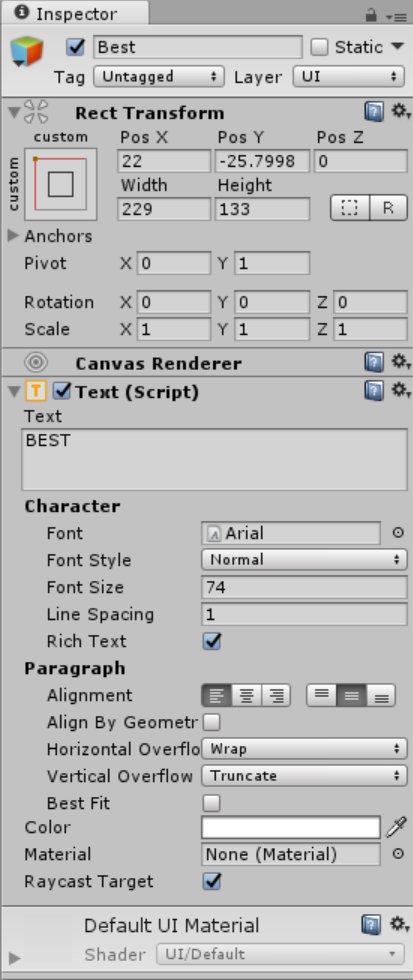
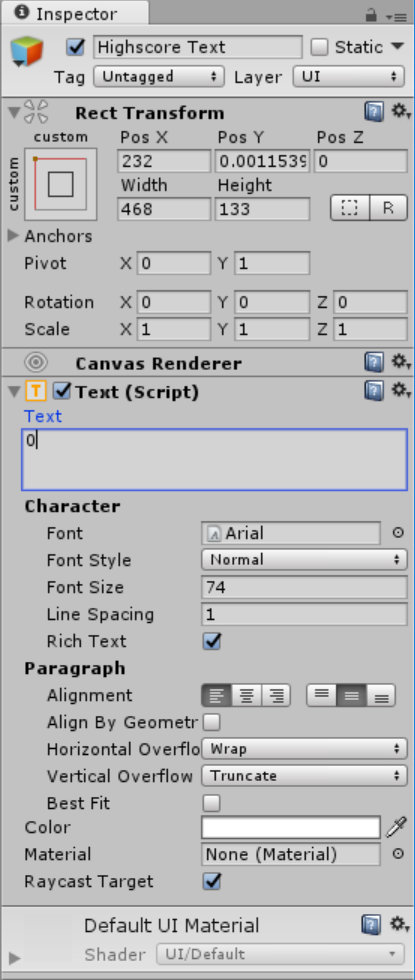
Now we will add a scoring at the top left of the screen. To do that simply go to the GameObject select UI then choose Text, rename it as "Best" , next add another child text by just right clicking the gameobject text name it as "Highscore Text". Then set the components of each gameobject as shown below.Best
Highscore Text
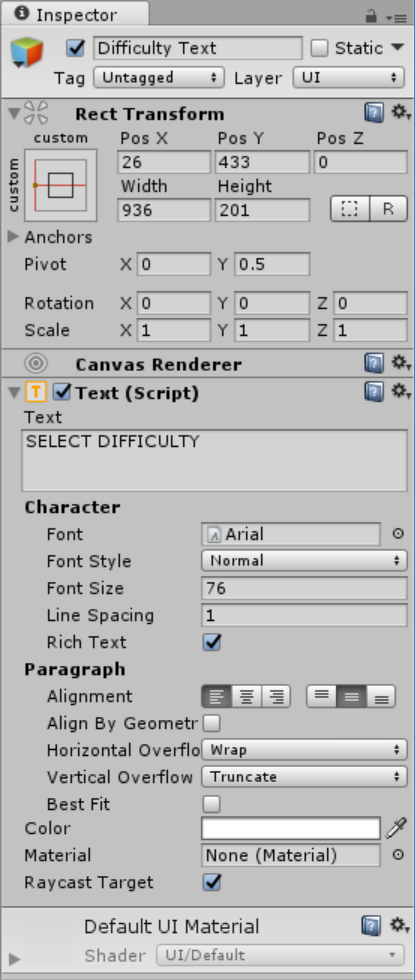
Then after that add a text name it as "Difficulty Text", then set the values as shown below.
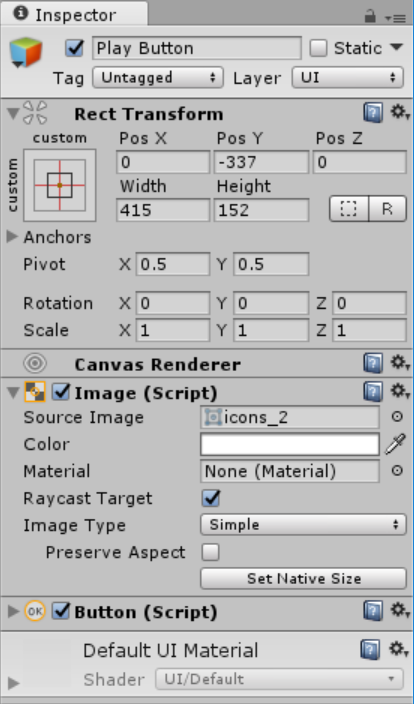
Add a button then set its component as shown below
Level Meter
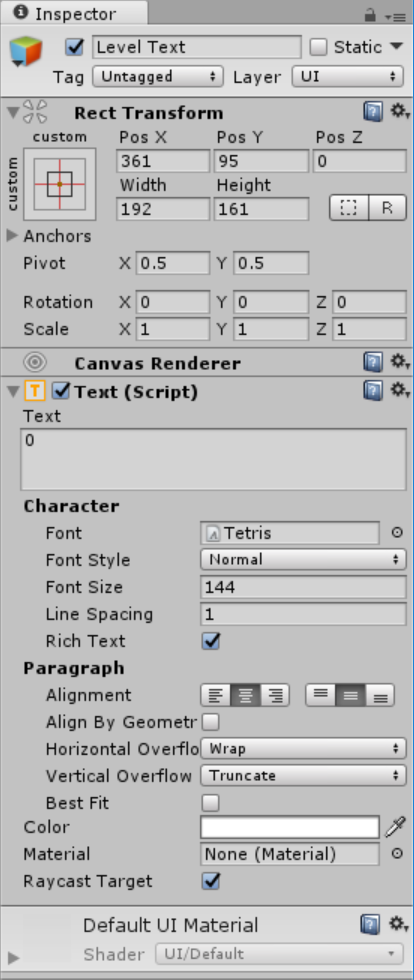
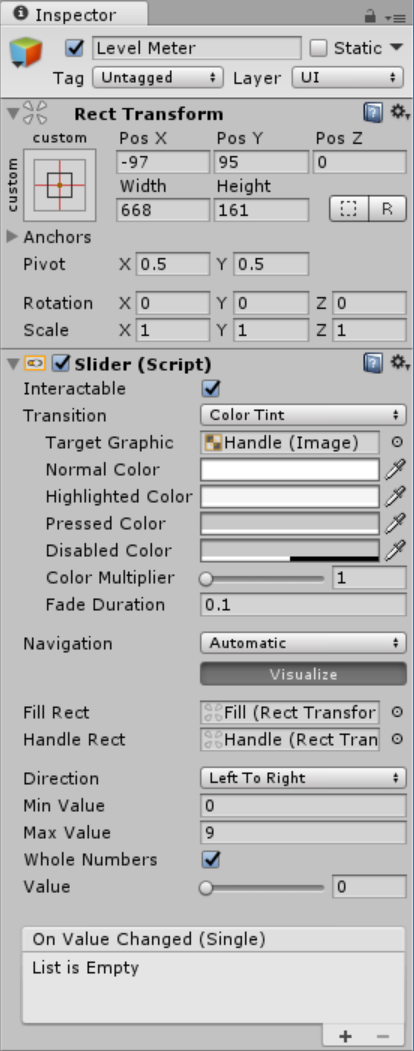
Next add a UI object that will handle the levels of the game when you start, go to GameObject select UI then choose Slider and also add a new text as an indicator. Rename the slider as "Level Meter" and text as "Level Text". Set the component values as shown below.Level Text
Level Meter
Level Menu Controller
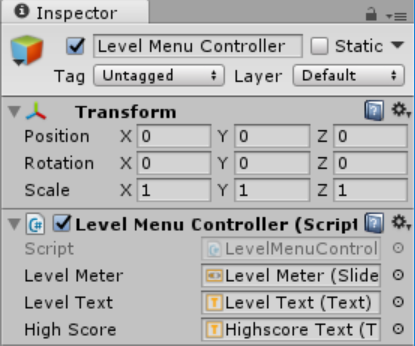
Now that we have the level menu ui, we will now create the Level Menu Controller just like what we did on the main menu. The Level Menu Controller handles the difficulties of the game by increasing or decreasing the Level Meter. To this just simply create a new GameObject name it as "Level Menu Controller". Create then a script and name it "LevelMenuController". Inside the Level Menu Controller script, create a certain variable that we will use. Write this code inside the Main Menu Controller class.- public Slider levelMeter;
- public Text levelText;
- public Text highScore;
- private int level;
- // Use this for initialization
- void Start () {
- if(GameController.instance.isMusicOn){
- MusicController.instance.PlayBgMusic ();
- }else{
- MusicController.instance.StopAllSound ();
- }
- InitializeLevelController ();
- }
- void Update(){
- if(Input.GetKeyDown(KeyCode.Escape)){
- SceneManager.LoadScene (SceneManager.GetActiveScene ().buildIndex - 1);
- }
- UpdateLevelMenu ();
- }
- void InitializeLevelController(){
- highScore.text = GameController.instance.highScore.ToString ("N0");
- }
- void UpdateLevelMenu(){
- level = (int)levelMeter.value;
- GameController.instance.currentLevel = level;
- levelText.text = level.ToString ();
- }
- public void PlayButton(){
- MusicController.instance.audioSource.Stop ();
- SceneManager.LoadScene (SceneManager.GetActiveScene ().buildIndex + 1);
- }
Creating The Gameplay
We will now create the gameplay, first thing to do is to create a new scene then save it inside the Scene directory as "Gameplay".Creating The Blocks
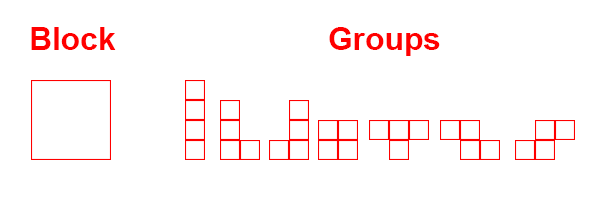
To create the game blocks, we will need to group the blocks as shown in the image below.
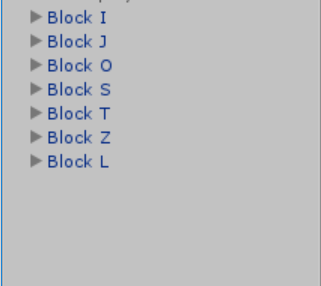
The Sprites that we will be needed is in the Sprite directory just locate the sprites and then create a GameObject then place them inside . After that name each of the the game object as Block L, Block O, Block Z, Block S, Block I, Block J, Block T.
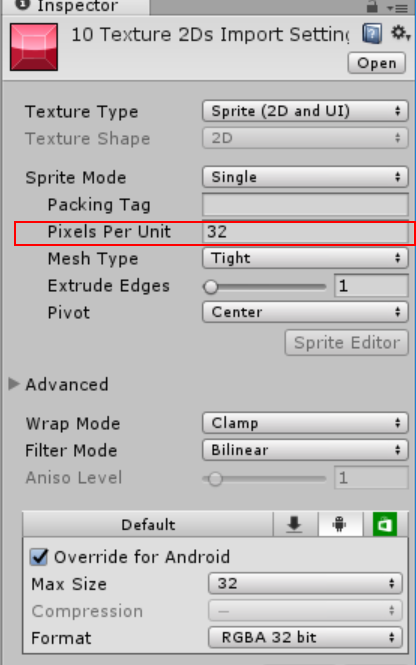
Note: Before using the blocks make sure you set the Pixels Per Unit to 32 because the game we will make is about 1 pixel per unit block.
Creating the Block Script
After creating the blocks we will add now the script that will make the block act responsibly in the game. Go to the Script directory then create another directory name it as "Player". In side the new directory create a new script called it "Block". Write this certain variables inside the Block class- public bool canRotate;
- public bool minRotate;
- public AudioClip moveSound;
- public AudioClip rotateSound;
- public AudioClip landSound;
- private AudioSource audioSource;
- private float fallSpeed;
- private float fall;
- private float verticalMoveSpeed = 0.02f;
- private float horizontalMoveSpeed = 0.03f;
- private float holdDownDelay = 0.2f;
- private float verticalDelay = 0;
- private float horizontalDelay = 0;
- private float holdDownTimerHorizontal = 0;
- private float holdDownTimerVertical = 0;
- private bool moveHorizontal;
- private bool moveVertical;
- private bool moved = false;
- private bool inPositionBlock;
- private int touchSensitivityHorizontal = 8;
- private int touchSensitivityVertical = 4;
- private Vector2 prevousUnitPosition = Vector2.zero;
- private Vector2 direction = Vector2.zero;
- void Awake(){
- tag = "CurrentBlock";
- audioSource = GetComponent<AudioSource> ();
- fallSpeed = GameplayController.instance.fallSpeed;
- }
- // Use this for initialization
- void Start () {
- }
- // Update is called once per frame
- void Update () {
- if (!GameplayController.instance.gameOver && GameplayController.instance.gameInprogress) {
- if (!inPositionBlock) {
- PlayerController ();
- TouchScreen ();
- } else {
- DestroyBlocks ();
- }
- }
- }
- void DestroyBlocks(){
- if(transform.childCount <= 0){
- Destroy (gameObject);
- }
- }
- void TouchScreen(){
- if(Input.touchCount > 0){
- Touch touch = Input.GetTouch (0);
- if(touch.phase == TouchPhase.Began){
- }else if(touch.phase == TouchPhase.Moved){
- Vector2 touchDeltaPosition = touch.deltaPosition;
- direction = touchDeltaPosition.normalized;
- if(Mathf.Abs(touch.position.x - prevousUnitPosition.x) >= touchSensitivityHorizontal && direction.x < 0 && touchDeltaPosition.y > -10 && touchDeltaPosition.y < 10){
- MoveLeft ();
- prevousUnitPosition = touch.position;
- moved = true;
- }else if(Mathf.Abs(touch.position.x - prevousUnitPosition.x) >= touchSensitivityHorizontal && direction.x > 0 && touch.deltaPosition.y > -10 && touch.deltaPosition.y < 10){
- MoveRight ();
- prevousUnitPosition = touch.position;
- moved = true;
- }else if(Mathf.Abs(touch.position.y - prevousUnitPosition.y) >= touchSensitivityVertical && direction.y < 0 && touchDeltaPosition.x > -10 && touchDeltaPosition.x < 10){
- MoveDown ();
- prevousUnitPosition = touch.position;
- moved = true;
- }
- }else if(touch.phase == TouchPhase.Ended){
- if(!moved && touch.position.x > Screen.width / 4){
- Rotate ();
- }
- moved = false;
- }
- }
- if(Time.time - fall >= fallSpeed){
- MoveDown ();
- }
- }
- void PlayerController(){
- if(Input.GetKeyUp(KeyCode.RightArrow) || Input.GetKeyUp(KeyCode.LeftArrow)){
- moveHorizontal = false;
- horizontalDelay = 0;
- holdDownTimerHorizontal = 0;
- }
- if (Input.GetKeyUp (KeyCode.DownArrow)) {
- moveVertical = false;
- horizontalDelay = 0;
- holdDownTimerVertical = 0;
- }
- if(Input.GetKey(KeyCode.RightArrow)){
- MoveRight ();
- }
- if(Input.GetKey(KeyCode.LeftArrow)){
- MoveLeft ();
- }
- if(Input.GetKeyDown(KeyCode.UpArrow)){
- Rotate ();
- }
- if(Input.GetKey(KeyCode.DownArrow) || Time.time - fall >= fallSpeed ){
- MoveDown ();
- }
- }
- private bool CheckCorrectPosition(){
- foreach(Transform block in transform){
- Vector2 position = GameplayController.instance.Estimate (block.position);
- if(GameplayController.instance.CheckBlockInside(position) == false){
- return false;
- }
- if(GameplayController.instance.GetGridPosition(position) != null && GameplayController.instance.GetGridPosition(position).parent != transform){
- return false;
- }
- }
- return true;
- }
- void MoveLeft(){
- if (moveHorizontal) {
- if (holdDownTimerHorizontal < holdDownDelay) {
- holdDownTimerHorizontal += Time.deltaTime;
- return;
- }
- if (horizontalDelay < horizontalMoveSpeed) {
- horizontalDelay += Time.deltaTime;
- return;
- }
- }
- if(!moveHorizontal){
- moveHorizontal = true;
- }
- horizontalDelay = 0;
- if (CheckCorrectPosition ()) {
- GameplayController.instance.UpdateGrid (this);
- if(GameController.instance.isMusicOn){
- audioSource.PlayOneShot (moveSound);
- }
- } else {
- }
- }
- void MoveRight(){
- if (moveHorizontal) {
- if (holdDownTimerHorizontal < holdDownDelay) {
- holdDownTimerHorizontal += Time.deltaTime;
- return;
- }
- if (horizontalDelay < horizontalMoveSpeed) {
- horizontalDelay += Time.deltaTime;
- return;
- }
- }
- if(!moveHorizontal){
- moveHorizontal = true;
- }
- horizontalDelay = 0;
- if (CheckCorrectPosition ()) {
- GameplayController.instance.UpdateGrid (this);
- if(GameController.instance.isMusicOn){
- audioSource.PlayOneShot (moveSound);
- }
- } else {
- }
- }
- void MoveDown(){
- if (moveVertical) {
- if (holdDownTimerVertical < holdDownDelay) {
- holdDownTimerVertical += Time.deltaTime;
- return;
- }
- if (verticalDelay < verticalMoveSpeed) {
- verticalDelay += Time.deltaTime;
- return;
- }
- }
- if (!moveVertical) {
- moveVertical = true;
- }
- verticalDelay = 0;
- if (CheckCorrectPosition ()) {
- GameplayController.instance.UpdateGrid (this);
- } else {
- GameplayController.instance.DeleteRow ();
- if(GameplayController.instance.CheckOutsideGrid (this)){
- GameplayController.instance.GameOver ();
- }
- if(!GameplayController.instance.gameOver){
- GameController.instance.currentScore += Random.Range (1, 15);
- }
- tag = "InPositionBlock";
- inPositionBlock = true;
- if(GameController.instance.isMusicOn){
- audioSource.PlayOneShot (landSound);
- }
- GameplayController.instance.SpawnNextBlock ();
- }
- fall = Time.time;
- }
- void Rotate(){
- if(canRotate){
- if (minRotate) {
- if (transform.rotation.eulerAngles.z >= 90) {
- transform.Rotate (0, 0, -90);
- } else {
- transform.Rotate (0, 0, 90);
- }
- } else {
- transform.Rotate (0, 0, 90);
- }
- if (CheckCorrectPosition ()) {
- GameplayController.instance.UpdateGrid (this);
- if(GameController.instance.isMusicOn){
- audioSource.PlayOneShot (rotateSound);
- }
- }else {
- if (minRotate) {
- if (transform.rotation.eulerAngles.z >= 90) {
- transform.Rotate (0, 0, -90);
- } else {
- transform.Rotate (0, 0, 90);
- }
- } else {
- transform.Rotate (0, 0, -90);
- }
- }
- }
- }
After we're done making the blocks, you will need to prefabs each of the gameobject so that we can use it later. In the Resources Directory create a new directory name it as "Prefabs" then inside the Prefbas directory create again a new directory namely "Blocks". After making the directory drag all the GameObject inside the Blocks Directory as show in the image below.
You'll notice that when you drag all the GameObjects in assets the name of the gameobject in the Hierarchy will turn blue, also will a add a new option in the inspector
First thing to do is to adjust our camera set the value of its components as show below
Note: We configure the Camera because our game itself is a grid base, when we spawn the blocks we just need to locate the absolute value of the x and y coordinate to place the block in exact position.
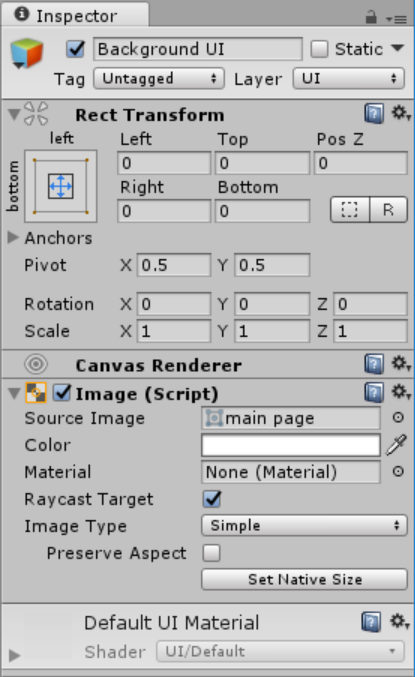
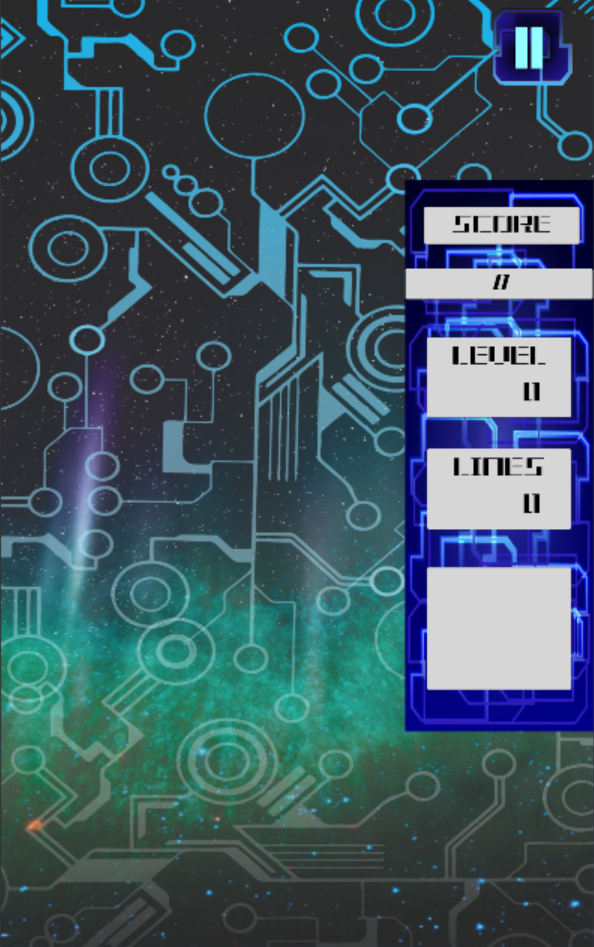
The Game UI take care the visual of the game, To do that go to GameObject then select the Image. Rename The canvas as "Game UI" and the image as "Background UI".
Game UI
Background UI
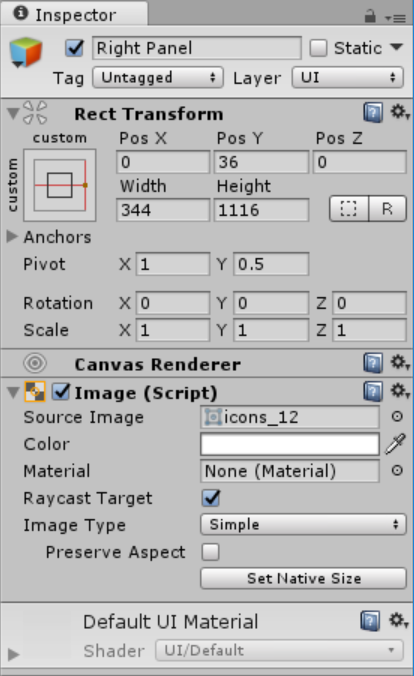
Right Panel
Now we will create the right panel, this will display the status of the game. Like displaying the score, the preview of block etc. To do that create another Image from Game UI then name it as "Right Panel". Set its component values as shown below.
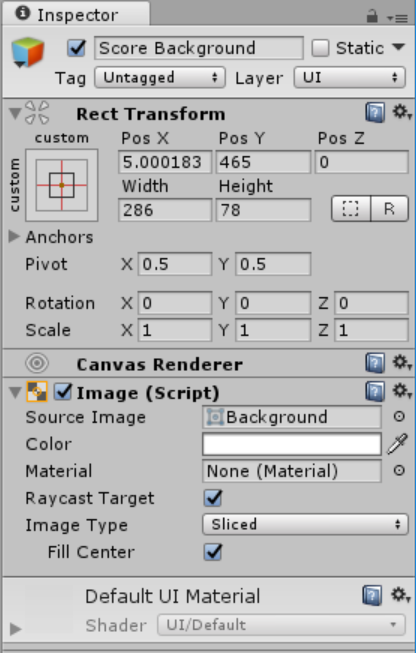
Now we will add some Images to make the game stunning. Add at least 5 Images, then name as:
*Score Background
*Score Text Background
*Level Background
*Lines Background
*Preview Background
After that set all the component values as shown in the image.
Score Background
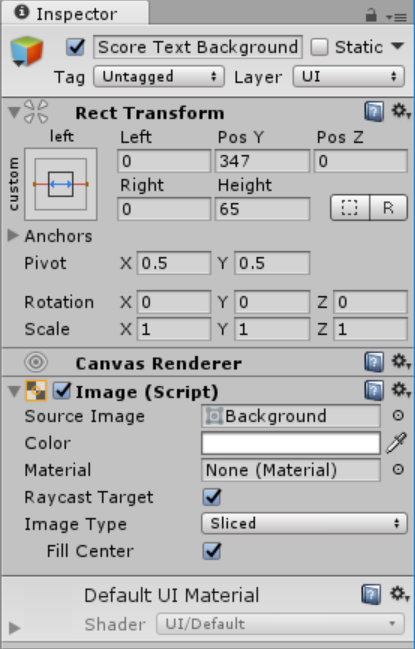
Then add a text GameObject the set its components same as the image below
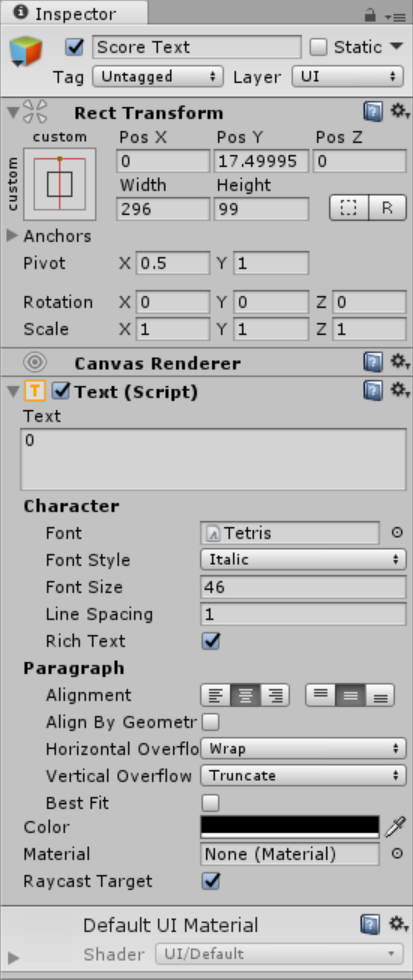
Score Text Background
Then add a text GameObject the set its components same as the image below
Level Background
Then add a two text GameObject then set the components same as the image below
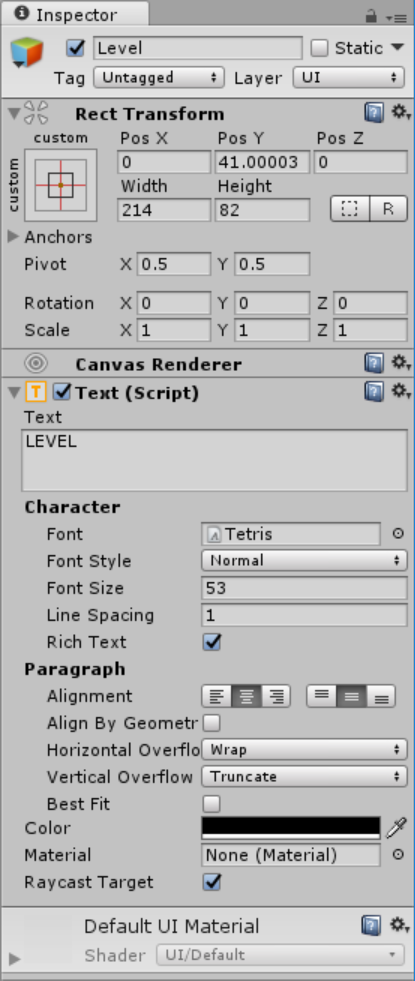
Level
Level Text
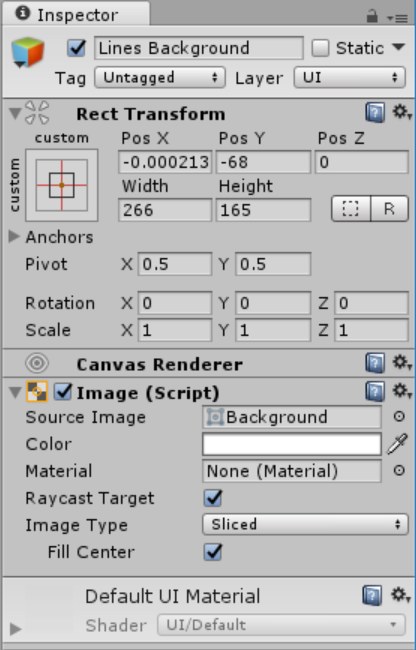
Lines Background
Then add a two text GameObject then set the components same as the image below
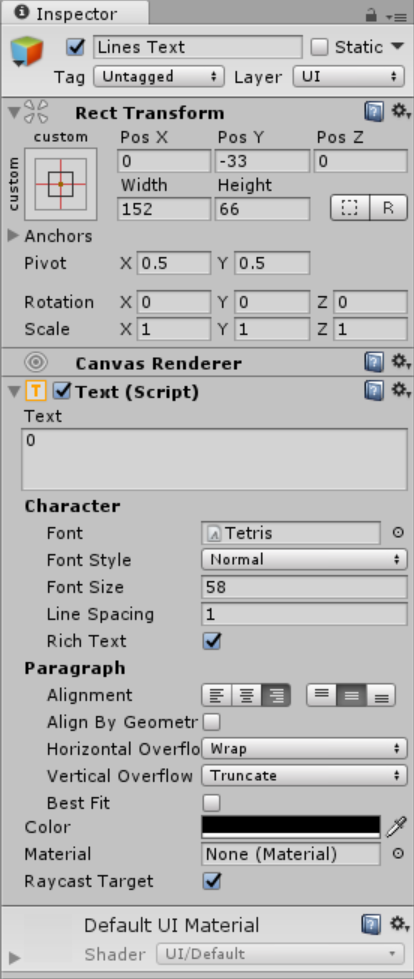
Lines
Lines Text
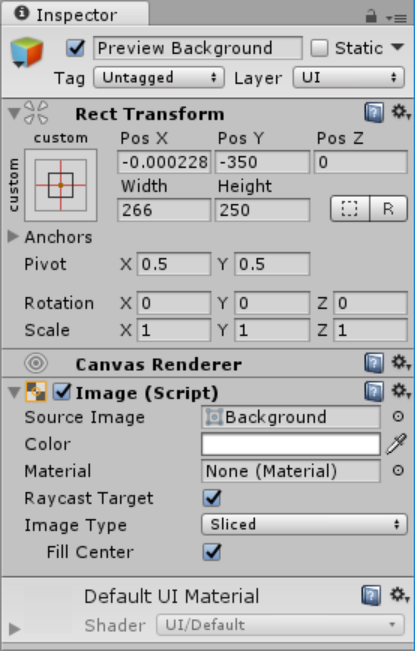
Preview Background
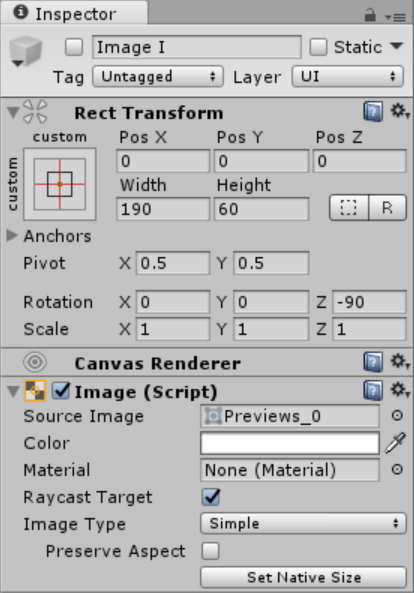
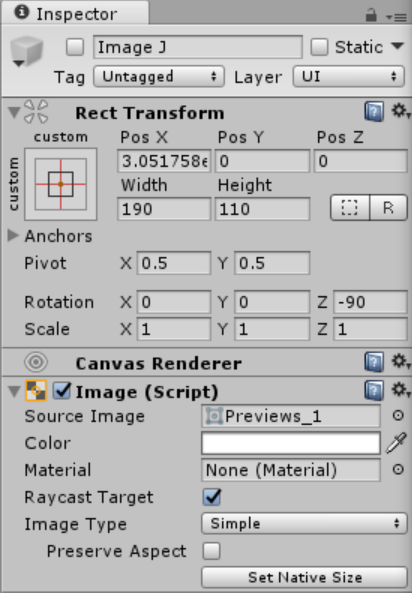
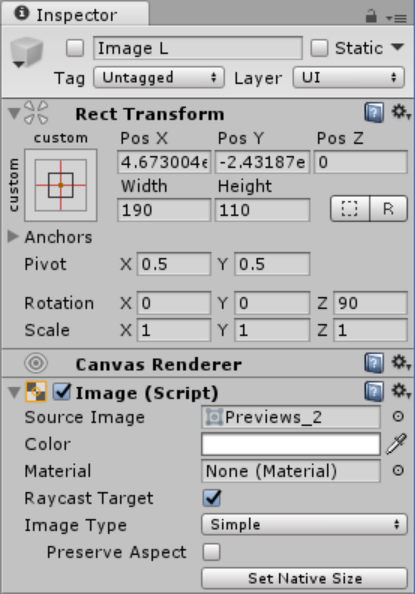
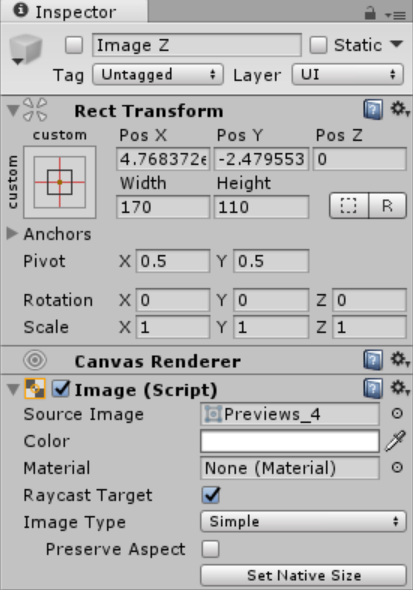
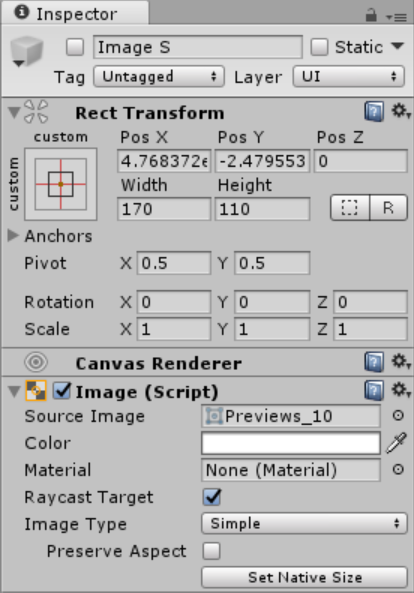
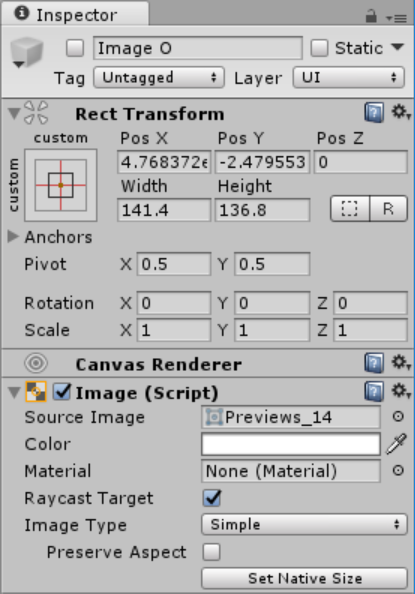
Then after that add a several images, this will display the blocks that will be drop later. Set its component values in the inspector same as the image shown below.
Image I
Image J
Image L
Image T
Image Z
Image S
Image O
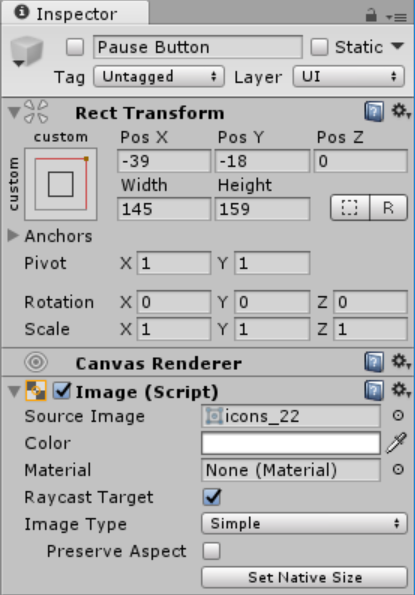
Pause Button
Now that we're done with the right panel we will then add a button in the Game UI that handles the stopping of the game. Then set it component values as shown below
This will be the output of the Game UI that we created.
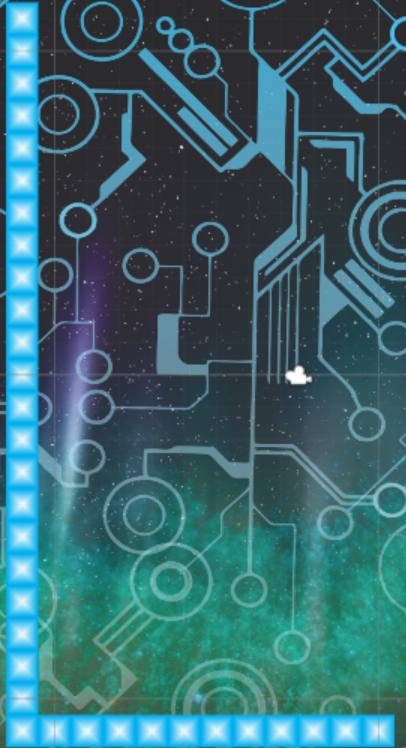
Creating The Grid And Background Gameplay
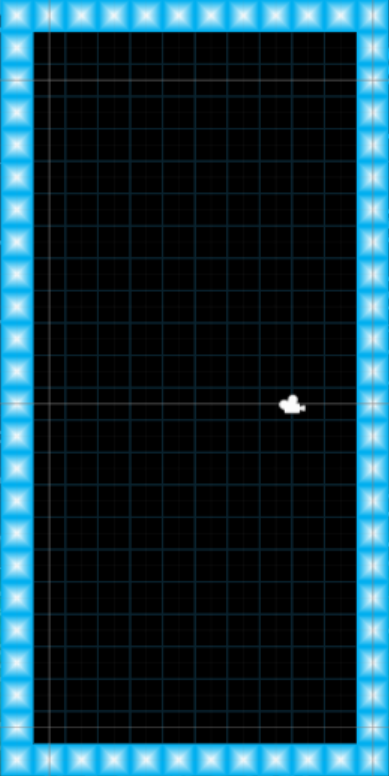
We will now create the the grid and the background of the gameplay. The Tetris scene will be 10 blocks wide and 22 high. The coordinate is between (0, 0) and (9, 21). Create a GameObject then name it as "Grid", and we will divide the grid children as follow: Top, Bottom, Left, Right;Bottom
In the bottom drag 12 blocks inside the GameObject and arrange it from 0 x axis to 11 x axis accordingly
Left
In the left drag 22 blocks inside the GameObject and arrange it from (0x, 0y) to (0x, 22y) ordinates It will be look like this
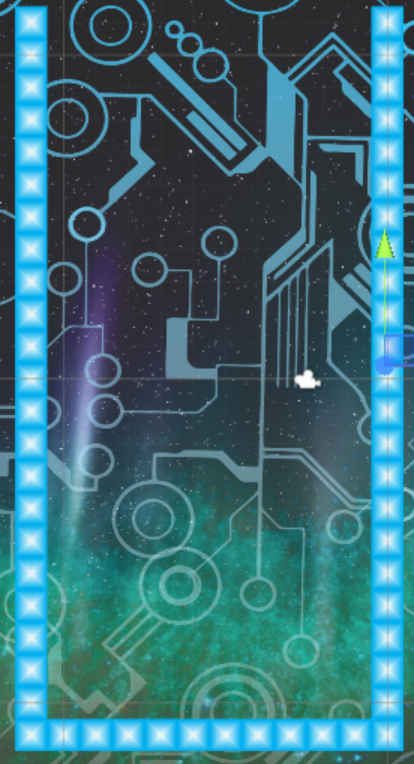
Right
To make this simple just duplicate the left GameObject and rename it as "Right", then set its children x axis to 11.
Top
To make this simple again just duplicate the bottom GameObject and rename it as "Top", then set its children y axis to 23.
This will be the grid look like after you've done
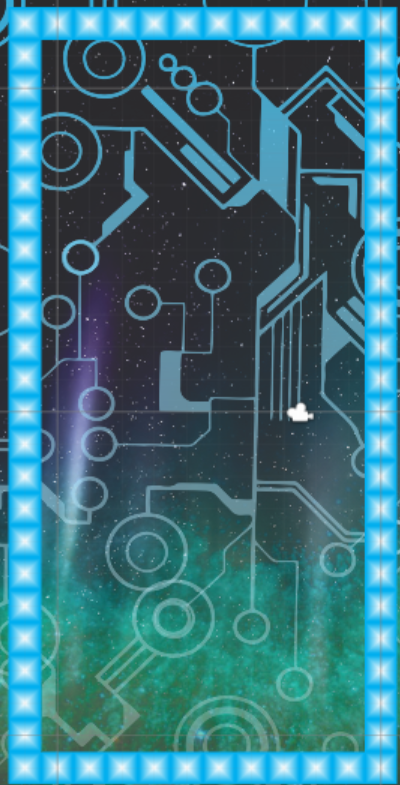
Background Gameplay
We will create the background gameplay, this will act as UI for the blocks background. To that create a GameObject then name it as "Background Gameplay", and drag black block inside of the GameObject then set it position (0x, 0y). Then duplicate each blocks, and place it 1 block away from each other as shown in the image below.
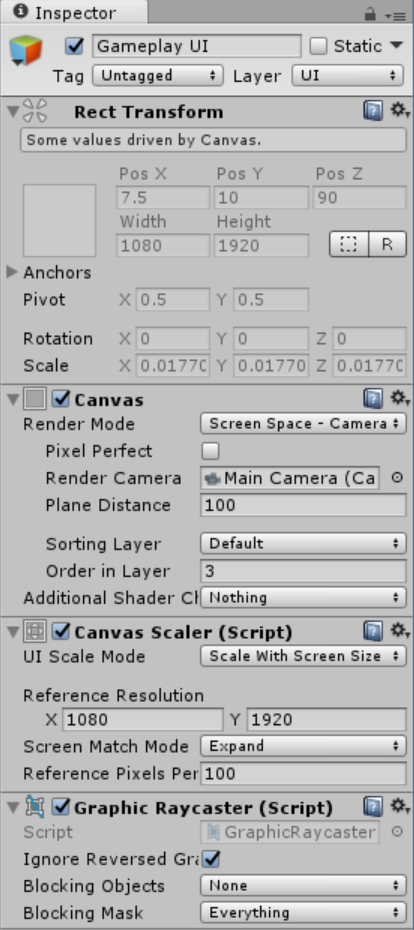
Creating Gameplay UI
This will handle the prompt for the GameOver and Pause. To do that create another Canvas, then name it as "Gameplay UI" and set it component as shown below
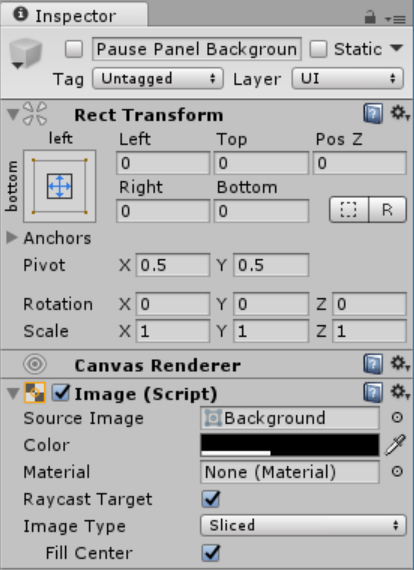
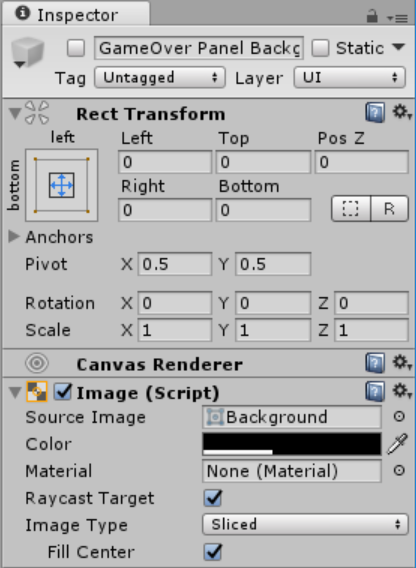
After that add a two panels inside the new canvas and name it as "Pause Panel Background" and "GameOver Panel Background". Then set it component as shown below
Pause Panel Background
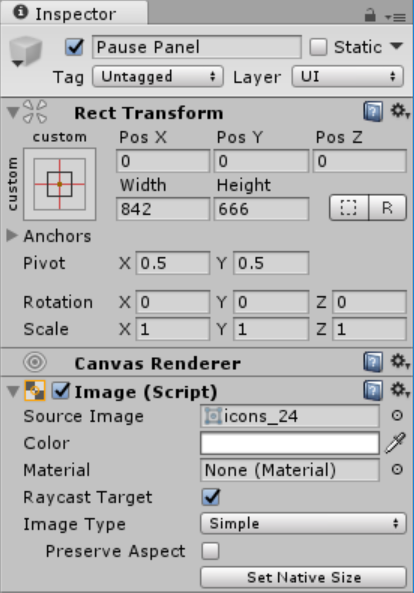
Then add another panel called it "Pause Panel" and set its component as shown below
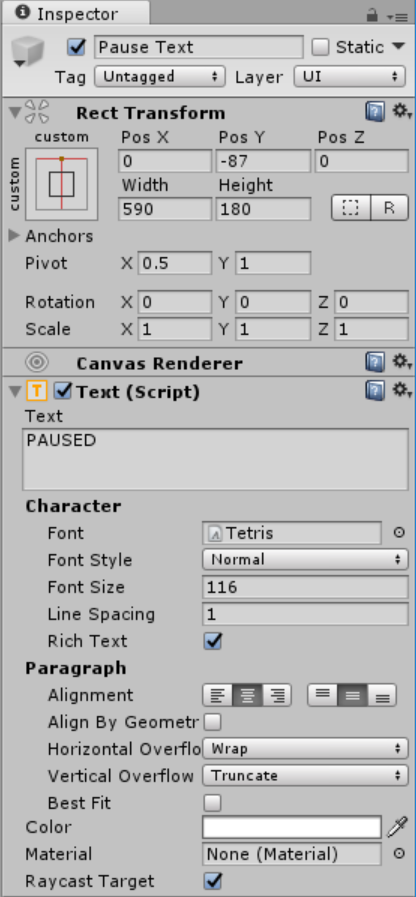
Inside the Pause Panel add Text, and two Buttons, then set their components as shown in the image
Pause Text
Resume Button
Quit Button
GameOver Panel Background
Then add another panel inside of it namely "GameOver Panel", then set its component as shown below
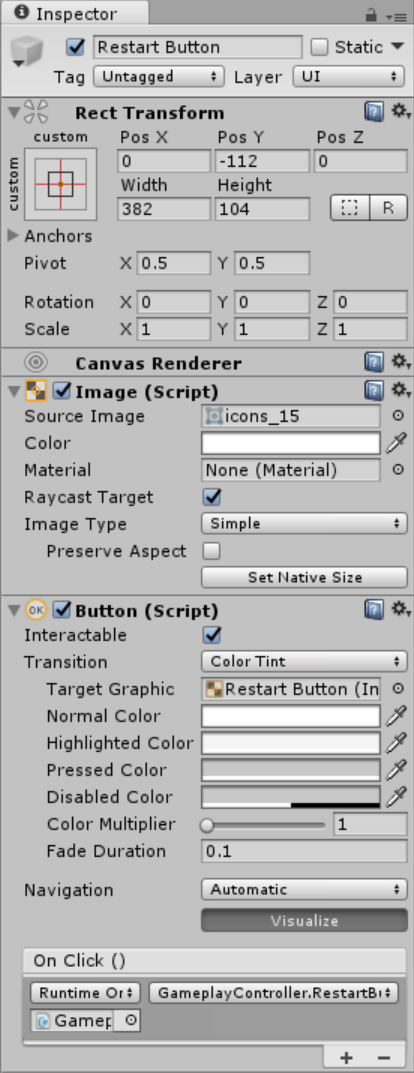
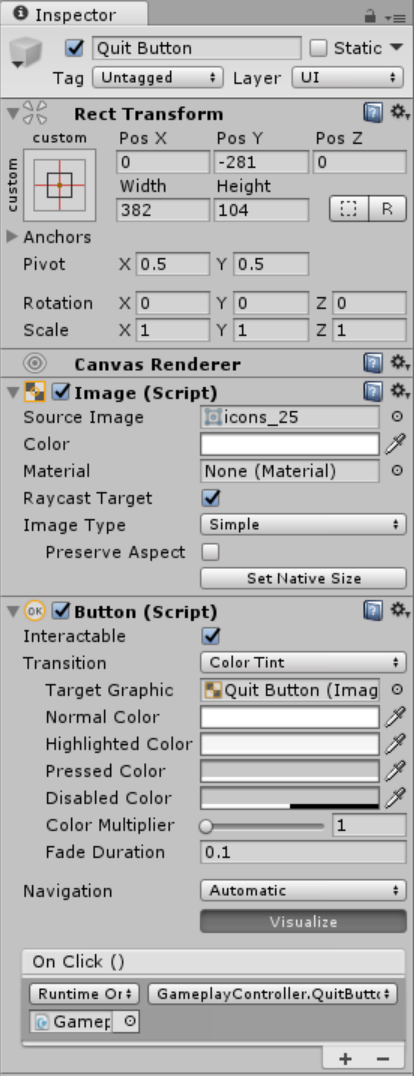
Then add several components inside the new panel (2 Buttons, 2 Text), then set their components as shown below
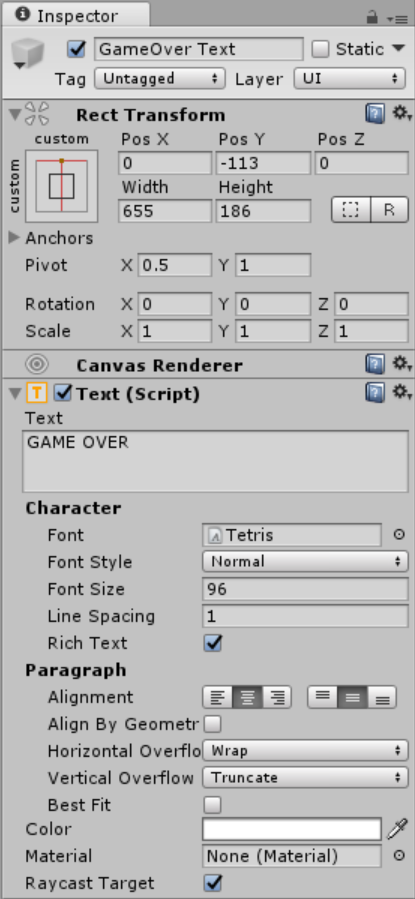
GameOver Text
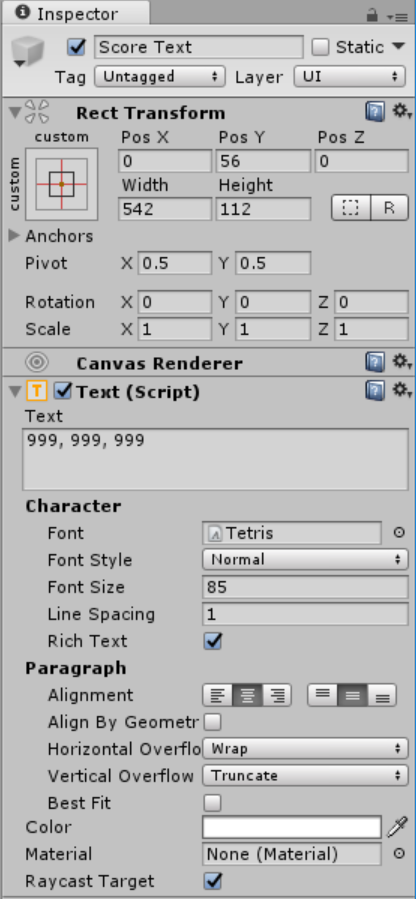
Score Text
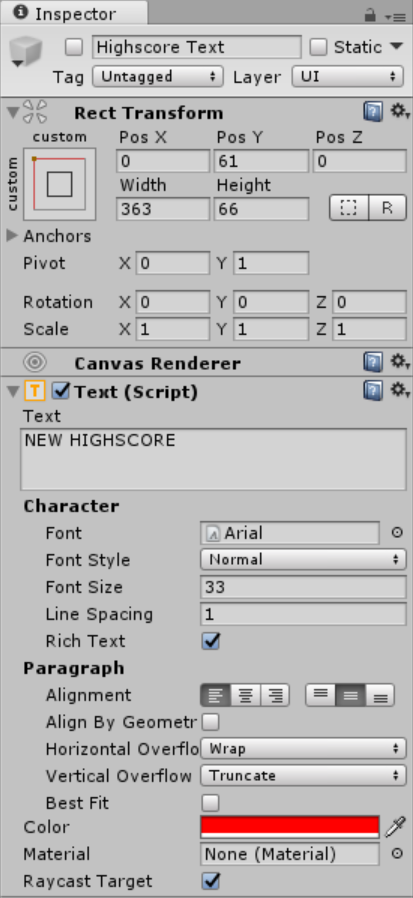
Then add additional text inside the score text name it as "Highscore Text", this will display when the player achieved a highscore.
Highscore Text
Restart Button
Quit Button
Note: Don't forget to attach the Gameplay Controller in the buttons, and also attach all the needed components in the Gameplay Controller Script as shown below.
Building The Game
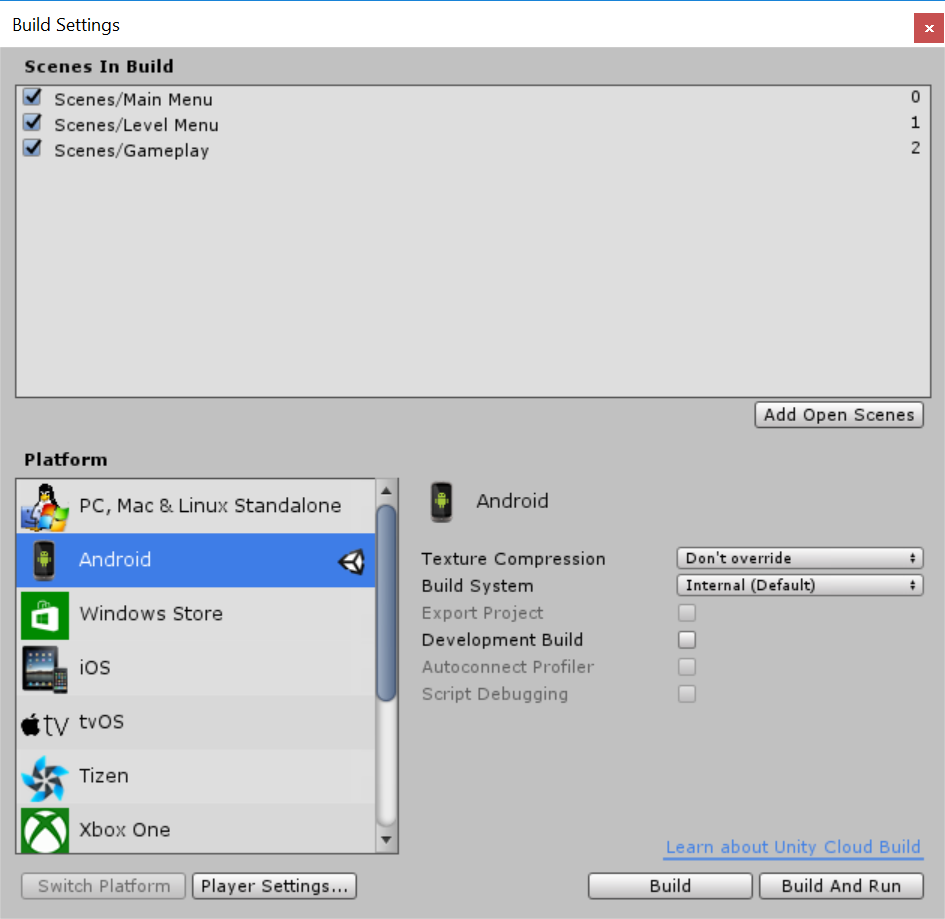
To build the game go to the file menu, then choose Build Setting. After that drag all the scenes in the empty box and set the platform to android as shown below.
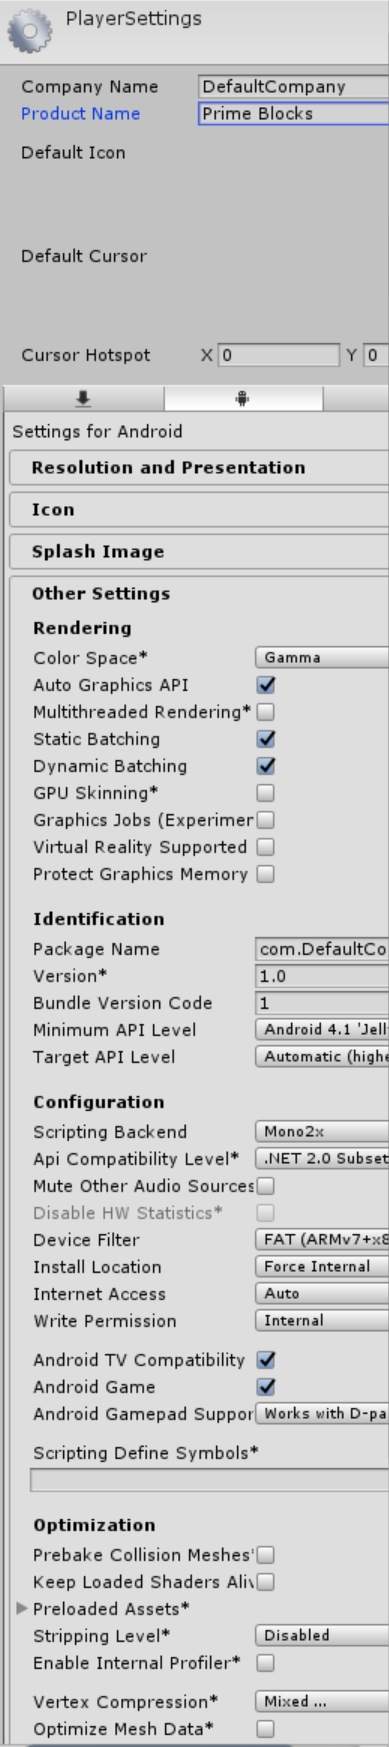
After you're done select the Player Setting, then fill up the required information in order to build the application.
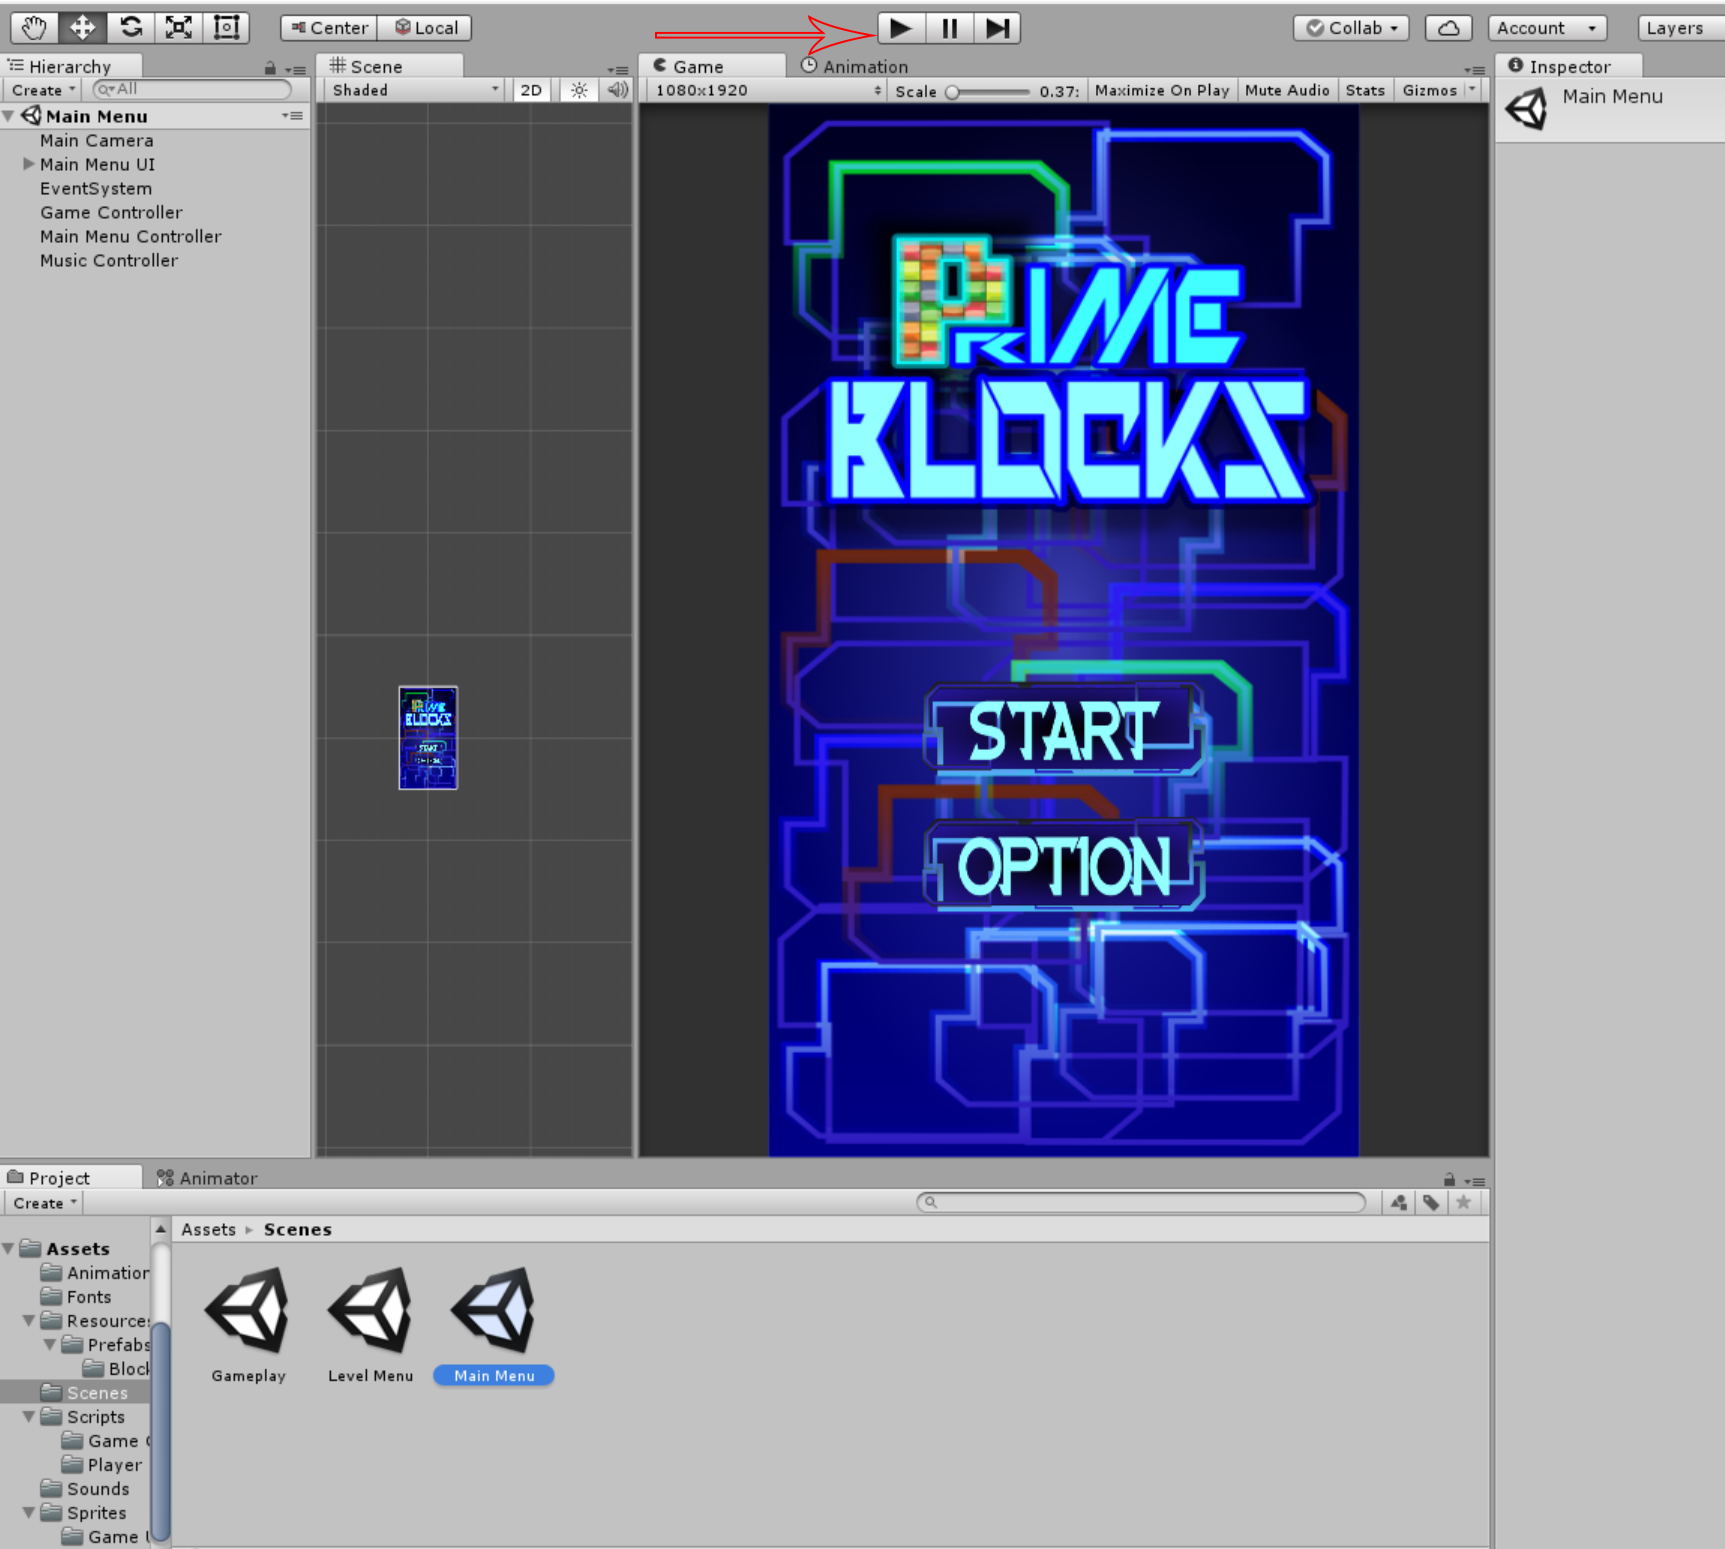
Once you're done try to start the game by the clicking the play button
Congratulations you successfully created the Tetris Clone Game. I hope that this simple tutorial help you develop your skills in building games. For more updates and tutorials just kindly visit this site. Enjoy Coding!!!Note: Due to the size or complexity of this submission, the author has submitted it as a .zip file to shorten your download time. After downloading it, you will need a program like Winzip to decompress it.
Virus note: All files are scanned once-a-day by SourceCodester.com for viruses, but new viruses come out every day, so no prevention program can catch 100% of them.
FOR YOUR OWN SAFETY, PLEASE:
1. Re-scan downloaded files using your personal virus checker before using it.
2. NEVER, EVER run compiled files (.exe's, .ocx's, .dll's etc.)--only run source code.
Add new comment
- 1268 views