Progress Bar control in Visual Basic.net
Submitted by joken on Thursday, September 12, 2013 - 13:56.
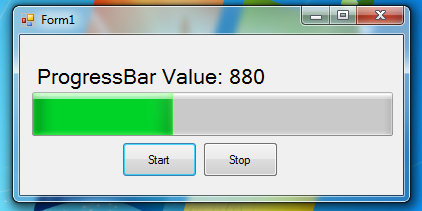
The Windows progress bar control represents the visual feedback to the users about the current status of any task. And it shows the bar that fills from left to right representing the operation progress. In this tutorial we will focus on how to put the prograess bar control and its functionality using visual basic. And here’s the final output of our project.
 To start building this program, open visual basic and create a new project and name it according to your will. Then add two buttons, a progress bar, a Timer and a label.
Next, add this code to our “Start” button.
Then for “Stop” button.
Now let's start testing our program by pressing "F5".
 To start building this program, open visual basic and create a new project and name it according to your will. Then add two buttons, a progress bar, a Timer and a label.
Object			Property		Settings
Button1			Name			btnstart
			Text			Start
Button2			Name			btnstop
			Text			Stop
Progressbar1		Name			Default
Label1			Name			lblprocess
			Text			ProgressBar Value: Timer1			Name			Default
Next let’s add functionality to our application. Double click the “timer1” control and add the following code:
- 'it test if the progressbar current value is greater than or equal to the set maximum value
- If ProgressBar1.Value >= ProgressBar1.Maximum Then
- 'if it is true the progress bar value will be reset into 0
- ProgressBar1.Value = 0
- lblprocess.Text = ProgressBar1.Value
- Else
- 'else the progressbar value will incremented by 20 until such time it will reach the maximum value
- ProgressBar1.Value += 20
- End If
- lblprocess.Text = ProgressBar1.Value
- lblprocess.Text = "ProgressBar Value: " & lblprocess.Text
- 'it start the timer
- Timer1.Start()
- 'check if the button text is set into Continue the it will set into Start
- If btnstart.Text = "Continue" Then
- btnstart.Text = "Start"
- End If
- 'it stop the timer
- Timer1.Stop()
- 'set the text of btstart into Continue
- btnstart.Text = "Continue"
Add new comment
- 1087 views
