Building a Simple Chat App with HTML, CSS, JavaScript, and WebSocket (Node.js)
In this tutorial, we will explore how to create a simple Chat Application using HTML, CSS, JavaScript, and Node.js. This chat application enables real-time messaging between users, allowing them to send and receive messages instantly without the need to reload the application page.
The primary objective of this tutorial is to guide you through the process of building a real-time chat application using websockets. Websockets are a powerful technology that facilitates two-way communication between the server and the client, making them ideal for applications that require real-time data exchange.
By following this tutorial, you will gain a solid understanding of how to implement key features of a chat application, such as real-time message broadcasting and user interaction. This knowledge can be invaluable for developing future web applications that require real-time communication, such as customer support systems, collaborative tools, or social networking platforms.
Let’s get started on creating your very own real-time chat application, combining the power of modern web technologies with a seamless user experience!
Step 1: Installing the Requirements
In this example, we will set up a WebSocket server using Node.js. To begin, ensure that Node.js and NPM are installed on your machine. You can easily follow the installation instructions available on the official Node.js website. Once installed, navigate to your application's source code directory and install the ws (WebSocket) package by running the following command in your terminal. Ensure that your terminal’s current directory is set to the root of your source code.
npm install --save ws
Step 2: Creating a Websocket Server
Now, let's start building the WebSocket server. Begin by creating a new JavaScript file—in this case, we'll name it socket_server.js. This file will require the ws (WebSocket) package and include the necessary scripts to handle listening, establishing connections, and managing message exchanges between the server and clients. The following script includes comments to enhance your understanding of how it works.
- // Require Websocket Package/Module
- const webSocket = require("ws");
- // Listen Socket on specific Port
- const server = new webSocket.Server({ port: 8090 });
- server.on("connection", (ws) => {
- console.log("New client connected!");
- // Send message to Client when connected
- ws.send(JSON.stringify({ msg: "You are successfully connected to JS Chat App Socket Server!" }));
- //Receive Message from Client
- ws.on("message", (msg) => {
- console.log(`Client has sent a message: ${msg}`);
- // Broadcast the message to all connected clients
- server.clients.forEach((client) => {
- if (client.readyState === WebSocket.OPEN) {
- client.send(`${msg}`);
- }
- })
- })
- });
To run the websocket server, you can simply execute the following command on your terminal.
node .\socket_server.js
Step 3: Creating the Interface
Next, we will create the interface for the client side of our application. Start by creating a new file named index.html. This file will contain the HTML elements essential for the client-side functionality, such as the conversation box, message input field, and send button. Refer to the script below for implementation details.
- <!DOCTYPE html>
- <html lang="en">
- <head>
- <meta charset="UTF-8">
- <meta name="viewport" content="width=device-width, initial-scale=1.0">
- <link rel="stylesheet" href="https://cdn.jsdelivr.net/npm/[email protected]/dist/css/bootstrap.min.css">
- <link rel="stylesheet" href="styles.css">
- <script src="https://cdn.jsdelivr.net/npm/[email protected]/dist/js/bootstrap.bundle.min.js"></script>
- </head>
- <body>
- <div id="main-wrapper">
- <div id="conversation-box" class="card rounded-0">
- <div class="card-header rounded-0">
- </div>
- <div class="card-body rounded-0">
- </div>
- <div class="card-footer rounded-0">
- <div class="d-flex w-100">
- <div class="flex-grow-1" id="txt-field-container">
- </div>
- <div id="send-btn-container">
- </div>
- </div>
- </div>
- </div>
- </div>
- </body>
- </html>
And for some custom design of some elements, here's the following Cascading Stylesheet (CSS). The following CSS file is known as styles.css which is loaded at the index file.
- @import url('https://fonts.googleapis.com/css2?family=Ubuntu+Mono:ital,wght@0,400;0,700;1,400;1,700&display=swap');
- *{
- font-family: "Ubuntu Mono", serif;
- font-weight: 400;
- font-style: normal;
- }
- strong, b{
- font-weight: 700;
- }
- html,body{
- margin: unset;
- padding: unset;
- height: 100%;
- max-height: 100%;
- width: 100%;
- max-width: 100%;
- overflow: auto;
- }
- body{
- display: flex;
- flex-flow: column;
- align-items: center;
- justify-content: center;
- background-image: linear-gradient(to top, #48c6ef 0%, #6f86d6 100%);
- }
- #main-wrapper{
- width: 350px;
- }
- #app-title{
- color: #fff;
- text-shadow: 0px 3px 5px #9a9a9a;
- text-align: center;
- margin-bottom: 50px
- }
- #msg-txt-field{
- resize: none;
- }
- #send-btn-container{
- width: 70px;
- }
- #send-btn{
- width: 100%;
- height: 100%;
- display: flex;
- align-items: center;
- justify-content: center;
- }
- #message-items-container{
- height:300px;
- overflow: auto;
- display: flex;
- flex-flow: column-reverse;
- }
- #message-items-container:empty{
- align-items: center;
- justify-content: center;
- }
- #message-items-container:empty::before{
- content:"conversation box is currently empty...";
- font-size: 11px;
- font-style: italic;
- align-self: center;
- color:#858585;
- }
- .message-item{
- max-width: 85%;
- padding: 10px 10px;
- margin-bottom: 10px;
- border-radius: 15px;
- }
- .message-item.received{
- background-image: linear-gradient(135deg, #f5f7fa 0%, #c3cfe2 100%);
- align-self: start;
- }
- .message-item.sent{
- background-image: linear-gradient(120deg, #89f7fe 0%, #66a6ff 100%);
- align-self: end;
- }
- .message-item .sender-name{
- font-style: italic;
- font-size: 11px;
- }
- .message-item .message-content{
- font-size: 12px;
- }
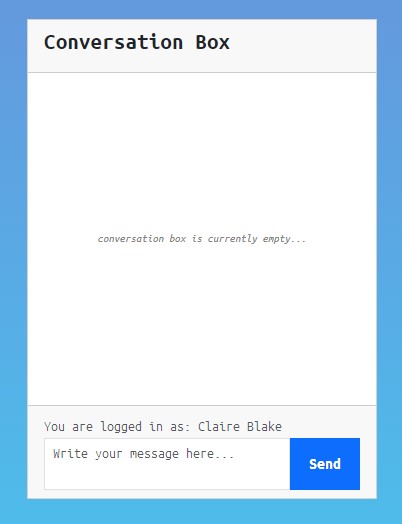
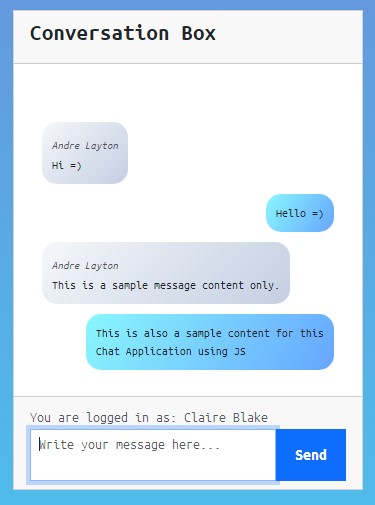
Here's the screenshot of the Application Interface.


Step 3: Client Side Websocket
Finally, let's create the client-side WebSocket script along with other JavaScript code to make our application fully functional. Save this new JavaScript file as chat_app.js, and make sure to load it in the index.html file. This script will handle connecting to the server, sending messages, and receiving messages. Additionally, it includes event listeners and functions to enable features like displaying sent and received messages in the conversation box.
- // Connect to the Websocket Server
- const chatSocket = new WebSocket("ws://localhost:8090")
- var isSocketConnected = false;
- var user_name = localStorage.getItem("userName") || "";
- // Messages Bubble
- let msgBubble = `<div class="message-item">
- <div><span class="text-muted sender-name"></span></div>
- <div class="message-content"></div>
- </div>`;
- // Event when socket is openned
- chatSocket.onopen = (event) => {
- // when connection is opened
- isSocketConnected = true;
- };
- // Function for Sending the Message data to the socket server
- function send_msg(JSONData) {
- // Pevent function to execute when socket not opened successfully
- if (!isSocketConnected)
- return;
- chatSocket.send(JSON.stringify(JSONData));
- }
- // Receive Message from socket
- chatSocket.onmessage = (event) => {
- // Message Data recived from socket server
- var msgData = JSON.parse(event.data) || null;
- if (msgData == null)
- return;
- if (!msgData.msg)
- return;
- if (!msgData.user) {
- console.log(msgData.msg)
- return;
- }
- // Show the message data into the conversation box if user is not equal to client
- if (msgData.user != user_name) {
- var bubble = $(msgBubble).clone(true);
- bubble.addClass("received");
- bubble.find(".sender-name").text(`${msgData.user-}`)
- var content = (msgData.msg).replace(/\n/gi, "<br>");
- bubble.find(".message-content").text(content);
- $('#message-items-container').prepend(bubble);
- }
- }
- // Closing the socket if window is unloading
- window.addEventListener("unload", function () {
- chatSocket.close();
- console.log(chatSocket);
- })
- // Listen for possible errors
- chatSocket.addEventListener("error", (event) => {
- console.log("WebSocket error: ", event);
- });
- // Function that handles the message data to send
- function triggerSend() {
- var msg = $("#msg-txt-field").val();
- msg = msg.trim();
- if (msg == "")
- return;
- var bubble = $(msgBubble).clone(true);
- bubble.addClass("sent");
- // bubble.find(".sender-name").text(`${user_name}`)
- var content = msg.replace(/\n/gi, "<br>");
- bubble.find(".message-content").text(content);
- $('#message-items-container').prepend(bubble);
- $("#msg-txt-field").val("");
- $("#msg-txt-field").focus();
- send_msg({ user: user_name, msg: msg });
- }
- $(document).ready(function () {
- // Prompt window if user does not exists yet
- if (user_name == "") {
- var enter_user = prompt("Enter Your Name");
- if (enter_user != "") {
- user_name = enter_user;
- localStorage.setItem("userName", user_name);
- } else {
- alert("User Name must be provided!");
- location.reload();
- }
- }
- $('#userName').text(user_name)
- // Event Listener when Send Button has been triggered Clicked
- $('#send-btn').on("click", triggerSend);
- //Event Listener when Message Text Field is submitted by hitting the Enter Key
- $('#msg-txt-field').on("keypress", function (e) {
- if (e.key == "Enter") {
- e.preventDefault();
- triggerSend();
- }
- });
- })
And there you have it! You can now test application on you end. Make sure that the websocket server script is running while testing the application.
DEMO VIDEO
I have also included the complete source code for the chat application mentioned in this content. You can download the source code for free by clicking the download button located below this article.
I hope this Simple Chat Application Tutorial using HTML, CSS, JavaScript, and Node.js provides you with valuable insights and inspiration to develop similar features for your future web application projects.
Explore more on this website for more Tutorials, Free Source Codes, and Articles covering the various programming languages.

