Creating an Image Gallery Grid View with Preview Modal using HTML, CSS, and JS Tutorial
In this Tutorial, you can learn how to create a creative and responsive Grid View of an Image Gallery with Preview Modal for websites using HTML, CSS, and JavaScript. The tutorial aims to provide students and beginners with a reference for learning to create a creative, interactive, and responsive website UI and component. Here, I will be providing a sample website page script that demonstrates the main goal of this tutorial. The complete source code zip file will also be provided and it is free to download.
What is Image Gallery?
An Image Gallery is a page of a website that contains some relevant images stored on the site. It is a common way of integrating images into websites that display multiple images at once. It is also often implemented with a preview modal that allows the users to view the image on a larger scale.
How to Create an Image Gallery Grid View with Preview Modal?
The Image Gallery Grid View with Preview Modal can be achieved using HTML, CSS, and JavaScript without using any other JS Libraries. Using HTML, we display the gallery images using some HTML elements such as div and img tags. The CSS will help us to design the gallery wrapper to be responsive and display the images in grid view. Also, we can design the Preview Modal using some CSS properties. Then, using JavaScript, we can create the preview modal and other elements functional. Check out the simple web page scripts that I created and provided below to have a better understanding.
Sample Web Page Scripts
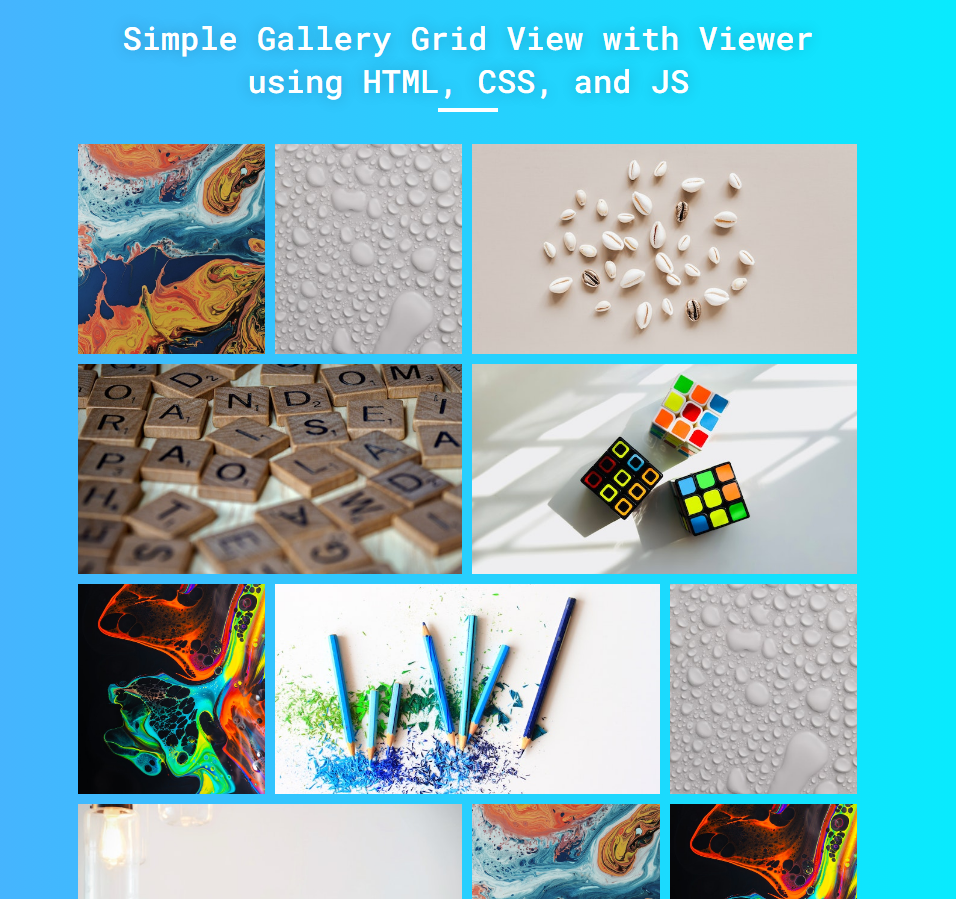
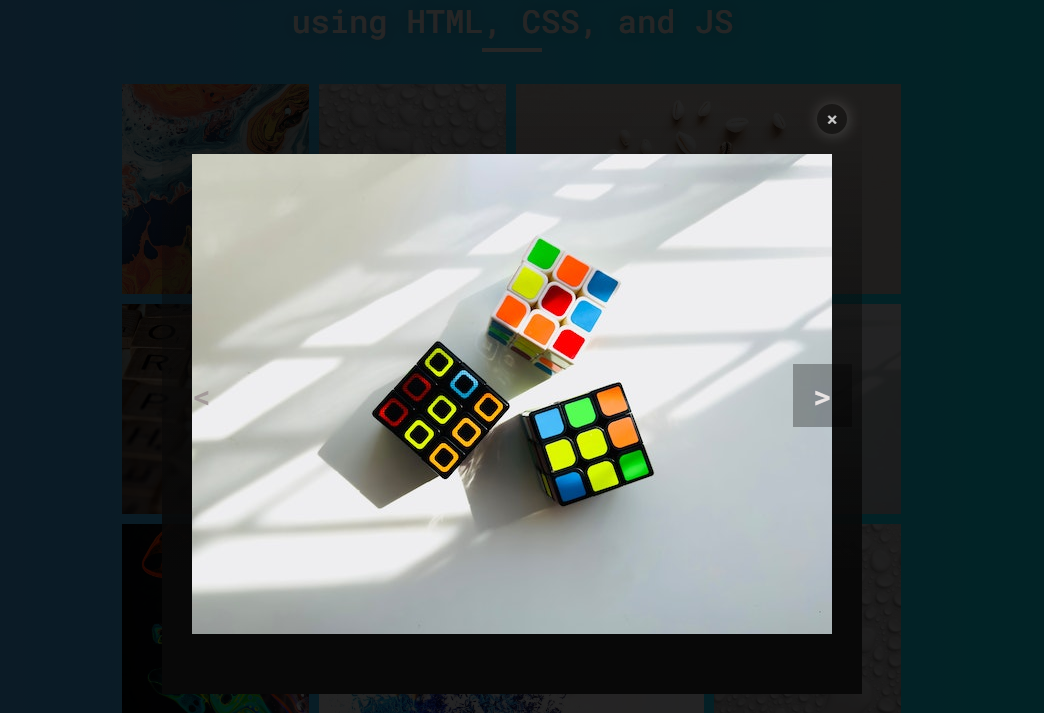
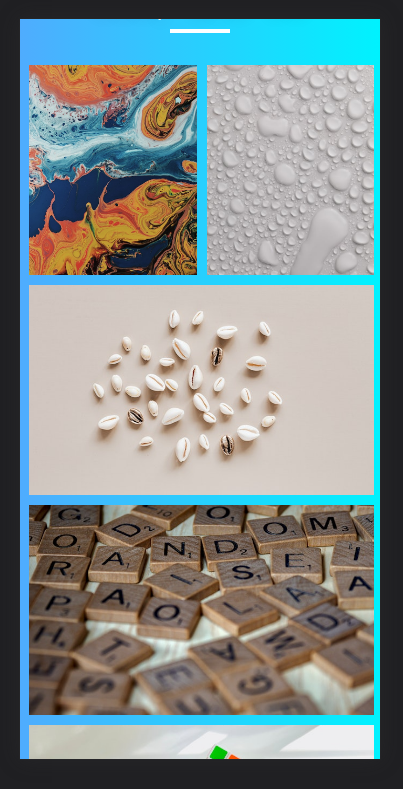
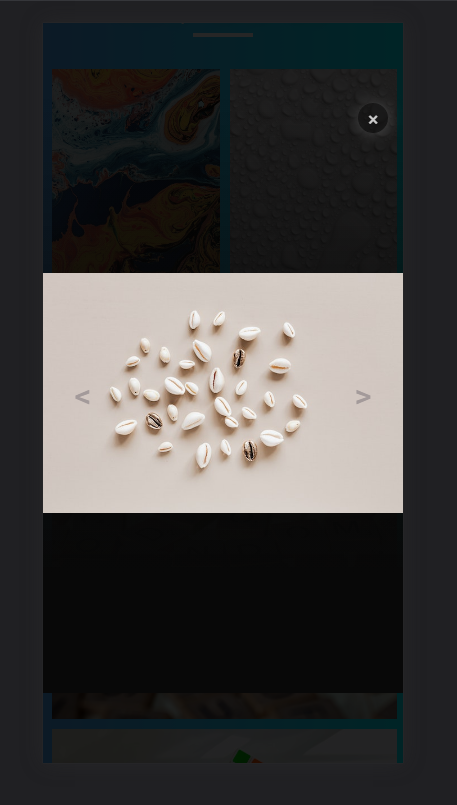
The following scripts result in a simple website page that contains an Image Gallery that is shown in a Grid View. The Gallery Grid is responsive to any device screen such as mobiles and desktops. The web page contains also a Preview modal that displays the selected image on a larger scale. The modal also contains a navigation button to simply navigate to the previous or next image without closing the Preview Modal.
HTML
Here's the HTML file script known as index.html. The file contains the relevant elements to the website page including the Image Gallery and Preview Modal. The images I used on the script below are included in the source code zip file.
- <!DOCTYPE html>
- <html lang="en">
- <head>
- <meta charset="UTF-8">
- <meta name="viewport" content="width=device-width, initial-scale=1.0">
- <link rel="stylesheet" href="style.css">
- <link rel="preconnect" href="https://fonts.googleapis.com">
- <link rel="preconnect" href="https://fonts.gstatic.com" crossorigin>
- <link rel="stylesheet" href="https://fonts.googleapis.com/css2?family=Material+Symbols+Outlined:opsz,wght,FILL,[email protected],100..700,0..1,-50..200" />
- </head>
- <body>
- <div class="container">
- <hr id="title_hr">
- <div id="gallery-wrapper">
- <div class="gallery-item">
- <img src="./images/image-1.jpg" alt="Photo By: Dids from pixels.com">
- </div>
- <div class="gallery-item">
- <img src="./images/image-2.jpeg" alt="Photo By: Karolina Grabowska from pixels.com">
- </div>
- <div class="gallery-item">
- <img src="./images/image-3.jpg" alt="Photo By: Karolina Grabowska from pixels.com">
- </div>
- <div class="gallery-item">
- <img src="./images/image-4.jpg" alt="Photo By: Brett Jordan from pixels.com">
- </div>
- <div class="gallery-item">
- <img src="./images/image-5.jpg" alt="Photo By: Bruno Cervera from pixels.com">
- </div>
- <div class="gallery-item">
- <img src="./images/image-6.jpg" alt="Photo By: Alexander Ant from pixels.com">
- </div>
- <div class="gallery-item">
- <img src="./images/image-7.jpg" alt="Photo By: Pixabay from pixels.com">
- </div>
- <div class="gallery-item">
- <img src="./images/image-2.jpeg" alt="Photo By: Karolina Grabowska from pixels.com">
- </div>
- <div class="gallery-item">
- <img src="./images/image-8.jpg" alt="Photo By: Tim Gouw from pixels.com">
- </div>
- <div class="gallery-item">
- <img src="./images/image-1.jpg" alt="Photo By: Dids from pixels.com">
- </div>
- <div class="gallery-item">
- <img src="./images/image-6.jpg" alt="Photo By: Alexander Ant from pixels.com">
- </div>
- </div>
- </div>
- <div id="preview">
- <div id="preview-body">
- <div id="preview-img">
- <img src="./images/image-6.jpg" alt="Preview Image">
- </div>
- </div>
- </div>
- </body>
- </html>
CSS
Next, here's the CSS file script known as style.css. It contains the stylesheet codes that design the application page layout and other elements.
- @import url('https://fonts.googleapis.com/css2?family=Dongle:wght@300;400;700&family=Roboto+Mono:ital,wght@0,100;0,200;0,300;0,400;0,500;0,600;1,100;1,200;1,300;1,400;1,500;1,600&display=swap" rel="stylesheet');
- *{
- margin: 0;
- padding: 0;
- box-sizing: border-box;
- font-family: 'Dongle', sans-serif;
- font-family: 'Roboto Mono', monospace;
- }
- ::selection{
- color: #fff;
- background: #4db2ec;
- }
- body{
- display: flex;
- align-items: center;
- justify-content: center;
- min-height: 100vh;
- background: #4facfe;
- background-image: linear-gradient(to right, #4facfe 0%, #00f2fe 100%);
- padding: 2em 0;
- }
- #page-title{
- color: #fff;
- text-align: center;
- font-weight: 500;
- text-shadow: 0px 0px 15px #0000003a;
- }
- #title_hr{
- width:60px;
- border: 2px solid #ffffff;
- margin: .35em auto;
- }
- @media (min-width: 780px){
- #page-title{
- width: 780px;
- }
- }
- #gallery-wrapper {
- width: 780px;
- position: relative;
- grid-gap: 10px;
- margin: 2em auto;
- display: grid;
- grid-template-columns: repeat(4, 24%);
- grid-auto-rows: minmax(50px, 100px);
- grid-auto-flow: dense;
- display: none;
- }
- .gallery-item {
- width: calc(33.33% - 30px);
- width: 100%;
- overflow: hidden;
- float: left;
- cursor: pointer;
- }
- .gallery-item img {
- width: 100%;
- height: 100%;
- object-fit: cover;
- object-position: center center;
- transition: all .2s ease;
- }
- .gallery-item:hover img {
- transform: scale(1.2);
- }
- .gallery-item[data-display="portrait"] {
- grid-row: span 2;
- }
- .gallery-item[data-display="landscape"] {
- grid-column: span 2;
- grid-row: span 2;
- }
- @media (max-width:800px){
- #gallery-wrapper{
- width: 95%;
- grid-template-columns: repeat(2, 49%) !important;
- }
- }
- div#preview {
- position: fixed;
- width: 100%;
- height: 100%;
- top: 0;
- left: 0;
- background: #000000d9;
- display: flex;
- align-items: center;
- justify-content: center;
- transition: all .3s ease;
- transform: scale(0);
- filter: blur(15px);
- }
- div#preview.show{
- transform: scale(1);
- filter: unset;
- }
- div#preview-body {
- position: relative;
- width: 700px;
- height: 600px;
- }
- div#preview-img {
- width: 100%;
- height: 100%;
- overflow: hidden;
- background: linear-gradient(0deg, #080808 20%, #00000000 100%);
- }
- div#preview-img img{
- width: 100%;
- height: 100%;
- object-fit: scale-down;
- object-position: center center;
- }
- button.preview-close {
- position: absolute;
- top: 10px;
- right: 15px;
- height: 30px;
- width: 30px;
- background: #0000002e;
- border: none;
- box-shadow: 1px 1px 15px #ffffff36;
- border-radius: 50%;
- color: #cdcdcd;
- font-size: 1.2rem;
- font-weight: 500;
- transition: all .2s ease;
- cursor: pointer;
- }
- button.preview-close:hover{
- transform: scale(1.02);
- background: #00000093;
- box-shadow: 1px 1px 15px #ffffff65;
- }
- @media (max-width: 700px){
- div#preview-body{
- width: 100%;
- }
- }
- @media (max-height: 600px){
- div#preview-body{
- height: 100%;
- }
- }
- button.previous-btn {
- position: absolute;
- top: calc(50% - 30px);
- left: 10px;
- font-size: 2rem;
- padding: 10px 20px;
- background: transparent;
- color: #a39a9a;
- font-weight: 500;
- border: unset;
- cursor: pointer;
- }
- button.previous-btn:hover{
- background: #0000004d;
- color: #e9e4e4;
- }
- button.next-btn {
- position: absolute;
- top: calc(50% - 30px);
- right: 10px;
- font-size: 2rem;
- padding: 10px 20px;
- background: transparent;
- color: #a39a9a;
- font-weight: 500;
- border: unset;
- cursor: pointer;
- }
- button.next-btn:hover{
- background: #0000004d;
- color: #e9e4e4;
- }
JavaScript
Finally, here is the JavaScript file script known as script.js. It contains the scripts that identify the images if it is either a portrait or landscape to add some attribute to the image parent elements for how the image should be shown on the page. It also contains the script for showing the image in the preview modal and navigating the image.
- const galleryWrapper = document.getElementById('gallery-wrapper')
- const imgItems = galleryWrapper.querySelectorAll('.gallery-item')
- const previewModal = document.getElementById('preview')
- const nextPreview = document.querySelector('.next-btn')
- const prevPreview = document.querySelector('.previous-btn')
- const showPreviewModal = () => {
- var img = galleryWrapper.querySelector('.gallery-item[data-is-Preview="true"] img').src
- previewModal.querySelector('#preview-img img').src = img
- if(!previewModal.classList.contains('show'))
- previewModal.classList.add('show');
- document.querySelector
- }
- const closePreviewModal = () => {
- if(galleryWrapper.querySelector('.gallery-item[data-is-Preview="true"]') != null){
- galleryWrapper.querySelector('.gallery-item[data-is-Preview="true"]').dataset.isPreview = 'false'
- }
- if(previewModal.classList.contains('show'))
- previewModal.classList.remove('show');
- }
- const nextItem = () => {
- var currentItem = galleryWrapper.querySelector('.gallery-item[data-is-Preview="true"]')
- if(currentItem.nextElementSibling != undefined)
- var nextItem = currentItem.nextElementSibling;
- else
- var nextItem = galleryWrapper.querySelectorAll('.gallery-item')[0]
- console.log(currentItem, nextItem)
- currentItem.dataset.isPreview = `false`
- nextItem.dataset.isPreview = `true`
- var img = galleryWrapper.querySelector('.gallery-item[data-is-Preview="true"] img').src
- previewModal.querySelector('#preview-img img').src = img
- }
- const prevItem = () => {
- var currentItem = galleryWrapper.querySelector('.gallery-item[data-is-Preview="true"]')
- if(currentItem.previousElementSibling != undefined)
- var prevItem = currentItem.previousElementSibling;
- else
- var prevItem = galleryWrapper.querySelectorAll('.gallery-item')[galleryWrapper.querySelectorAll('.gallery-item').length - 1]
- console.log(currentItem, prevItem)
- currentItem.dataset.isPreview = `false`
- prevItem.dataset.isPreview = `true`
- var img = galleryWrapper.querySelector('.gallery-item[data-is-Preview="true"] img').src
- previewModal.querySelector('#preview-img img').src = img
- }
- previewModal.querySelector('.preview-close').addEventListener('click', e=>{
- e.preventDefault()
- closePreviewModal()
- })
- nextPreview.addEventListener('click', e => {
- e.preventDefault()
- nextItem()
- })
- prevPreview.addEventListener('click', e => {
- e.preventDefault()
- prevItem()
- })
- imgItems.forEach(el=>{
- var img = el.querySelector('img')
- var tmpImg = document.createElement('img')
- tmpImg.src = img.src
- var height = tmpImg.naturalHeight
- var width = tmpImg.naturalWidth
- if(height > width){
- el.dataset.display = `portrait`
- }else if(width > height){
- el.dataset.display = `landscape`
- }else{
- el.dataset.display = `landscape`
- }
- el.addEventListener('click' , e=> {
- e.preventDefault()
- el.dataset.isPreview = 'true'
- showPreviewModal()
- })
- })
- galleryWrapper.style.display = `grid`
Snapshots
Here are some snapshots of the overall result of the provided scripts.
Page UI
Desktop or Larger Screens Gallery Grid Display
Desktop or Larger Screens Preview Modal
Mobile or Smaller Screens Gallery Grid Display
Mobile or Smaller Screens Preview Modal
There you go! I have also provided the complete source code zip file on this website and it is free to download. The download button can be found below this tutorial's content. Feel free to download and modify the source code to do some enhancement and enhance your programming capabilities.
That's it! I hope this Creating an Image Gallery Grid View with Preview Modal using HTML, CSS, and JS Tutorial will help you with what you are looking for and that you'll find it useful for your current and future web application projects.
Explore more on this website for more Tutorials and Free Source Codes.


