Setting up Cookie upon Login using PHP/MySQLi
Submitted by nurhodelta_17 on Tuesday, August 22, 2017 - 16:25.
Language
In my previous post, I created a Simple Login with Validation, so I've decided to create another tutorial to show how to set up cookie upon user login. But in this tutorial, I have created a simple login since the focus of this tutorial is to give you knowledge on how to set up cookie.
Cookies are small amount of data that has been stored in user's computer. This is used so that when the same computer access the website, some data are already available to use. Data usually saved by this method are id's.

Creating our Database
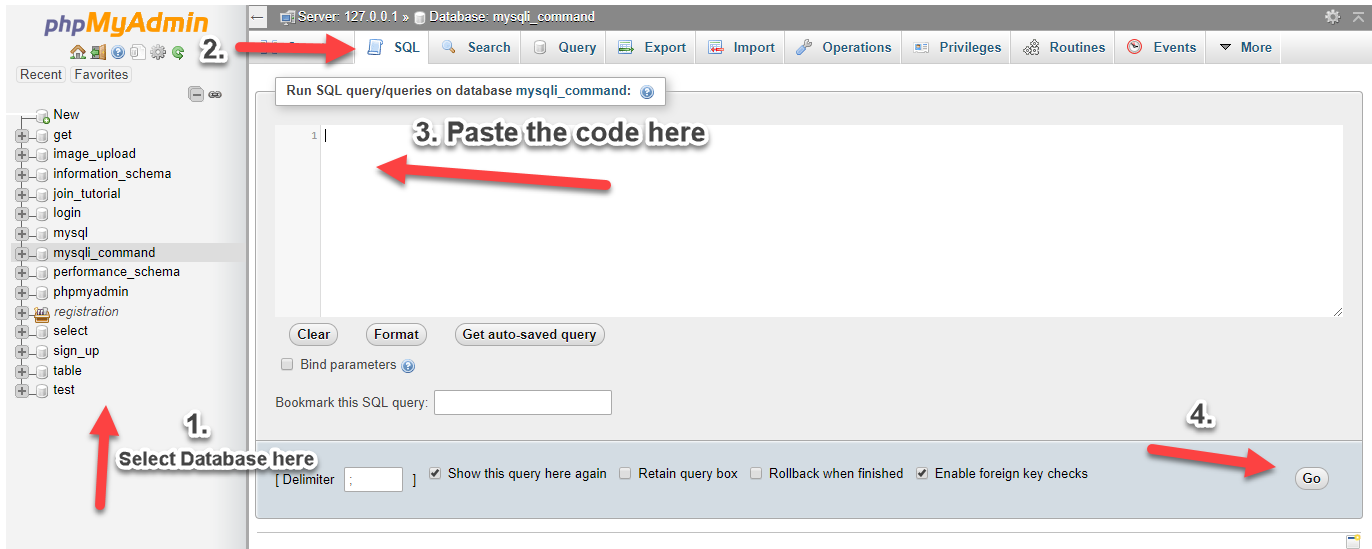
First, we're going to create a database that contains our data. 1. Open phpMyAdmin. 2. Click databases, create a database and name it as "cookie". 3. After creating a database, click the SQL and paste the below code. See image below for detailed instruction.- CREATE TABLE `user` (
- `userid` INT(11) NOT NULL AUTO_INCREMENT,
- `username` VARCHAR(30) NOT NULL,
- `password` VARCHAR(30) NOT NULL,
- `fullname` VARCHAR(60) NOT NULL,
- PRIMARY KEY (`userid`)
- ) ENGINE=InnoDB DEFAULT CHARSET=latin1;

Creating our Connection
Next step is to create a database connection and save it as "conn.php". This file will serve as our bridge between our form and our database. To create the file, open your HTML code editor and paste the code below after the tag.- <?php
- // Check connection
- {
- }
- ?>
Creating our Login Form
Next is to create our login form. To create the form, open your HTML code editor and paste the code below after the tag. We name this as "index.php".- <!DOCTYPE html>
- <html>
- <head>
- <title>Setting Up Cookie on User Login</title>
- </head>
- <body>
- <h2>Login Form</h2>
- <form method="POST" action="login.php">
- <label>Username:</label> <input type="text" name="username">
- <label>Password:</label> <input type="password" name="password"><br><br>
- <input type="checkbox" name="remember"> Remember me <br><br>
- <input type="submit" value="Login" name="login">
- </form>
- <span>
- <?php
- echo $_SESSION['message'];
- }
- ?>
- </span>
- </body>
- </html>
Creating our Login Script
Next step is creating our login script. We name this script as "login.php". If the user checks the "Remember me" checkbox, it will store user information via cookie.- <?php
- include('conn.php');
- $username=$_POST['username'];
- $password=$_POST['password'];
- $query=mysqli_query($conn,"select * from `user` where username='$username' && password='$password'");
- $_SESSION['message']="Login Failed. No user Found!";
- }
- else{
- //set up cookie
- $name_cookie = "user";
- $value_cookie = $row['userid'];
- }
- $_SESSION['id']=$row['userid'];
- }
- }
- else{
- $_SESSION['message']="Please Login!";
- }
- ?>
Creating our Login Success Page
Lastly, we create a go to page if login is successful. This page will show the user that login successfully. We name this page as "success.php".- <?php
- }
- include('conn.php');
- ?>
- <!DOCTYPE html>
- <html>
- <head>
- <title>Setting Up Cookie on User Login</title>
- </head>
- <body>
- <h2>Login Success</h2>
- <?php echo $row['fullname']; ?>
- <br>
- <a href="index.php">Back</a>
- </body>
- </html>
Note: Due to the size or complexity of this submission, the author has submitted it as a .zip file to shorten your download time. After downloading it, you will need a program like Winzip to decompress it.
Virus note: All files are scanned once-a-day by SourceCodester.com for viruses, but new viruses come out every day, so no prevention program can catch 100% of them.
FOR YOUR OWN SAFETY, PLEASE:
1. Re-scan downloaded files using your personal virus checker before using it.
2. NEVER, EVER run compiled files (.exe's, .ocx's, .dll's etc.)--only run source code.

