How to Create a Matte Border in Java
Submitted by donbermoy on Wednesday, December 10, 2014 - 11:52.
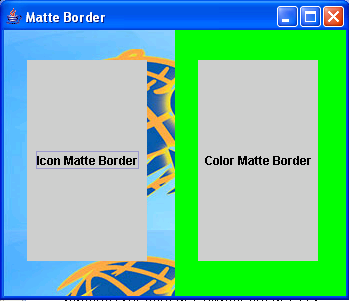
This tutorial will teach you how to create a matte border in Java. A matte border has a matte pattern. This border can create a color matte border which is solid and an icon matte border which is tiled.
So, now let's start this tutorial!
1. Open JCreator or NetBeans and make a java program with a file name of matteBorder.java.
2. Import the following package library:
3. We will initialize variables in our Main, variable frame as JFrame and button1 labeled "Icon Matte Border",button2 labeled "Color Matte Border" as JButton, and icon as ImageIcon. You can put any pictures in the icon then put it inside on your project folder.
Then code for the matte border of the button1. Have its border to matte border using the setBorder method.
On the second matte border, we will use again the matte border class but with a color parameter in the constructor.
In your button2, have this code below to have a color matte border.
5. Now, we will have its layout into Grid Layout using the setLayout method of the frame.
Add all the buttons to the frame using the add method.
Lastly, set the size, visibility, and the close operation of the frame. Have this code below:
Output:
 Here's the full code of this tutorial:
For more inquiries and need programmer for your thesis systems in any kind of programming languages, just contact my number below.
Best Regards,
Engr. Lyndon Bermoy
IT Instructor/System Developer/Android Developer/Freelance Programmer
Mobile: 09488225971
Landline: 826-9296
E-mail:[email protected]
Add and Follow me on Facebook: https://www.facebook.com/donzzsky
Visit and like my page on Facebook at: https://www.facebook.com/BermzISware
- import javax.swing.*; // used to access ImageIcon and BorderFactory class
- import javax.swing.border.*; //used to access the MatteBorder class
- import java.awt.*; // used to access the GridLayout class
4. Now, we will create a Matte Border using the MatteBorder class. First, we will have a syntax for the iconized matte border.
- button1.setBorder(matteBorder1);
- button2.setBorder(matteBorder2);
- frame.getContentPane().add(button1);
- frame.getContentPane().add(button2);
- frame.setSize(350,300);
- frame.setVisible(true);
 Here's the full code of this tutorial:
- import javax.swing.*; // used to access ImageIcon and BorderFactory class
- import javax.swing.border.*; //used to access the MatteBorder class
- import java.awt.*; // used to access the GridLayout class
- public class matteBorder {
- button1.setBorder(matteBorder1);
- button2.setBorder(matteBorder2);
- frame.getContentPane().add(button1);
- frame.getContentPane().add(button2);
- frame.setSize(350,300);
- frame.setVisible(true);
- }
- }

